- Target audience
- 1. Introduction to JBoss DNA
- I. Developers and Contributors
- II. JBoss DNA Core
- III. JBoss DNA JCR
- IV. Connector Library
- V. Sequencer Library
- VI. MIME Type Detector Library
- 27. Looking to the future
This reference guide is for the developers of JBoss DNA and those users that want to have a better understanding of how JBoss DNA works or how to extend the functionality. For a higher-level introduction to JBoss DNA, see the Getting Started document.
If you have any questions or comments, please feel free to contact JBoss DNA's user mailing list or use the user forums. If you'd like to get involved on the project, join the mailing lists, download the code and get it building, and visit our JIRA issue management system. If there's something in particular you're interested in, talk with the community - there may be others interested in the same thing.
JBoss DNA is a JCR implementation that provides access to content stored in many different kinds of systems. A JBoss DNA repository isn't yet another silo of isolated information, but rather it's a JCR view of the information you already have in your environment: files systems, databases, other repositories, services, applications, etc.
To your applications, JBoss DNA looks and behaves like a regular JCR repository. Using the standard JCR API, applications can search, navigate, version, and listen for changes in the content. But under the covers, JBoss DNA gets its content by federating multiple back-end systems (like databases, services, other repositories, etc.), allowing those systems to continue "owning" the information while ensuring the unified repository stays up-to-date and in sync.
Of course when you start providing a unified view of all this information, you start recognizing the need to store more information, including metadata about and relationships between the existing content. JBoss DNA lets you do this, too. And JBoss DNA even tries to help you discover more about the information you already have, especially the information wrapped up in the kinds of files often found in enterprise systems: service definitions, policy files, images, media, documents, presentations, application components, reusable libraries, configuration files, application installations, databases schemas, management scripts, and so on. As files are loaded into the repository, you can make JBoss DNA automatically sequence these files to extract from their content meaningful information that can be stored in the repository, where it can then be searched, accessed, and analyzed using the JCR API.
This document goes into detail about how JBoss DNA works to provide these capabilities. It also talks in detail about many of the parts within JBoss DNA - what they do, how they work, and how you can extend or customize the behavior. In particular, you'll learn about JBoss DNA connectors and sequencers, how you can use the implementations included in JBoss DNA, and how you can write your own to tailor JBoss DNA for your needs.
So whether your a developer on the project, or you're trying to learn the intricate details of how JBoss DNA works, this document hopefully serves a good reference for developers on the project.
JBoss DNA repositories can be used in a variety of applications. One of the more obvious use cases for a metadata repository is in provisioning and management, where it's critical to understand and keep track of the metadata for models, database, services, components, applications, clusters, machines, and other systems used in an enterprise. Governance takes that a step farther, by also tracking the policies and expectations against which performance of the systems described by the repository can be verified. In these cases, a repository is an excellent mechanism for managing this complex and highly-varied information.
But these large and complex use cases aren't the only way to use a JBoss DNA repository. You could use an embedded JBoss DNA repository to manage configuration information for an application, or you could use JBoss DNA just provide a JCR interface on top of a few non-JCR systems.
The point is that JBoss DNA can be used in many different ways, ranging from the very tiny embedded repository to a large and distributed enterprise-grade repository. The choice is yours.
Before we dive into more detail about JBoss DNA and metadata repositories, it's probably useful to explain what we mean by the term "metadata." Simply put, metadata is the information you need to manage something. For example, it's the information needed to configure an operating system, or the description of the information in an LDAP tree, or the topology of your network. It's the configuration of an application server or enterprise service bus. It's the steps involved in validating an application before it can go into production. It's the description of your database schemas, or of your services, or of the messages going in and coming out of a service. JBoss DNA is designed to be a repository for all this (and more).
There are a couple of important things to understand about metadata. First, many systems manage (and frequently change) their own metadata and information. Databases, applications, file systems, source code management systems, services, content management systems, and even other repositories are just a few types of systems that do this. We can't pull the information out and duplicate it, because then we risk having multiple copies that are out-of-sync. Ideally, we could access all of this information through a homogenous API that also provides navigation, caching, versioning, search, and notification of changes. That would make our lives significantly easier.
What we want is federation. We can connect to these back-end systems to dynamically access the content and project it into a single, unified repository. We can also cache it for faster access, as long as the cache can be invalidated based upon time or event. But we also need to maintain a clear picture of where all the bits come from, so users can be sure they're looking at the right information. And we need to make it as easy as possible to write new connectors, since there are a lot of systems out there that have information we want to federate.
The second important characteristic of the metadata is that a lot of it is represented as files, and there are a lot of different file formats. These include source code, configuration files, web pages, database schemas, XML schemas, service definitions, policies, documents, spreadsheets, presentations, images, audio files, workflow definitions, business rules, and on and on. And logically if files contain metadata, we want to add those files to our metadata repository. The problem is, all that metadata is tied up as blobs in the repository. Ideally, our repository would automatically extract from those files the content that's most useful to us, and place that content inside the repository where it can be much more easily used, searched, related, and analyzed. JBoss DNA does exactly this via a process we call sequencing, and it's an important part of a metadata repository.
The third important characteristic of metadata is that it rarely stays the same. Different consumers of the information need to see different views of it. Metadata about two similar systems is not always the same. The metadata often needs to be tagged or annotated with additional information. And the things being described often change over time, meaning the metadata has to change, too. As a result, the way in which we store and manage the metadata has to be flexible and able to adapt to our ever-changing needs, and the object model we use to interact with the repository must accommodate these needs. The graph-based nature of the JCR API provides this flexibility while also giving us the ability to constrain information when it needs to be constrained.
There are a lot of choices for how applications can store information persistently so that it can be accessed at a later time and by other processes. The challenge developers face is how to use an approach that most closely matches the needs of their application. This choice becomes more important as developers choose to focus their efforts on application-specific logic, delegating much of the responsibilities for persistence to libraries and frameworks.
Perhaps one of the easiest techniques is to simply store information in files . The Java language makes working with files relatively easy, but Java really doesn't provide many bells and whistles. So using files is an easy choice when the information is either not complicated (for example property files), or when users may need to read or change the information outside of the application (for example log files or configuration files). But using files to persist information becomes more difficult as the information becomes more complex, as the volume of it increases, or if it needs to be accessed by multiple processes. For these situations, other techniques often have more benefits.
Another technique built into the Java language is Java serialization , which is capable of persisting the state of an object graph so that it can be read back in at a later time. However, Java serialization can quickly become tricky if the classes are changed, and so it's beneficial usually when the information is persisted for a very short period of time. For example, serialization is sometimes used to send an object graph from one process to another. Using serialization for longer-term storage of information is more risky.
One of the more popular and widely-used persistence technologies is the relational database. Relational database management systems have been around for decades and are very capable. The Java Database Connectivity (JDBC) API provides a standard interface for connecting to and interacting with relational databases. However, it is a low-level API that requires a lot of code to use correctly, and it still doesn't abstract away the DBMS-specific SQL grammar. Also, working with relational data in an object-oriented language can feel somewhat unnatural, so many developers map this data to classes that fit much more cleanly into their application. The problem is that manually creating this mapping layer requires a lot of repetitive and non-trivial JDBC code.
Object-relational mapping libraries automate the creation of this mapping layer and result in far less code that is much more maintainable with performance that is often as good as (if not better than) handwritten JDBC code. The new Java Persistence API (JPA) provide a standard mechanism for defining the mappings (through annotations) and working with these entity objects. Several commercial and open-source libraries implement JPA, and some even offer additional capabilities and features that go beyond JPA. For example, Hibernate is one of the most feature-rich JPA implementations and offers object caching, statement caching, extra association mappings, and other features that help to improve performance and usefulness. Plus, Hibernate is open-source (with support offered by JBoss).
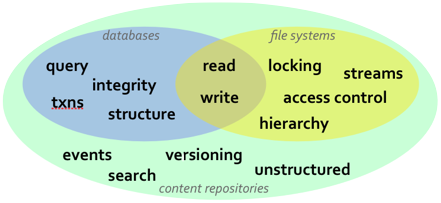
While relational databases and JPA are solutions that work well for many applications, they are more limited in cases when the information structure is highly flexible, the structure is not known a priori, or that structure is subject to frequent change and customization. In these situations, content repositories may offer a better choice for persistence. Content repositories are almost a hybrid with the storage capabilities of relational databases and the flexibility offered by other systems, such as using files. Content repositories also typically provide other capabilities as well, including versioning, indexing, search, access control, transactions, and observation. Because of this, content repositories are used by content management systems (CMS), document management systems (DMS), and other applications that manage electronic files (e.g., documents, images, multi-media, web content, etc.) and metadata associated with them (e.g., author, date, status, security information, etc.). The Content Repository for Java technology API provides a standard Java API for working with content repositories. Abbreviated "JCR", this API was developed as part of the Java Community Process under JSR-170 and is being revised under JSR-283.
The JCR API provides a number of information services that are needed by many applications, including: read and write access to information; the ability to structure information in a hierarchical and flexible manner that can adapt and evolve over time; ability to work with unstructured content; ability to (transparently) handle large strings; notifications of changes in the information; search and query; versioning of information; access control; integrity constraints; participation within distributed transactions; explicit locking of content; and of course persistence.
The roadmap for JBoss DNA is managed in the project's JIRA instance . The roadmap shows the different tasks, requirements, issues and other activities that have been targeted to each of the upcoming releases. (The roadmap report always shows the next three releases.)
By convention, the JBoss DNA project team periodically review JIRA issues that aren't targeted to a release, and then schedule them based upon current workload, severity, and the roadmap. And if we review an issue and don't know how to target it, we target it to the Future Releases bucket.
At the start of a release, the project team reviews the roadmap, identifies the goals for the release, and targets (or retargets) the issues appropriately.
Rather than use a single formal development methodology, the JBoss DNA project incorporates those techniques, activities, and processes that are practical and work for the project. In fact, the committers are given a lot of freedom for how they develop the components and features they work on.
Nevertheless, we do encourage familiarity with several major techniques, including:
Agile software development includes those software methodologies (e.g., Scrum) that promote development iterations and open collaboration. While the JBoss DNA project doesn't follow these closely, we do emphasize the importance of always having running software and using running software as a measure of progress. The JBoss DNA project also wants to move to more frequent releases (on the order of 4-6 weeks)
Test-driven development (TDD) techniques encourage first writing test cases for new features and functionality, then changing the code to add the new features and functionality, and finally the code is refactored to clean-up and address any duplication or inconsistencies.
Behavior-driven development (BDD) is an evolution of TDD, where developers specify the desired behaviors first (rather than writing "tests"). In reality, this BDD adopts the language of the user so that tests are written using words that are meaningful to users. With recent test frameworks (like JUnit 4.4), we're able to write our unit tests to express the desired behavior. For example, a test class for sequencer implementation might have a test method
shouldNotThrowAnErrorWhenStreamIsNull(), which is very easy to understand the intent. The result appears to be a larger number of finer-grained test methods, but which are more easily understood and easier to write. In fact, many advocates of BDD argue that one of the biggest challenges of TDD is knowing what tests to write in the beginning, whereas with BDD the shift in focus and terminology make it easier for more developers to enumerate the tests they need.Lean software development is an adaptation of lean manufacturing techniques, where emphasis is placed on eliminating waste (e.g., defects, unnecessary complexity, unnecessary code/functionality/features), delivering as fast as possible, deferring irrevocable decisions as much as possible, continuous learning (continuously adapting and improving the process), empowering the team (or community, in our case), and several other guidelines. Lean software development can be thought of as an evolution of agile techniques in the same way that behavior-driven development is an evolution of test-driven development. Lean techniques help the developer to recognize and understand how and why features, bugs, and even their processes impact the development of software.
JBoss DNA consists of the following modules:
dna-jcr contains JBoss DNA's implementation of the JCR API. If you're using JBoss DNA as a JCR repository, this is the top-level dependency that you'll want to use. The module defines all required dependencies, except for the repository connector(s) and any sequencer implementations needed by your configuration. As we'll see later on, using JBoss DNA as a JCR repository is easy: simply create a configuration, start the JCR engine, get the JCR Repository object for your repository, and then use the JCR API. This module also contains the Jackrabbit JCR API unit tests that verify the behavior of the JBoss DNA implementation. As DNA does not fully implement the JCR 1.0.1 specification, there are a series of tests that are currently commented out in this module. The
dna-jcr-tckmodule contains all of these tests.dna-repository provides the core DNA graph engine and services for managing repository connections, sequencers, MIME type detectors, and observation. If you're using JBoss DNA repositories via our graph API rather than JCR, then this is where you'd start.
dna-graph defines the Application Programming Interface (API) for JBoss DNA's low-level graph model, including a DSL-like API for working with graph content. This module also defines the APIs necessary to implement custom connectors, sequencers, and MIME type detectors.
dna-cnd provides a self-contained utility for parsing CND (Compact Node Definition) files and transforming the node definitions into a graph notation compatible with JBoss DNA's JCR implementation.
dna-common is a small low-level library of common utilities and frameworks, including logging, progress monitoring, internationalization/localization, text translators, component management, and class loader factories.
There are several modules that provide system- and integration-level tests:
dna-jcr-tck provides a separate testing project that executes all Jackrabbit JCR TCK tests on a nightly basis to track implementation progress against the JCR 1.0 specification. This module will likely be retired when the
dna-jcrimplementation is complete.dna-integration-tests provides a home for all of the integration tests that involve more components that just unit tests. Integration tests are often more complicated, take longer, and involve testing the integration and functionality of multiple components (whereas unit tests focus on testing a single class or component and may use stubs or mock objects to isolate the code being tested from other related components).
The following modules are optional extensions that may be used selectively and as needed (and are located in the source
under the
extensions/
directory):
dna-classloader-maven is a small library that provides a
ClassLoaderFactoryimplementation that can createjava.lang.ClassLoaderinstances capable of loading classes given a Maven Repository and a list of Maven coordinates. The Maven Repository can be managed within a JCR repository.dna-common-jdbc contains several helpful utility classes for interacting with JDBC connections.
dna-connector-federation is a DNA repository connector that federates, integrates and caches information from multiple sources (via other repository connectors).
dna-connector-filesystem is a DNA repository connector that provides read-only access to file systems, allowing their structure and data to be viewed as repository content.
dna-connector-jdbc-metadata is a prototype DNA repository connector that provides read-only access to metadata from relational databases through a JDBC connection. This is still under development.
dna-connector-jbosscache is a DNA repository connector that manages content within a JBoss Cache instance. JBoss Cache is a powerful cache implementation that can serve as a distributed cache and that can persist information. The cache instance can be found via JNDI or created and managed by the connector.
dna-connector-store-jpa is a DNA sequencer that provides for persistent storage and access of DNA content in a relational database. This connector is based on JPA technology.
dna-connector-svn is a prototype DNA sequencer that obtains content from a Subversion repository, providing that content in the form of
nt:fileandnt:foldernodes.dna-sequencer-zip is a DNA sequencer that extracts from ZIP archives the files (with content) and folders.
dna-sequencer-xml is a DNA sequencer that extracts the structure and content from XML files.
dna-sequencer-images is a DNA sequencer that extracts the image metadata (e.g., size, date, etc.) from PNG, JPEG, GIF, BMP, PCS, IFF, RAS, PBM, PGM, and PPM image files.
dna-sequencer-mp3 is a DNA sequencer that extracts metadata (e.g., author, album name, etc.) from MP3 audio files.
dna-sequencer-java is a DNA sequencer that extracts the package, class/type, member, documentation, annotations, and other information from Java source files.
dna-sequencer-msoffice is a DNA sequencer that extracts metadata and summary information from Microsoft Office documents. For example, the sequencer extracts from a PowerPoint presentation the outline as well as thumbnails of each slide. Microsoft Word and Excel files are also supported.
dna-sequencer-cnd is a DNA sequencer that extracts JCR node definitions from JCR Compact Node Definition (CND) files.
dna-sequencer-jbpm-jpdl is a prototype DNA sequencer that extracts process definition metadata from jBPM process definition language (jPDL) files. This is still under development.
dna-sequencer-java is a DNA sequencer that extracts the structure (methods, fields) from Java source files.
dna-mimetype-detector-aperture is a DNA MIME type detector that uses the Aperture library to determine the best MIME type from the filename and file contents.
dna-web-jcr-rest provides a set of JSR-311 (JAX-RS) objects that form the basis of a RESTful server for Java Content Repositories. This project provides integration with DNA's JCR implementation (of course) but also contains a service provider interface (SPI) that can be used to integrate other JCR implementations with these RESTful services in the future. For ease of packaging, these classes are provided as a JAR that can be placed in the WEB-INF/lib of a deployed RESTful server WAR.
dna-web-jcr-rest-war wraps the RESTful services from the dna-web-jcr-rest JAR into a WAR and provides in-container integration tests. This project can be consulted as a template for how to deploy the RESTful services in a custom implementation.
There are also documentation modules (located in the source under the
docs/
directory):
docs-getting-started is the project with the DocBook source for the JBoss DNA Getting Started document.
docs-getting-started-examples is the project with the Java source for the example application used in the JBoss DNA Getting Started document.
docs-reference-guide is the project with the DocBook source for this document, the JBoss DNA Reference Guide document.
Finally, there is a module that represents the whole JBoss DNA project:
dna is the parent project that aggregates all of the other projects and that contains some asset files to create the necessary Maven artifacts during a build.
Each of these modules is a Maven project with a group ID of
org.jboss.dna
. All of these projects correspond to artifacts in the
JBoss Maven 2 Repository
.
The JBoss DNA project uses a number of process, tools, and procedures to assist in the development of the software. This portion of the document focuses on these aspects and will help developers and contributors obtain the source code, build locally, and contribute to the project.
If you're not contributing to the project but are still developing custom connectors or sequencers. this information may be helpful in establishing your own environment.
Table of Contents
The JBoss DNA project uses Maven as its primary build tool, Subversion for its source code repository, JIRA for the issue management and bug tracking system, and Hudson for the continuous integration system. We do not stipulate a specific integrated development environment (IDE), although most of us use Eclipse and rely upon the code formatting and compile preferences to ensure no warnings or errors.
The rest of this chapter talks in more detail about these different tools and how to set them up.
Currently, JBoss DNA is developed and built using JDK 5. So if you're trying to get JBoss DNA to compile locally, you should make sure you have the JDK 5 installed and are using it. If you're a contributor, you should make sure that you're using JDK 5 before committing any changes.
Note
You should be able to use the latest JDK, which is currently JDK 6. It is possible to build JBoss DNA using JDK 6 without any code changes, but it's not our official JDK (yet).
Why do we build using JDK 5 and not 6? The main reason is that if we were to use JDK 6, then JBoss DNA couldn't really be used in any applications or projects that still used JDK 5. Plus, anybody using JDK 6 can still use JBoss DNA. However, considering that the end-of-life for Java 5 is October 2009, we may be switching to Java 6 sometime in 2009.
When installing a JDK, simply follow the procedure for your particular platform. On most platforms, this should set the
JAVA_HOME environment variable. But if you run into any problems, first check that this environment
variable was set to the correct location, and then check that you're running the version you expect by running
the following command:
$ java -version
If you don't see the correct version, double-check your JDK installation.
JBoss DNA uses JIRA as its bug tracking, issue tracking, and project management tool. This is a browser-based tool, with very good functionality for managing the different tasks. It also serves as the community's roadmap, since we can define new features and manage them along side the bugs and other issues. Although most of the issues have been created by community members, we encourage any users to suggest new features, log defects, or identify shortcomings in JBoss DNA.
The JBoss DNA community also encourages its members to work only issues that are managed in JIRA, and preferably those that are targeted to the current release effort. If something isn't in JIRA but needs to get done, then create an issue before you start working on the code changes. Once you have code changes, you can upload a patch to the JIRA issue if the change is complex, if you want someone to review it, or if you don't have commit privileges and have fixed a bug.
JBoss DNA uses Subversion as its source code management system, and specifically the instance at JBoss.org. Although you can view the trunk of the Subversion repository directly (or using FishEye) through your browser, it order to get more than just a few files of the latest version of the source code, you probably want to have an SVN client installed. Several IDE's have SVN support included (or available as plugins), but having the command-line SVN client is recommended. See http://subversion.tigris.org/ for downloads and instructions for your particular platform.
Here are some useful URLs for the JBoss DNA Subversion:
Table 2.1. SVN URLs for JBoss DNA
| Repository | URL |
|---|---|
| Anonymous Access URL | http://anonsvn.jboss.org/repos/dna/trunk/ |
| Secure Developer Access URL | http://fisheye.jboss.org/browse/DNA/trunk/ |
| FishEye Code Browser | https://svn.jboss.org/repos/dna/trunk/ |
When committing to SVN, be sure to include in a commit comment that includes the JIRA issue that the commit applies to and a very good and thorough description of what was done. It only takes a minute or two to be very clear about the change. And including the JIRA issue (e.g., "DNA-123") in the comment allows the JIRA system to track the changes that have been made for each issue.
Also, any single SVN commit should apply to one and only one JIRA issue. Doing this helps ensure that each commit is atomic and focused on a single activity. There are exceptions to this rule, but they are rare.
Sometimes you may have some local changes that you don't want to (or aren't allowed to) commit. You can make a patch file
and upload it to the JIRA issue, allowing other committers to review the patch. However, to ensure that patches are easily
applied, please use SVN to create the patch. To do this, simply do the following in the top of the codebase (e.g., the
trunk directory):
$ svn diff . > ~/DNA-000.patch
where DNA-000 represents the DNA issue number. Note that the above command places the patch file in your home directory,
but you can place the patch file anywhere. Then, simply use JIRA to attach the patch file to the particular issue, also adding
a comment that describes the version number against which the patch was created.
To apply a patch, you usually want to start with a workspace that has no changes. Download the patch file, then issue the following command (again, from the top-level of the workspace):
$ patch -E -p0 < ~/DNA-000.patch
The "-E" option specifies to delete any files that were made empty by the application of the patch, and the "-p0" option instructs the patch tool to not change any of the paths. After you run this command, your working area should have the changes defined by the patch.
Several contributors are using Git on their local development machines. This allows the developer to use Git branches, commits, merges, and other Git tools, but still using the JBoss DNA Subversion repository. For more information, see our blog posts on the topic.
JBoss DNA uses Maven 2 for its build system, as is this example. Using Maven 2 has several advantages, including the ability to manage dependencies. If a library is needed, Maven automatically finds and downloads that library, plus everything that library needs. This means that it's very easy to build the examples - or even create a maven project that depends on the JBoss DNA JARs.
To use Maven with JBoss DNA, you'll need to have JDK 5 or 6 and Maven 2.0.9 (or higher).
Maven can be downloaded from http://maven.apache.org/, and is installed by unzipping the
maven-2.0.9-bin.zip file to a convenient location on your local disk. Simply add $MAVEN_HOME/bin
to your path and add the following profile to your ~/.m2/settings.xml file:
<settings>

  <profiles>

    <profile>

      <id>jboss.repository</id>

      <activation>

        <property>

          <name>!jboss.repository.off</name>

        </property>

      </activation>

      <repositories>

        <repository>

          <id>snapshots.jboss.org</id>

          <url>http://snapshots.jboss.org/maven2</url>

          <snapshots>

            <enabled>true</enabled>

          </snapshots>

        </repository>

        <repository>

          <id>repository.jboss.org</id>

          <url>http://repository.jboss.org/maven2</url>

          <snapshots>

            <enabled>false</enabled>

          </snapshots>

        </repository>

      </repositories>

      <pluginRepositories>

        <pluginRepository>

          <id>repository.jboss.org</id>

          <url>http://repository.jboss.org/maven2</url>

          <snapshots>

            <enabled>false</enabled>

          </snapshots>

        </pluginRepository>

        <pluginRepository>

          <id>snapshots.jboss.org</id>

          <url>http://snapshots.jboss.org/maven2</url>

          <snapshots>

            <enabled>true</enabled>

          </snapshots>

        </pluginRepository>

      </pluginRepositories>

    </profile>

  </profiles>

</settings>
This profile informs Maven of the two JBoss repositories (snapshots and releases) that contain all of the JARs for JBoss DNA and all dependent libraries.
While you're adding $MAVEN_HOME/bin to your path, you should also set the $MAVEN_OPTS environment variable
to "-Xmx256m". If you don't do this, you'll likely see an java.lang.OutOfMemoryError sometime during a full
build.
Note
The JBoss Maven repository provides a central location for not only the artifacts produced by the JBoss.org projects (well, at least those that use Maven), but also is where those projects can place the artifacts that they depend on. JBoss DNA has a policy that the source code and JARs for all dependencies must be loaded into the JBoss Maven repository. It may be a little bit more work for the developers, but it does help ensure that developers have easy access to the source and that the project (and dependencies) can always be rebuilt when needed.
For more information about the JBoss Maven repository, including instructions for adding source and JAR artifacts, see the JBoss.org Wiki.
There are just a few commands that are useful for building JBoss DNA (and it's subprojects).
Usually, these are issued while at the top level of the code (usually just below trunk/), although issuing
them inside a subproject just applies to that subproject.
Table 2.2. Useful Maven commands
| Command | Description |
|---|---|
mvn clean | Clean up all built artifacts (e.g., the target/ directory in each project) |
mvn clean install | Clean up all built artifacts, then compile, run the unit tests, and install the resulting JAR artifact(s)
into your local Maven repository (e.g, usually ~/.m2/repository).
|
JBoss DNA's continuous integration is done with several Hudson jobs on JBoss.org. These jobs run periodically and basically run the Maven build process. Any build failures or test failures are reported, as are basic statistics and history for each job.
Table 2.3. Continuous integration jobs
| Job | Description |
|---|---|
| Continuous on JDK 5 | Continuous build that runs after changes are committed to SVN. SVN is polled every 15 minutes. |
| Nightly on JDK 5 | Build that runs every night (usually around 2 a.m. EDT), regardless of whether changes have been committed to SVN since the previous night. |
Many of the JBoss DNA committers use the Eclipse IDE, and all project files required by Eclipse are committed in SVN, making it pretty easy to get an Eclipse workspace running with all of the JBoss DNA projects. Many of the JBoss DNA committers use the Eclipse IDE, and all project files required by Eclipse are committed in SVN, making it pretty easy to get an Eclipse workspace running with all of the JBoss DNA projects.
We're using the latest released version of Eclipse (3.4, called "Ganymede"), available from Eclipse.org. Simply follow the instructions for your platform.
After Eclipse is installed, create a new workspace. Before importing the JBoss DNA projects, import (via
File->Import->Preferences) the subset of the Eclipse preferences by importing the
eclipse-preferences.epf file (located under trunk). Then, open the Eclipse preferences and
open the Java->Code Style-> Formatter preference page, and press the "Import" button and
choose the eclipse-code-formatter-profile.xml file (also located under trunk). This will load the code
formatting preferences for the JBoss DNA project.
Then install Eclipse plugins for SVN and Maven. (Remember, you will have to restart Eclipse after installing them.) We use the following plugins:
Table 2.4. Eclipse Subversion Plugins
| Eclipse Plugins | Update Site URLs |
|---|---|
| Subversive SVN Client | http://www.polarion.org/projects/subversive/download/eclipse/2.0/update-site/ http://www.polarion.org/projects/subversive/download/integrations/update-site/ |
| Maven Integration for Eclipse | http://m2eclipse.sonatype.org/update/ |
After you check out the JBoss DNA codebase, you can import the JBoss DNA Maven projects into Eclipse as Eclipse projects.
To do this, go to "File->Import->Existing Projects", navigate to the trunk/ folder in the import wizard,
and then check each of the subprojects that you want to have in your workspace.
Don't forget about the projects under extensions/ or docs/.
This section outlines the basic process of releasing JBoss DNA. This must be done either by the project lead or only after communicating with the project lead.
Before continuing, your local workspace should contain no changes and should be a perfect reflection of Subversion. You can verify this by getting the latest from Subversion
$ svn update
and ensuring that you have no additional changes with
$ svn status
You may also want to note the revision number for use later on in the process. The release number is returned by
the svn update command, but may also be found using
$ svn info
At this point, you're ready to verify that everything builds normally.
By default, the project's Maven build process is does not build the documentation, JavaDocs, or assemblies. These take extra time, and most of our builds don't require them. So the first step of releasing JBoss DNA is to use Maven to build all of regular artifacts (e.g., JARs) and these extra documents and assemblies.
Note
Before running Maven commands to build the releases, increase the memory available to Maven with this command:
$ export MAVEN_OPTS=-Xmx256m
To perform this complete build, issue the following command while in the target/ directory:
$ mvn -P assembly clean javadoc:javadoc install
This command runs the "clean", "javadoc:javadoc", and "install" goals using the "assembly" profile, which adds the production of JavaDocs, the Getting Started document, the Reference Guide document, the Getting Started examples, and several ZIP archives. The order of the goals is important, since the "install" goal attempts to include the JavaDoc in the archives.
After this build has completed, verify that the assemblies under target/ have actually been created and that
they contain the correct information.
At this point, we know that the actual Maven build process is building
everything we want and will complete without errors. We can now proceed with preparing for the release.
The version being released should match the JIRA road map. Make sure that all issues related to the release are closed. The project lead should be notified and approve that the release is taking place.
The next step is to ensure that all information in the POM is correct and contains all the information required for the release process. This is called a dry run, and is done with the Maven "release" plugin:
$ mvn -Passembly release:prepare -DdryRun=true
This may download a lot of Maven plugins if they already haven't been downloaded, but it will eventually prompt you for
the release version of each of the Maven projects, the tag name for the release, and the next development versions
(again for each of the Maven projects). The default values are probably acceptable; if not, then check that the
"<version>" tags in each of the POM files is correct and end with "-SNAPSHOT".
After the dry run completes you should clean up the files that the release plugin created in the dry run:
$ mvn -Passembly release:clean
Run the prepare step (without the dryRun option):
$ mvn -Passembly release:prepare
You will again be prompted for the release versions and tag name. These should be the same as what was used during the dry run. This will run the same steps as the dry run, with the additional step of tagging the release in SVN.
If there are any problems during this step, you should go back and try the dry run option. But after this runs successfully,
the release will be tagged in SVN, and the pom.xml files in SVN under /trunk will have the
next version in the "<version>" values.
However, the artifacts for the release are not yet published. That's the next step.
At this point, the release's artifacts need to be published to the JBoss Maven repository. This next command check outs the
files from the release tag created earlier (into a trunk/target/checkout directory), runs a build, and then
deploys the generated artifacts. Note that this ensures that the artifacts are built from the tagged code.
$ mvn release:perform -DuseReleaseProfile=false
Note
If during this process you get an error finding the released artifacts in your local Maven repository, you may
need to go into the trunk/target/checkout folder and run $ mvn install. This is a simple
workaround to make the artifacts available locally. Another option to try is adding -Dgoals=install,assembly
to the $ mvn release:perform... command above.
The artifacts are deployed to the local file system, which is comprised of a local checkout of the JBoss Maven2 repository
in a location specified by a combination of the <distributionManagement> section of several pom.xml
files and your personal settings.xml file. Once this Maven command completes, you will need to
commit the new files after they are deployed. For more information, see the
JBoss wiki.
At this point, the software has been released and tagged, and it's been deployed to a local checked-out copy of the JBoss DNA Maven 2 repository (via the "<distribution>" section of the pom.xml files). Those need to be committed into the Maven 2 repository using SVN. And finally, the last thing is to publish the release onto the project's downloads and documentation pages.
The assemblies of the source, binaries, etc. also need to be published onto the http://www.jboss.org/dna/downloads.html area of the the project page. This process is expected to change, as JBoss.org improves its infrastructure.
In this chapter, we described the various aspects of developing code for the JBoss DNA project. Before we start talking about some of the details of JBoss DNA repositories, connectors, and sequencers, we'll first talk about some very ubiquitous information: how does JBoss DNA load all of the extension classes? This is the topic of the next chapter.
The JBoss DNA project uses automated testing to verify that the software is doing what it's supposed to and not doing what it shouldn't do. These automated tests are run continuously and also act as regression tests, ensuring that we known if any problems we find and fix reappear later. All of our tests are executed as part of our Maven build process, and the entire build process (including the tests) is automatically run using Hudson continuous integration system.
Unit tests verify the behavior of a single class (or small set of classes) in isolation from other classes. We use the JUnit 4.4 testing framework, which has significant improvements over earlier versions and makes it very easy to quickly write unit tests with little extra code. We also frequently use the Mockito library to help create mock implementations of other classes that are not under test but are used in the tests.
Unit tests should generally run quickly and should not require large assemblies of components. Additionally, they may rely upon the file resources included in the project, but these tests should require no external resources (like databases or servers). Note that our unit tests are run during the "test" phase of the standard Maven lifecycle. This means that they are executed against the raw .class files created during complication.
Developers are expected to run all of the JBoss DNA unit tests in their local environment before committing changes to SVN.
So, if you're a developer and you've made changes to your local copy of the source, you can run those tests that are
related to your changes using your IDE or with Maven (or any other mechanism). But before you commit your changes,
you are expected to run a full Maven build using mvn clean install (in the "trunk/" directory).
Please do not rely upon continuous integration to run all of the tests for you - the CI
system is there to catch the occasional mistakes and to also run the integration tests.
While unit tests test individual classes in (relative) isolation, the purpose of integration tests are to verify that assemblies of classes and components are behaving correctly. These assemblies are often the same ones that end users will actually use. In fact, integration tests are executed during the "integration-test" phase of the standard Maven lifecycle, meaning they are executed against the packaged JARs and artifacts of the project.
Integration tests also use the JUnit 4.4 framework, so they are again easy to write and follow the same pattern as unit tests. However, because they're working with larger assemblies of components, they often will take longer to set up, longer to run, and longer to tear down. They also may require initializing "external resources", like databases or servers.
Note, that while external resources may be required, care should be taken to minimize these dependencies and to
ensure that most (if not all) integration tests may be run by anyone who downloads the source code. This means
that these external resources should be available and set up within the tests. For example, use in-memory databases
where possible. Or, if a database is required, use an open-source database (e.g., MySQL or PostgreSQL). And when
these external resources are not available, it should be obvious from the test class names and/or test method names
that it involved an external resource (e.g., "MySqlConnectorIntegrationTest.shouldFindNodeStoredInDatabase()").
As mentioned in the introduction, the JBoss DNA project doesn't follow any one methodology or process. Instead, we simply have a goal that as much code as possible is tested to ensure it behaves as expected. Do we expect 100% of the code is covered by automated tests? No, but we do want to test as much as we can. Maybe a simple JavaBean class doesn't need many tests, but any class with non-trivial logic should be tested.
We do encourage writing tests either before or while you write the code. Again, we're not blindly following a methodology. Instead, there's a very practical reason: writing the tests early on helps you write classes that are testable. If you wait until after the class (or classes) are done, you'll probably find that it's not easy to test all of the logic (especially the complicated logic).
Another suggestion is to write tests so that they specify and verify the behavior that is expected from a class or component.
One challenge developers often have is knowing what they should even test and what the tests should look like.
This is where Behavior-driven development (BDD)
helps out. If you think about what a class' behaviors are supposed to be (e.g., requirements), simply capture those
requirements as test methods (with no implementations). For example, a test class for sequencer
implementation might have a test method shouldNotThrowAnErrorWhenTheSuppliedStreamIsNull() { }. Then, after you enumerate
all the requirements you can think of, go back and start implementing the test methods.
If you look at the existing test cases, you'll find that the names of the unit and integration tests in JBoss DNA follow a naming style, where the test method names are readable sentences. Actually, we try to name the test methods and the test classes such that they form a concisely-worded requirement. For example,
InMemorySequencerTest.shouldNotThrowAnErrorWhenTheSuppliedStreamIsNull()
is easily translated into a readable requirement:
InMemorySequencer should not throw an error when the supplied stream is null.
In fact, at some point in the future, we'd like to process the source to automatically generate a list of the behavior specifications that are asserted by the tests.
But for now, we write tests - a lot of them. And by following a few simple conventions and practices, we're able to do it quickly and in a way that makes it easy to understand what the code is supposed to do (or not do).
Many Java specifications provide TCK test suites that can be used to check or verify that an implementation correctly implements the API or SPI defined by the specification. These TCK tests vary by technology, but JSR-170 does provide TCK tests that ensure that a JCR repository implementation exhibits the correct and expected behavior.
JBoss DNA has not yet passed enough of the TCK tests to publish the results. We still have to implement queries, which is a required feature of Level 1 repositories. However, suffice to say that JBoss DNA has passed many of the individual tests that make up the Level 1 and Level 2 tests, and it is a major objective of the next release to pass the remaining Level 1 and Level 2 tests (along with some other optional features).
JBoss DNA also frequently runs the JCR unit tests from the Apache Jackrabbit project. (Those these tests are not
the official TCK, they apparently are used within the official TCK.) These unit tests are set up in the
dna-jcr-tck project.
The JBoss DNA project organizes the codebase into a number of subprojects. The most fundamental are those core libraries, including the graph API, connector framework, sequencing framework, as well as the configuration and engine in which all the components run. These are all topics covered in this part of the document.
The JBoss DNA implementation of the JCR API as well as some other JCR-related components are covered in the next part.
The various components of JBoss DNA are designed as plain old Java objects, or POJOs. And rather than making assumptions about their environment, each component instead requires that any external dependencies necessary for it to operate must be supplied to it. This pattern is known as Dependency Injection, and it allows the components to be simpler and allows for a great deal of flexibility and customization in how the components are configured.
The approach that JBoss DNA takes is simple: a simple POJO that represents the everything about the environment
in which components operate. Called ExecutionContext, it contains references to most of the essential
facilities, including: security (authentication and authorization); namespace registry; name factories; factories
for properties and property values; logging; and access to class loaders (given a classpath).
Most of the JBoss DNA components require an ExecutionContext and thus have access to all these facilities.
The ExecutionContext is a concrete class that is instantiated with the no-argument constructor:
public classExecutionContextimplements ClassLoaderFactory { /** * Create an instance of an execution context, with default implementations for all components. */ publicExecutionContext() { ... } /** * Get the factories that should be used to create values for {@link Property properties}. * @return the property value factory; never null */ public ValueFactories getValueFactories() {...} /** * Get the namespace registry for this context. * @return the namespace registry; never null */ public NamespaceRegistry getNamespaceRegistry() {...} /** * Get the factory for creating {@link Property} objects. * @return the property factory; never null */ public PropertyFactory getPropertyFactory() {...} /** * Get the security context for this environment. * @return the security context; nevernull*/ public SecurityContext getSecurityContext() {...} /** * Return a logger associated with this context. This logger records only those activities within the * context and provide a way to capture the context-specific activities. All log messages are also * sent to the system logger, so classes that log via this mechanism should <i>not</i> also * {@link Logger#getLogger(Class) obtain a system logger}. * @param clazz the class that is doing the logging * @return the logger, named afterclazz; never null */ public Logger getLogger( Class<?> clazz ) {...} /** * Return a logger associated with this context. This logger records only those activities within the * context and provide a way to capture the context-specific activities. All log messages are also * sent to the system logger, so classes that log via this mechanism should <i>not</i> also * {@link Logger#getLogger(Class) obtain a system logger}. * @param name the name for the logger * @return the logger, named afterclazz; never null */ public Logger getLogger( String name ) {...} ... }
The fact that so many of the JBoss DNA components take ExecutionContext instances gives us some interesting possibilities.
For example, one execution context instance can be used as the highest-level (or "application-level") context for all of the services
(e.g., RepositoryService, SequencingService, etc.).
Then, an execution context could be created for each user that will be performing operations, and that user's context can
be passed around to not only provide security information about the user but also to allow the activities being performed
to be recorded for user feedback, monitoring and/or auditing purposes.
As mentioned above, the starting point is to create a default execution context, which will have all the default components:
ExecutionContextcontext = newExecutionContext();
Once you have this top-level context, you can start creating subcontexts with different components,
and different security contexts. (Of course, you can create a subcontext from any instance.)
To create a subcontext, simply use one of the with(...) methods on the parent context. We'll show examples
later on in this chapter.
JBoss DNA uses a simple abstraction layer to isolate it from the security infrastructure used within an application. A SecurityContext represents the context of an authenticated user, and is defined as an interface:
public interface SecurityContext {

    /**
     * Get the name of the authenticated user.
     * @return the authenticated user's name
     */
    String getUserName();

    /**
     * Determine whether the authenticated user has the given role.
     * @param roleName the name of the role to check
     * @return true if the user has the role and is logged in; false otherwise
     */
    boolean hasRole( String roleName );

    /**
     * Logs the user out of the authentication mechanism.
     * For some authentication mechanisms, this will be implemented as a no-op.
     */
    void logout();
}
Every ExecutionContext has a SecurityContext instance, though the top-level (default) execution context does not represent
an authenticated user. But you can create a subcontext for a user authenticated via JAAS:
ExecutionContextcontext = ... String username = ... char[] password = ... String jaasRealm = ... SecurityContext securityContext = new JaasSecurityContext(jaasRealm, username, password);ExecutionContextuserContext = context.with(securityContext);
In the case of JAAS, you might not have the password but would rather prompt the user. In that case, simply create a subcontext with a different security context:
ExecutionContextcontext = ... String jaasRealm = ... CallbackHandler callbackHandler = ...ExecutionContextuserContext = context.with(new JaasSecurityContext(jaasRealm, callbackHandler);
Of course if your application has a non-JAAS authentication and authorization system, you can simply provide your own implementation of SecurityContext:
ExecutionContextcontext = ... SecurityContext mySecurityContext = ...ExecutionContextmyAppContext = context.with(mySecurityContext);
These ExecutionContext then represent the authenticated user in any component that uses the context.
One of the SecurityContext implementations provided by JBoss DNA is the JaasSecurityContext, which delegates any authentication
or authorization requests to a Java Authentication and Authorization Service (JAAS)
provider. This is the standard approach for authenticating and authorizing in Java.
There are quite a few JAAS providers available, but one of the best and most powerful providers is JBoss Security, the open source security framework used by JBoss. JBoss Security offers a number of JAAS login modules, including:
User-Roles Login Module is a simple
javax.security.auth.login.LoginContextimplementation that uses usernames and passwords stored in a properties file.Client Login Module prompts the user for their username and password.
Database Server Login Module uses a JDBC database to authenticate principals and associate them with roles.
LDAP Login Module uses an LDAP directory to authenticate principals. Two implementations are available.
Certificate Login Module authenticates using X509 certificates, obtaining roles from either property files or a JDBC database.
Operating System Login Module authenticates using the operating system's mechanism.
and many others. Plus, JBoss Security also provides other capabilities, such as using XACML policies or using federated single sign-on. For more detail, see the JBoss Security project.
If JBoss DNA is being used within a web application, then it is probably desirable to reuse the security infrastructure
of the application server. This can be accomplished by implementing the SecurityContext interface with an implementation
that delegates to the HttpServletRequest. Then, for each request, create a SecurityContextCredentials
instance around your SecurityContext, and use that credentials to obtain a JCR Session.
Here is an example of the SecurityContext implementation that uses the servlet request:
@Immutable
public class ServletSecurityContext implements SecurityContext {

    private final String userName;
    private final HttpServletRequest request;

    /**
     * Create a {@link ServletSecurityContext} with the supplied
     * {@link HttpServletRequest servlet information}.
     *
     * @param request the servlet request; may not be null
     */
    public ServletSecurityContext( HttpServletRequest request ) {
        this.request = request;
        this.userName = request.getUserPrincipal() != null ? request.getUserPrincipal().getName() : null;
    }

    /**
     * Get the name of the authenticated user.
     * @return the authenticated user's name
     */
    public String getUserName() {
        return userName;
    }

    /**
     * Determine whether the authenticated user has the given role.
     * @param roleName the name of the role to check
     * @return true if the user has the role and is logged in; false otherwise
     */
    boolean hasRole( String roleName ) {
        request.isUserInRole(roleName);
    }

    /**
     * Logs the user out of the authentication mechanism.
     * For some authentication mechanisms, this will be implemented as a no-op.
     */
    public void logout() {
    }
}
Then use this to create a Session:
HttpServletRequest request = ...
Repository repository = engine.getRepository("my repository");
SecurityContext securityContext = new ServletSecurityContext(httpServletRequest);
ExecutionContext servletContext = context.with(securityContext);
We'll see later in the JCR chapter how this can be use to obtain a JCR Session for the authenticated user.
As we saw earlier, every ExecutionContext has a registry of namespaces. Namespaces are used throughout the graph API
(as we'll see soon), and the prefix associated with each namespace makes for more readable string representations.
The namespace registry tracks all of these namespaces and prefixes, and allows registrations to be added, modified, or
removed. The interface for the NamespaceRegistry shows how these operations are done:
public interface NamespaceRegistry {

    /**
     * Return the namespace URI that is currently mapped to the empty prefix.
     * @return the namespace URI that represents the default namespace,
     * or null if there is no default namespace
     */
    String getDefaultNamespaceUri();

    /**
     * Get the namespace URI for the supplied prefix.
     * @param prefix the namespace prefix
     * @return the namespace URI for the supplied prefix, or null if there is no
     * namespace currently registered to use that prefix
     * @throws IllegalArgumentException if the prefix is null
     */
    String getNamespaceForPrefix( String prefix );

    /**
     * Return the prefix used for the supplied namespace URI.
     * @param namespaceUri the namespace URI
     * @param generateIfMissing true if the namespace URI has not already been registered and the
     *        method should auto-register the namespace with a generated prefix, or false if the
     *        method should never auto-register the namespace
     * @return the prefix currently being used for the namespace, or "null" if the namespace has
     *         not been registered and "generateIfMissing" is "false"
     * @throws IllegalArgumentException if the namespace URI is null
     * @see #isRegisteredNamespaceUri(String)
     */
    String getPrefixForNamespaceUri( String namespaceUri, boolean generateIfMissing );

    /**
     * Return whether there is a registered prefix for the supplied namespace URI.
     * @param namespaceUri the namespace URI
     * @return true if the supplied namespace has been registered with a prefix, or false otherwise
     * @throws IllegalArgumentException if the namespace URI is null
     */
    boolean isRegisteredNamespaceUri( String namespaceUri );

    /**
     * Register a new namespace using the supplied prefix, returning the namespace URI previously
     * registered under that prefix.
     * @param prefix the prefix for the namespace, or null if a namesapce prefix should be generated
     *        automatically
     * @param namespaceUri the namespace URI
     * @return the namespace URI that was previously registered with the supplied prefix, or null if the
     *         prefix was not previously bound to a namespace URI
     * @throws IllegalArgumentException if the namespace URI is null
     */
    String register( String prefix, String namespaceUri );

    /**
     * Unregister the namespace with the supplied URI.
     * @param namespaceUri the namespace URI
     * @return true if the namespace was removed, or false if the namespace was not registered
     * @throws IllegalArgumentException if the namespace URI is null
     * @throws NamespaceException if there is a problem unregistering the namespace
     */
    boolean unregister( String namespaceUri );

    /**
     * Obtain the set of namespaces that are registered.
     * @return the set of namespace URIs; never null
     */
    Set<String> getRegisteredNamespaceUris();

    /**
     * Obtain a snapshot of all of the {@link Namespace namespaces} registered at the time this method
     * is called. The resulting set is immutable, and will not reflect changes made to the registry.
     * @return an immutable set of Namespace objects reflecting a snapshot of the registry; never null
     */
    Set<Namespace> getNamespaces();
}
This interfaces exposes Namespace objects that are immutable:
@Immutable
interface Namespace extends Comparable<Namespace> {
    /**
     * Get the prefix for the namespace
     * @return the prefix; never null but possibly the empty string
     */
    String getPrefix();

    /**
     * Get the URI for the namespace
     * @return the namespace URI; never null but possibly the empty string
     */
    String getNamespaceUri();
}
JBoss DNA actually uses several implementations of NamespaceRegistry, but you can even implement your own
and create ExecutionContexts that uses it:
NamespaceRegistry myRegistry = ...
ExecutionContext contextWithMyRegistry = context.with(myRegistry);
JBoss DNA is designed around extensions: sequencers, connectors, MIME type detectors, and class loader factories. The core part of JBoss DNA is relatively small and has few dependencies, while many of the "interesting" components are extensions that plug into and are used by different parts of the core or by layers above (such as the JCR implementation). The core doesn't really care what the extensions do or what external libraries they require, as long as the extension fulfills its end of the extension contract.
This means that you only need the core modules of JBoss DNA on the application classpath, while the extensions do not have to be on the application classpath. And because the core modules of JBoss DNA have few dependencies, the risk of JBoss DNA libraries conflicting with the application's are lower. Extensions, on the other hand, will likely have a lot of unique dependencies. By separating the core of JBoss DNA from the class loaders used to load the extensions, your application is isolated from the extensions and their dependencies.
Note
Of course, you can put all the JARs on the application classpath, too. This is what the examples in the Getting Started document do.
But in this case, how does JBoss DNA load all the extension classes? You may have noticed earlier that
ExecutionContext implements the ClassLoaderFactory interface with a single method:
public interface ClassLoaderFactory {
    /**
     * Get a class loader given the supplied classpath.  The meaning of the classpath
     * is implementation-dependent.
     * @param classpath the classpath to use
     * @return the class loader; may not be null
     */
    ClassLoader getClassLoader( String... classpath );
}
This means that any component that has a reference to an ExecutionContext has the ability to create a
class loader with a supplied class path. As we'll see later, the connectors and sequencers are all
defined with a class and optional class path. This is where that class path comes in.
The actual meaning of the class path, however, is a function of the implementation. JBoss DNA uses
a StandardClassLoaderFactory that just loads the classes using the Thread's current context
class loader (or, if there is none, delegates to the class loader that loaded the StandardClassLoaderFactory class).
Of course, it's possible to implement other ClassLoaderFactory with other implementations.
Then, just create a subcontext with your implementation:
ClassLoaderFactory myClassLoaderFactory = ...
ExecutionContext contextWithMyClassLoaderFactories = context.with(myClassLoaderFactory);
Note
The dna-classloader-maven project has a class loader factory implementation that parses the names into
Maven coordinates, then uses those coordinates
to look up artifacts in a Maven 2 repository. The artifact's POM file is used to determine the dependencies,
which is done transitively to obtain the complete dependency graph. The resulting class loader has access
to these artifacts in dependency order.
This class loader is not ready for use, however, since there is no tooling to help populate the repository.
JBoss DNA often needs the ability to determine the MIME type for some binary content. When uploading content into a repository, we may want to add the MIME type as metadata. Or, we may want to make some processing decisions based upon the MIME type. So, JBoss DNA created a small pluggable framework for determining the MIME type by using the name of the file (e.g., extensions) and/or by reading the actual content.
JBoss DNA defines a MimeTypeDetector interface that abstracts the implementation that actually determines the MIME type given the name and content. If the detector is able to determine the MIME type, it simply returns it as a string. If not, it merely returns null. Note, however, that a detector must be thread-safe. Here is the interface:
@ThreadSafe public interface MimeTypeDetector { /** * Returns the MIME-type of a data source, using its supplied content and/or its supplied name, * depending upon the implementation. If the MIME-type cannot be determined, either a "default" * MIME-type ornullmay be returned, where the former will prevent earlier * registered MIME-type detectors from being consulted. * * @param name The name of the data source; may benull. * @param content The content of the data source; may benull. * @return The MIME-type of the data source, or optionallynull* if the MIME-type could not be determined. * @throwsIOExceptionIf an error occurs reading the supplied content. */ String mimeTypeOf( String name, InputStream content ) throwsIOException; }
To use a detector, simply invoke the method and supply the name of the content (e.g., the name of the file, with the extension) and the InputStream to the actual binary content. The result is a String containing the MIME type (e.g., "text/plain") or null if the MIME type cannot be determined. Note that the name or InputStream may be null, making this a very versatile utility.
Once again, you can obtain a MimeTypeDetector from the ExecutionContext. JBoss DNA provides and uses by
default an implementation that uses only the name (the content is ignored), looking at the name's extension
and looking for a match in a small listing (loaded from the org/jboss/dna/graph/mime.types loaded from the classpath).
You can add extensions by copying this file, adding or correcting the entries, and then placing your updated file in the
expected location on the classpath.
Of course, you can always use a different MimeTypeDetector by creating a subcontext and supplying your implementation:
MimeTypeDetector myDetector = ...
ExecutionContext contextWithMyDetector = context.with(myDetector);
Two other components are made available by the ExecutionContext. The PropertyFactory is an interface
that can be used to create Property instances, which are used throughout the graph API. The ValueFactories
interface provides access to a number of different factories for different kinds of property values.
These will be discussed in much more detail in the next chapter. But like the other components that
are in an ExecutionContext, you can create subcontexts with different implementations:
PropertyFactory myPropertyFactory = ...
ExecutionContext contextWithMyPropertyFactory = context.with(myPropertyFactory);
and
ValueFactories myValueFactories = ...
ExecutionContext contextWithMyValueFactories = context.with(myValueFactories);
Of course, implementing your own factories is a pretty advanced topic, and it will likely be something you do not need to do in your application.
In this chapter, we introduced the ExecutionContext as a representation of the environment in which many of the
JBoss DNA components operate. ExecutionContext provides a very simple but powerful way to inject commonly-needed
facilities throughout the system.
In the next chapter, we'll dive into Graph API and will introduce the notion of nodes, paths, names, and properties, that are so essential and used throughout JBoss DNA.
One of the central concepts within JBoss DNA is that of its graph model. Information is structured into a hierarchy of nodes with properties, where nodes in the hierarchy are identified by their path (and/or identifier properties). Properties are identified by a name that incorporates a namespace and local name, and contain one or more property values consisting of normal Java strings, names, paths, URIs, booleans, longs, doubles, decimals, binary content, dates, UUIDs, references to other nodes, or any other serializable object.
This graph model is used throughout JBoss DNA: it forms the basis for the connector framework, it is used by the sequencing framework for the generated output, and it is what the JCR implementation uses internally to access and operate on the repository content.
Therefore, this chapter provides essential information that will be essential to really understanding how the connectors, sequencers, and other JBoss DNA features work.
JBoss DNA uses names to identify quite a few different types of objects. As we'll soon see, each property of a node is given by a name, and each segment in a path is comprised of a name. Therefore, names are a very important concept.
JBoss DNA names consist of a local part and are qualified with a namespaces. The local part can consist of
any character, and the namespace is identified by a URI. Namespaces were introduced in the
previous chapter and are managed by the ExecutionContext's
namespace registry. Namespaces help reduce the risk of
clashes in names that have an equivalent same local part.
All names are immutable, which means that once a Name object is created, it will never change. This characteristic makes it much easier to write thread-safe code - the objects never change and therefore require no locks or synchronization to guarantee atomic reads. This is a technique that is more and more often found in newer languages and frameworks that simplify concurrent operations.
Name is also a interface rather than a concrete class:
@Immutable
public interface Name extends Comparable<Name>, Serializable, Readable {

    /**
     * Get the local name part of this qualified name.
     * @return the local name; never null
     */
    String getLocalName();

    /**
     * Get the URI for the namespace used in this qualified name.
     * @return the URI; never null but possibly empty
     */
    String getNamespaceUri();
}
This means that you need to use a factory to create Name instances.
The use of a factory may seem like a disadvantage and unnecessary complexity, but there actually are several benefits. First, it hides the concrete implementations, which is very appealing if an optimized implementation can be chosen for particular situations. It also simplifies the usage, since Name only has a few methods. Third, it allows the factory to cache or pool instances where appropriate to help conserve memory. Finally, the very same factory actually serves as a conversion mechanism from other forms. We'll actually see more of this later in this chapter, when we talk about other kinds of property values.
The factory for creating Name objects is called NameFactory and is available within the ExecutionContext,
via the getValueFactories() method. But before we see that, let's first discuss how names are represented as strings.
We'll see how names are used later one, but one more point to make: Name is both serializable and comparable,
and all implementations should support equals(...) and hashCode() so that Name can
be used as a key in a hash-based map. Name also extends the Readable interface, which we'll learn
more about later in this chapter.
Another important concept in JBoss DNA's graph model is that of a path, which provides a way of locating a node within a hierarchy. JBoss DNA's Path object is an immutable ordered sequence of Path.Segment objects. A small portion of the interface is shown here:
@Immutable public interface Path extends Comparable<Path>, Iterable<Path.Segment>, Serializable, Readable { /** * Return the number of segments in this path. * @return the number of path segments */ public int size(); /** * Return whether this path represents the root path. * @return true if this path is the root path, or false otherwise */ public boolean isRoot(); /** * {@inheritDoc} */ public Iterator<Path.Segment> iterator(); /** * Obtain a copy of the segments in this path. None of the segments are encoded. * @return the array of segments as a copy */ public Path.Segment[] getSegmentsArray(); /** * Get an unmodifiable list of the path segments. * @return the unmodifiable list of path segments; never null */ public List<Path.Segment> getSegmentsList(); /** * Get the last segment in this path. * @return the last segment, or null if the path is empty */ public Path.Segment getLastSegment(); /** * Get the segment at the supplied index. * @param index the index * @return the segment * @throws IndexOutOfBoundsException if the index is out of bounds */ public Path.Segment getSegment( int index ); /** * Return an iterator that walks the paths from the root path down to this path. This method * always returns at least one path (the root returns an iterator containing itself). * @return the path iterator; never null */ public Iterator<Path> pathsFromRoot(); /** * Return a new path consisting of the segments starting atbeginIndexindex (inclusive). * This is equivalent to callingpath.subpath(beginIndex,path.size()-1). * @param beginIndex the beginning index, inclusive. * @return the specified subpath * @exception IndexOutOfBoundsException if thebeginIndexis negative or larger * than the length of thisPathobject */ public Path subpath( int beginIndex ); /** * Return a new path consisting of the segments between thebeginIndexindex (inclusive) * and theendIndexindex (exclusive). * @param beginIndex the beginning index, inclusive. * @param endIndex the ending index, exclusive. * @return the specified subpath * @exception IndexOutOfBoundsException if thebeginIndexis negative, or *endIndexis larger than the length of thisPath* object, orbeginIndexis larger thanendIndex. */ public Path subpath( int beginIndex, int endIndex ); ... }
There are actually quite a few methods (not shown above) for obtaining related paths: the path of the parent, the path of an ancestor, resolving a path relative to this path, normalizing a path (by removing "." and ".." segments), finding the lowest common ancestor shared with another path, etc. There are also a number of methods that compare the path with others, including determining whether a path is above, equal to, or below this path.
Each Path.Segment is an immutable pair of a Name and same-name-sibling (SNS) index. When two sibling nodes have the same name, then the first sibling will have SNS index of "1" and the second will be given a SNS index of "2". (This mirrors the same-name-sibling index behavior of JCR paths.)
@Immutable
public static interface Path.Segment extends Cloneable, Comparable<Path.Segment>, Serializable, Readable {

    /**
     * Get the name component of this segment.
     * @return the segment's name
     */
    public Name getName();

    /**
     * Get the index for this segment, which will be 1 by default.
     * @return the index
     */
    public int getIndex();

    /**
     * Return whether this segment has an index that is not "1"
     * @return true if this segment has an index, or false otherwise.
     */
    public boolean hasIndex();

    /**
     * Return whether this segment is a self-reference (or ".").
     * @return true if the segment is a self-reference, or false otherwise.
     */
    public boolean isSelfReference();

    /**
     * Return whether this segment is a reference to a parent (or "..")
     * @return true if the segment is a parent-reference, or false otherwise.
     */
    public boolean isParentReference();
}
Like Name, the only way to create a Path or a Path.Segment is to use the PathFactory, which is available
within the ExecutionContext via the getValueFactories() method.
The JBoss DNA graph model allows nodes to hold multiple properties, where each property is identified by a unique Name and may have one or more values. Like many of the other classes used in the graph model, Property is an immutable object that, once constructed, can never be changed and therefore provides a consistent snapshot of the state of a property as it existed at the time it was read.
JBoss DNA properties can hold a wide range of value objects, including normal Java strings, names, paths, URIs, booleans, longs, doubles, decimals, binary content, dates, UUIDs, references to other nodes, or any other serializable object. All but three these are the standard Java classes: dates are represented by an immutable DateTime class; binary content is represented by an immutable Binary interface patterned after the proposed interface of the same name in JSR-283; and is an immutable interface patterned after the corresponding interface is JSR-170 and JSR-283.
The Property interface defines methods for obtaining the name and property values:
@Immutable public interface Property extends Iterable<Object>, Comparable<Property>, Readable { /** * Get the name of the property. * * @return the property name; never null */ Name getName(); /** * Get the number of actual values in this property. * @return the number of actual values in this property; always non-negative */ int size(); /** * Determine whether the property currently has multiple values. * @return true if the property has multiple values, or false otherwise. */ boolean isMultiple(); /** * Determine whether the property currently has a single value. * @return true if the property has a single value, or false otherwise. */ boolean isSingle(); /** * Determine whether this property has no actual values. This method may returntrue* regardless of whether the property has a single value or multiple values. * This method is a convenience method that is equivalent tosize() == 0. * @return true if this property has no values, or false otherwise */ boolean isEmpty(); /** * Obtain the property's first value in its natural form. This is equivalent to calling *isEmpty() ? null : iterator().next()* @return the first value, or null if the property is {@link #isEmpty() empty} */ Object getFirstValue(); /** * Obtain the property's values in their natural form. This is equivalent to callingiterator(). * A valid iterator is returned if the property has single valued or multi-valued. * The resulting iterator is immutable, and all property values are immutable. * @return an iterator over the values; never null */ Iterator<?> getValues(); /** * Obtain the property's values as an array of objects in their natural form. * A valid iterator is returned if the property has single valued or multi-valued, or a * null value is returned if the property is {@link #isEmpty() empty}. * The resulting array is a copy, guaranteeing immutability for the property. * @return the array of values */ Object[] getValuesAsArray(); }
Creating Property instances is done by using the PropertyFactory object owned by the ExecutionContext.
This factory defines methods for creating properties with a Name and various representation of values,
including variable-length arguments, arrays, Iterator, and .
When it comes to using the property values, JBoss DNA takes a non-traditional approach. Many other graph models (including JCR) mark each property with a data type and then require all property values adhere to this data type. When the property values are obtained, they are guaranteed to be of the correct type. However, many times the property's data type may not match the data type expected by the caller, and so a conversion may be required and thus has to be coded.
The JBoss DNA graph model uses a different tact. Because callers almost always have to convert the values to the types they can handle, JBoss DNA skips the steps of associating the Property with a data type and ensuring the values match. Instead, JBoss DNA simply provides a very easy mechanism to convert the property values to the type desired by the caller. In fact, the conversion mechanism is exactly the same as the factories that create the values in the first place.
JBoss DNA properties can hold a variety of types of value objects: strings, names, paths, URIs, booleans, longs, doubles, decimals, binary content, dates, UUIDs, references to other nodes, or any other serializable object. To assist in the creation of these values and conversion into other types, JBoss DNA defines a ValueFactory interface. This interface is parameterized with the type of value that is being created, but defines methods for creating those values from all of the other known value types:
public interface ValueFactory<T> {

    /**
     * Get the PropertyType of values created by this factory.
     * @return the value type; never null
     */
    PropertyType getPropertyType();

		/*
		 * Methods to create a value by converting from another value type.
		 * If the supplied value is the same type as returned by this factory,
		 * these methods simply return the supplied value.
		 * All of these methods throw a ValueFormatException if the supplied value
		 * could not be converted to this type.
		 */
    T create( String value ) throws ValueFormatException;
    T create( String value, TextDecoder decoder ) throws ValueFormatException;
    T create( int value ) throws ValueFormatException;
    T create( long value ) throws ValueFormatException;
    T create( boolean value ) throws ValueFormatException;
    T create( float value ) throws ValueFormatException;
    T create( double value ) throws ValueFormatException;
    T create( BigDecimal value ) throws ValueFormatException;
    T create( Calendar value ) throws ValueFormatException;
    T create( Date value ) throws ValueFormatException;
    T create( DateTime value ) throws ValueFormatException;
    T create( Name value ) throws ValueFormatException;
    T create( Path value ) throws ValueFormatException;
    T create(  value ) throws ValueFormatException;
    T create( URI value ) throws ValueFormatException;
    T create( UUID value ) throws ValueFormatException;
    T create( byte[] value ) throws ValueFormatException;
    T create( Binary value ) throws ValueFormatException, IoException;
    T create( InputStream stream, long approximateLength ) throws ValueFormatException, IoException;
    T create( Reader reader, long approximateLength ) throws ValueFormatException, IoException;
    T create( Object value ) throws ValueFormatException, IoException;

    /*
     * Methods to create an array of values by converting from another array of values.
     * If the supplied values are the same type as returned by this factory,
     * these methods simply return the supplied array.
     * All of these methods throw a ValueFormatException if the supplied values
     * could not be converted to this type.
		 */
    T[] create( String[] values ) throws ValueFormatException;
    T[] create( String[] values, TextDecoder decoder ) throws ValueFormatException;
    T[] create( int[] values ) throws ValueFormatException;
    T[] create( long[] values ) throws ValueFormatException;
    T[] create( boolean[] values ) throws ValueFormatException;
    T[] create( float[] values ) throws ValueFormatException;
    T[] create( double[] values ) throws ValueFormatException;
    T[] create( BigDecimal[] values ) throws ValueFormatException;
    T[] create( Calendar[] values ) throws ValueFormatException;
    T[] create( Date[] values ) throws ValueFormatException;
    T[] create( DateTime[] values ) throws ValueFormatException;
    T[] create( Name[] values ) throws ValueFormatException;
    T[] create( Path[] values ) throws ValueFormatException;
    T[] create( [] values ) throws ValueFormatException;
    T[] create( URI[] values ) throws ValueFormatException;
    T[] create( UUID[] values ) throws ValueFormatException;
    T[] create( byte[][] values ) throws ValueFormatException;
    T[] create( Binary[] values ) throws ValueFormatException, IoException;
    T[] create( Object[] values ) throws ValueFormatException, IoException;

    /**
     * Create an iterator over the values (of an unknown type). The factory converts any
     * values as required.  This is useful when wanting to iterate over the values of a property,
     * where the resulting iterator exposes the desired type.
     * @param values the values
     * @return the iterator of type T over the values, or null if the supplied parameter is null
     * @throws ValueFormatException if the conversion from an iterator of objects could not be performed
     * @throws IoException If an unexpected problem occurs during the conversion.
     */
    Iterator<T> create( Iterator<?> values ) throws ValueFormatException, IoException;
    Iterable<T> create( <?> valueIterable ) throws ValueFormatException, IoException;
}
This makes it very easy to convert one or more values (of any type, including mixtures) into corresponding value(s) that are of the desired type. For example, converting the first value of a property (regardless of type) to a String is simple:
ValueFactory<String> stringFactory = ...
Property property = ...
String value = stringFactory.create( property.getFirstValue() );
Likewise, iterating over the values in a property and converting them is just as easy:
ValueFactory<String> stringFactory = ...
Property property = ...
for ( String value : stringFactory.create(property) ) {
    // do something with the values
}
What we've glossed over so far, however, is how to obtain the correct ValueFactory for the desired type.
If you remember back to the previous chapter, ExecutionContext has a getValueFactories() method
that return a ValueFactories interface:
This interface exposes a ValueFactory for each of the types, and even has methods to obtain a ValueFactory
given the PropertyType enumeration. So, the previous examples could be expanded a bit:
ValueFactory<String> stringFactory = context.getValueFactories().getStringFactory();
Property property = ...
String value = stringFactory.create( property.getFirstValue() );
and
ValueFactory<String> stringFactory = context.getValueFactories().getStringFactory();
Property property = ...
for ( String value : stringFactory.create(property) ) {
    // do something with the values
}
You might have noticed that several of the ValueFactories methods return subinterfaces of ValueFactory. These add type-specific methods that are more commonly needed in certain cases. For example, here is the NameFactory interface:
public interface NameFactory extends ValueFactory<Name> {

    Name create( String namespaceUri, String localName );
    Name create( String namespaceUri, String localName, TextDecoder decoder );

    NamespaceRegistry getNamespaceRegistry();
}
and here is the DateTimeFactory interface, which adds methods for creating DateTime values for the current time as well as for specific instants in time:
public interface DateTimeFactory extends ValueFactory<DateTime> {

    /**
     * Create a date-time instance for the current time in the local time zone.
     */
    DateTime create();

    /**
     * Create a date-time instance for the current time in UTC.
     */
    DateTime createUtc();

    DateTime create( DateTime original, long offsetInMillis );
    DateTime create( int year, int monthOfYear, int dayOfMonth,
                     int hourOfDay, int minuteOfHour, int secondOfMinute, int millisecondsOfSecond );
    DateTime create( int year, int monthOfYear, int dayOfMonth,
                     int hourOfDay, int minuteOfHour, int secondOfMinute, int millisecondsOfSecond,
                     int timeZoneOffsetHours );
    DateTime create(	int year, int monthOfYear, int dayOfMonth,
                     int hourOfDay, int minuteOfHour, int secondOfMinute, int millisecondsOfSecond,
                     int timeZoneOffsetHours, String timeZoneId );
}
The PathFactory interface defines methods for creating relative and absolute Path objects using combinations of other Path objects and Names and Path.Segments, and introduces methods for creating Path.Segment objects:
public interface PathFactory extends ValueFactory<Path> {

    Path createRootPath();
    Path createAbsolutePath( Name... segmentNames );
    Path createAbsolutePath( Path.Segment... segments );
    Path createAbsolutePath( <Path.Segment> segments );

    Path createRelativePath();
    Path createRelativePath( Name... segmentNames );
    Path createRelativePath( Path.Segment... segments );
    Path createRelativePath( <Path.Segment> segments );

    Path create( Path parentPath, Path childPath );
    Path create( Path parentPath, Name segmentName, int index );
    Path create( Path parentPath, String segmentName, int index );
    Path create( Path parentPath, Name... segmentNames );
    Path create( Path parentPath, Path.Segment... segments );
    Path create( Path parentPath, <Path.Segment> segments );
    Path create( Path parentPath, String subpath );

    Path.Segment createSegment( String segmentName );
    Path.Segment createSegment( String segmentName, TextDecoder decoder );
    Path.Segment createSegment( String segmentName, int index );
    Path.Segment createSegment( Name segmentName );
    Path.Segment createSegment( Name segmentName, int index );
}
And finally, the BinaryFactory defines methods for creating Binary objects from a variety of binary formats, as well as a method that looks for a cached Binary instance given the supplied secure hash:
public interface BinaryFactory extends ValueFactory<Binary> {

    /**
     * Create a value from the binary content given by the supplied input, the approximate length,
     * and the SHA-1 secure hash of the content. If the secure hash is null, then a secure hash is
     * computed from the content. If the secure hash is not null, it is assumed to be the hash for
     * the content and may not be checked.
     */
    Binary create( InputStream stream, long approximateLength, byte[] secureHash )
                          throws ValueFormatException, IoException;
    Binary create( Reader reader, long approximateLength, byte[] secureHash )
                          throws ValueFormatException, IoException;

    /**
     * Create a binary value from the given file.
     */
    Binary create( File file ) throws ValueFormatException, IoException;

    /**
     * Find an existing binary value given the supplied secure hash. If no such binary value exists,
     * null is returned. This method can be used when the caller knows the secure hash (e.g., from
     * a previously-held Binary object), and would like to reuse an existing binary value
     * (if possible) rather than recreate the binary value by processing the stream contents. This is
     * especially true when the size of the binary is quite large.
     *
     * @param secureHash the secure hash of the binary content, which was probably obtained from a
     *        previously-held Binary object; a null or empty value is allowed, but will always
     *        result in returning null
     * @return the existing Binary value that has the same secure hash, or null if there is no
     *        such value available at this time
     */
    Binary find( byte[] secureHash );
}
JBoss DNA provides efficient implementations of all of these interfaces: the ValueFactory interfaces and subinterfaces;
the Path, Path.Segment, Name, Binary, DateTime, and interfaces; and the ValueFactories interface
return by the ExecutionContext. In fact, some of these interfaces have multiple implementations that are optimized for
specific but frequently-occurring conditions.
As shown above, the Name, Path.Segment, Path, and Property interfaces all extend the Readable interface,
which defines a number of getString(...) methods that can produce a (readable) string representation of
of that object. Recall that all of these objects contain names with namespace URIs and local names (consisting of any
characters), and so obtaining a readable string representation will require converting the URIs to prefixes,
escaping certain characters in the local names, and formatting the prefix and escaped local name appropriately.
The different getString(...) methods of the Readable interface accept various combinations
of NamespaceRegistry and TextEncoder parameters:
@Immutable
public interface Readable {

    /**
     * Get the string form of the object. A default encoder is used to encode characters.
     * @return the encoded string
     */
    public String getString();

    /**
     * Get the encoded string form of the object, using the supplied encoder to encode characters.
     * @param encoder the encoder to use, or null if the default encoder should be used
     * @return the encoded string
     */
    public String getString( TextEncoder encoder );

    /**
     * Get the string form of the object, using the supplied namespace registry to convert any
     * namespace URIs to prefixes. A default encoder is used to encode characters.
     * @param namespaceRegistry the namespace registry that should be used to obtain the prefix
     *        for any namespace URIs
     * @return the encoded string
     * @throws IllegalArgumentException if the namespace registry is null
     */
    public String getString( NamespaceRegistry namespaceRegistry );

    /**
     * Get the encoded string form of the object, using the supplied namespace registry to convert
     * the any namespace URIs to prefixes.
     * @param namespaceRegistry the namespace registry that should be used to obtain the prefix for
     *        the namespace URIs
     * @param encoder the encoder to use, or null if the default encoder should be used
     * @return the encoded string
     * @throws IllegalArgumentException if the namespace registry is null
     */
    public String getString( NamespaceRegistry namespaceRegistry,
                             TextEncoder encoder );

    /**
     * Get the encoded string form of the object, using the supplied namespace registry to convert
     * the names' namespace URIs to prefixes and the supplied encoder to encode characters, and using
     * the second delimiter to encode (or convert) the delimiter used between the namespace prefix
     * and the local part of any names.
     * @param namespaceRegistry the namespace registry that should be used to obtain the prefix
     *        for the namespace URIs in the names
     * @param encoder the encoder to use for encoding the local part and namespace prefix of any names,
     *        or null if the default encoder should be used
     * @param delimiterEncoder the encoder to use for encoding the delimiter between the local part
     *        and namespace prefix of any names, or null if the standard delimiter should be used
     * @return the encoded string
     */
    public String getString( NamespaceRegistry namespaceRegistry,
                             TextEncoder encoder, TextEncoder delimiterEncoder );
}
We've seen the NamespaceRegistry in the previous chapter, but we've haven't yet talked about the TextEncoder interface. A TextEncoder merely does what you'd expect: it encodes the characters in a string using some implementation-specific algorithm. JBoss DNA provides a number of TextEncoder implementations, including:
The
Jsr283Encoderescapes characters that are not allowed in JCR names, per the JSR-283 specification. Specifically, these are the '*', '/', ':', '[', ']', and '|' characters, which are escaped by replacing them with the Unicode characters U+F02A, U+F02F, U+F03A, U+F05B, U+F05D, and U+F07C, respectively.The
NoOpEncoderdoes no conversion.The
UrlEncoderconverts text to be used within the different parts of a URL, as defined by Section 2.3 of RFC 2396. Note that this class does not encode a complete URL (sincejava.net.URLEncoderandjava.net.URLDecodershould be used for such purposes).The
XmlNameEncoderconverts any UTF-16 unicode character that is not a valid XML name character according to the World Wide Web Consortium (W3C) Extensible Markup Language (XML) 1.0 (Fourth Edition) Recommendation, escaping such characters as_xHHHH_, whereHHHHstands for the four-digit hexadecimal UTF-16 unicode value for the character in the most significant bit first order. For example, the name "Customer_ID" is encoded as "Customer_x0020_ID".The
XmlValueEncoderescapes characters that are not allowed in XML values. Specifically, these are the '&', '<', '>', '"', and ''', which are all escaped to "&", '<', '>', '"', and '''.
All of these classes also implement the TextDecoder interface, which defines a method that decodes an encoded string using the opposite transformation.
Of course, you can provide alternative implementations, and supply them to the appropriate getString(...) methods
as required.
In addition to Path objects, nodes can be identified by one or more identification properties.
These really are just Property instances with names that have a special meaning
(usually to connectors).
JBoss DNA also defines a Location class that encapsulates:
So, when a client knows the path and/or the identification properties, they can create a Location object
and then use that to identify the node. Location is a class that can be instantiated through factory
methods on the class:
public abstract classLocationimplements <Property>, Comparable<Location> { public staticLocationcreate( Path path ) { ... } public staticLocationcreate(UUIDuuid ) { ... } public staticLocationcreate( Path path,UUIDuuid ) { ... } public staticLocationcreate( Path path, Property idProperty ) { ... } public staticLocationcreate( Path path, Property firstIdProperty, Property... remainingIdProperties ) { ... } public staticLocationcreate( Path path, <Property idProperties ) { ... } public staticLocationcreate( Property idProperty ) { ... } public staticLocationcreate( Property firstIdProperty, Property... remainingIdProperties ) { ... } public staticLocationcreate( <Property> idProperties ) { ... } public staticLocationcreate( List<Property> idProperties ) { ... } ... }
Like many of the other classes and interfaces, Location is immutable and cannot be changed once created.
However, there are methods on the class to create a copy of the Location object with a different Path,
a different UUID, or different identification properties:
public abstract classLocationimplements <Property>, Comparable<Location> { ... publicLocationwith( Property newIdProperty ); publicLocationwith( Path newPath ); publicLocationwith(UUIDuuid ); ... }
One more thing about locations: we'll see later in the next chapter how they are used to make requests
to the connectors. When creating the requests, clients usually have an
incomplete location (e.g., a path but no identification properties). When processing the requests, connectors
provide an actual location that contains the path and all identification properties.
If actual Location objects are then reused in subsequent requests by the client, the connectors will have the benefit of having
both the path and identification properties and may be able to more efficiently locate the identified node.
JBoss DNA's Graph API was designed as a lightweight public API for working with graph information.
The Graph class is the primary class in API, and each instance represents a single, independent
view of a single graph. Graph instances don't maintain state, so every request (or batch of requests) operate against
the underlying graph and the return immutable snapshots of the requested state at the time
the request was made.
There are several ways to obtain a Graph instance, as we'll see in later chapters. For the time being, the important
thing to understand is what a Graph instance represents and how it interacts with the underlying content to return
representations of portions of that underlying graph content.
The Graph class basically represents an internal domain specific language (DSL),
designed to be easy to use in an application.
The Graph API makes extensive use of interfaces and method chaining, so that methods return a concise interface that has only those
methods that make sense at that point. In fact, this should be really easy if your IDE has code completion.
Just remember that under the covers, a Graph is just building Request objects, submitting them to the connector,
and then exposing the results.
The next few subsections describe how to use a Graph instance.
JBoss DNA graphs have the notion of workspaces that provide different views of the content. Some graphs may have one workspace, while others may have multiple workspaces. Some graphs will allow a client to create new workspaces or destroy existing workspaces, while other graphs will not allow adding or removing workspaces. Some graphs may have workspaces may show the same (or very similar) content, while other graphs may have workspaces that each contain completely independent content.
The Graph object is always bound to a workspace, which initially is the default workspace. To find out
what the name of the default workspace is, simply ask for the current workspace after creating the Graph:
Workspace current = graph.getCurrentWorkspace();
To obtain the list of workspaces available in a graph, simply ask for them:
Set<String> workspaceNames = graph.getWorkspaces();
Once you know the name of a particular workspace, you can specify that the graph should use it:
graph.useWorkspace("myWorkspace");
From this point forward, all requests will apply to the workspace named "myWorkspace". At any time, you can use a different workspace, which will affect all subsequent requests made using the graph. To go back to the default workspace, simply supply a null name:
graph.useWorkspace(null);
Of course, creating a new workspace is just as easy:
graph.createWorkspace().named("newWorkspace");
This will attempt to create a workspace named "newWorkspace", which will fail if that workspace already exists. You may want to create a new workspace with a name that should be altered if the name you supply is already used. The following code shows how you can do this:
graph.createWorkspace().namedSomethingLike("newWorkspace");
If there is no existing workspace named "newWorkspace", a new one will be created with this name. However, if "newWorkspace" already exists, this call will create a workspace with a name that is some alteration of the supplied name.
You can also clone workspaces, too:
graph.createWorkspace().clonedFrom("original").named("something");
or
graph.createWorkspace().clonedFrom("original").namedSomethingLike("something");
As you can see, it's very easy to specify which workspace you want to use or to create new workspaces. You can also find out which workspace the graph is currently using:
String current = graph.getCurrentWorkspaceName();
or, if you want, you can get more information about the workspace:
Workspace current = graph.getCurrentWorkspace();
String name = current.getName();
Location rootLocation = current.getRoot();
Now let's switch to working with nodes. This first example returns a map of properties (keyed by property name) for a node at a specific Path:
Path path = ...
Map<Name,Property> propertiesByName = graph.getPropertiesByName().on(path);
This next example shows how the graph can be used to obtain and loop over the properties of a node:
Path path = ...
for ( Property property : graph.getProperties().on(path) ) {
	  ...
}
Likewise, the next example shows how the graph can be used to obtain and loop over the children of a node:
Path path = ...
for ( Location child : graph.getChildren().of(path) ) {
    Path childPath = child.getPath();
	  ...
}
Notice that the examples pass a Path instance to the on(...) and of(...) methods. Many
of the Graph API methods take a variety of parameter types, including String, Paths, Locations, UUID, or Property parameters.
This should make it easy to use in many different situations.
Of course, changing content is more interesting and offers more interesting possibilities. Here are a few examples:
Path path = ...Locationlocation = ... Property idProp1 = ... Property idProp2 = ...UUIDuuid = ... graph.move(path).into(idProp1, idProp2); graph.copy(path).into(location); graph.delete(uuid); graph.delete(idProp1,idProp2);
The methods shown above work immediately, as soon as each request is built. However, there is another way to use
the Graph object, and that is in a batch mode. Simply create a Graph.Batch object using the
batch() method, create the requests on that batch object, and then execute all of the commands on the
batch by calling its execute() method. That execute() method returns a Results interface
that can be used to read the node information retrieved by the batched requests.
Method chaining works really well with the batch mode, since multiple commands can be assembled together very easily:
Path path = ... String path2 = ...Locationlocation = ... Property idProp1 = ... Property idProp2 = ...UUIDuuid = ... graph.batch().move(path).into(idProp1, idProp2) .and().copy(path2).into(location) .and().delete(uuid) .execute(); Results results = graph.batch().read(path2) .and().readChildren().of(idProp1,idProp2) .and().readSugraphOfDepth(3).at(uuid2) .execute(); for (Locationchild : results.getNode(path2) ) { ... }
Of course, this section provided just a hint of the Graph API.
The Graph interface is actually quite complete and offers a full-featured approach for reading and updating a graph.
For more information, see the Graph JavaDocs.
JBoss DNA Graph objects operate upon the underlying graph content, but we haven't really talked about how that works.
Recall that the Graph objects don't maintain any stateful representation of the content, but instead submit requests
to the underlying graph and return representations of the requested portions of the content.
This section focuses on what those requests look like, since they'll actually become very important when
working with connectors in the next chapter.
A graph Request is an encapsulation of a command that is to be executed by the underlying graph owner (typically
a connector). Request objects can take many different forms, as there are different classes for each kind of request.
Each request contains the information needed to complete the processing, and it also is the place
where the results (or error) are recorded.
The Graph object creates the Request objects using Location objects to identify the node (or nodes) that are the
subject of the request. The Graph can either submit the request immediately, or it can batch multiple requests
together into "units of work". The submitted requests are then processed by the underlying system (e.g., connector)
and returned back to the Graph object, which then extracts and returns the results.
There are actually quite a few different types of Request classes:
Table 5.1. Types of Read Requests
| Name | Description |
|---|---|
| ReadNodeRequest |
A request to read from the named workspace in the source a node's properties and children.
The node may be specified by path and/or by identification properties.
The connector returns all properties and the locations for all children,
or sets a PathNotFoundException error on the request if the node did not exist in the workspace.
If the node is found, the connector sets on the request the actual location of the node (including the path and identification properties).
The connector sets a InvalidWorkspaceException error on the request if the named workspace does not exist.
|
| VerifyNodeExistsRequest |
A request to verify the existance of a node at the specified location in the named workspace of the source.
The connector returns all the actual location for the node if it exists, or
sets a PathNotFoundException error on the request if the node does not exist in the workspace.
The connector sets a InvalidWorkspaceException error on the request if the named workspace does not exist.
|
| ReadAllPropertiesRequest |
A request to read from the named workspace in the source all of the properties of a node.
The node may be specified by path and/or by identification properties.
The connector returns all properties that were found on the node,
or sets a PathNotFoundException error on the request if the node did not exist in the workspace.
If the node is found, the connector sets on the request the actual location of the node (including the path and identification properties).
The connector sets a InvalidWorkspaceException error on the request if the named workspace does not exist.
|
| ReadPropertyRequest |
A request to read from the named workspace in the source a single property of a node.
The node may be specified by path and/or by identification properties,
and the property is specified by name.
The connector returns the property if found on the node,
or sets a PathNotFoundException error on the request if the node or property did not exist in the workspace.
If the node is found, the connector sets on the request the actual location of the node (including the path and identification properties).
The connector sets a InvalidWorkspaceException error on the request if the named workspace does not exist.
|
| ReadAllChildrenRequest |
A request to read from the named workspace in the source all of the children of a node.
The node may be specified by path and/or by identification properties.
The connector returns an ordered list of locations for each child found on the node,
an empty list if the node had no children,
or sets a PathNotFoundException error on the request if the node did not exist in the workspace.
If the node is found, the connector sets on the request the actual location of the parent node (including the path and identification properties).
The connector sets a InvalidWorkspaceException error on the request if the named workspace does not exist.
|
| ReadBlockOfChildrenRequest |
A request to read from the named workspace in the source a block of children of a node, starting with the nth children.
This is designed to allow paging through the children, which is much more efficient for large numbers of children.
The node may be specified by path and/or by identification properties, and the block
is defined by a starting index and a count (i.e., the block size).
The connector returns an ordered list of locations for each of the node's children found in the block,
or an empty list if there are no children in that range.
The connector also sets on the request the actual location of the parent node (including the path and identification properties)
or sets a PathNotFoundException error on the request if the parent node did not exist in the workspace.
The connector sets a InvalidWorkspaceException error on the request if the named workspace does not exist.
|
| ReadNextBlockOfChildrenRequest |
A request to read from the named workspace in the source a block of children of a node, starting with the children that immediately follow
a previously-returned child.
This is designed to allow paging through the children, which is much more efficient for large numbers of children.
The node may be specified by path and/or by identification properties, and the block
is defined by the location of the node immediately preceding the block and a count (i.e., the block size).
The connector returns an ordered list of locations for each of the node's children found in the block,
or an empty list if there are no children in that range.
The connector also sets on the request the actual location of the parent node (including the path and identification properties)
or sets a PathNotFoundException error on the request if the parent node did not exist in the workspace.
The connector sets a InvalidWorkspaceException error on the request if the named workspace does not exist.
|
| ReadBranchRequest |
A request to read a portion of a subgraph that has as its root a particular node, up to a maximum depth.
This request is an efficient mechanism when a branch (or part of a branch) is to be navigated and processed,
and replaces some non-trivial code to read the branch iteratively using multiple ReadNodeRequests.
The connector reads the branch to the specified maximum depth, returning the properties and children for all
nodes found in the branch.
The connector also sets on the request the actual location of the branch's root node (including the path and identification properties).
The connector sets a PathNotFoundException error on the request if the node at
the top of the branch does not exist in the workspace.
The connector sets a InvalidWorkspaceException error on the request if the named workspace does not exist.
|
ChangeRequest is a subclass of Request that provides a base class for all the requests that request a change
be made to the content. As we'll see later, these ChangeRequest objects also get reused by the
observation system.
Table 5.2. Types of Change Requests
| Name | Description |
|---|---|
| CreateNodeRequest |
A request to create a node at the specified location and setting on the new node the properties included in the request.
The connector creates the node at the desired location, adjusting any same-name-sibling indexes as required.
(If an SNS index is provided in the new node's location, existing children with the same name after that SNS index
will have their SNS indexes adjusted. However, if the requested location does not include a SNS index, the new
node is added after all existing children, and it's SNS index is set accordingly.)
The connector also sets on the request the actual location of the new node (including the path and identification properties)..
The connector sets a PathNotFoundException error on the request if the parent node does not exist in the workspace.
The connector sets a InvalidWorkspaceException error on the request if the named workspace does not exist.
|
| RemovePropertiesRequest |
A request to remove a set of properties on an existing node. The request contains the location of the node as well as the
names of the properties to be removed. The connector performs these changes and sets on the request the
actual location (including the path and identification properties) of the node.
The connector sets a PathNotFoundException error on the request if the node does not exist in the workspace.
The connector sets a InvalidWorkspaceException error on the request if the named workspace does not exist.
|
| UpdatePropertiesRequest |
A request to set or update properties on an existing node. The request contains the location of the node as well as the
properties to be set and those to be deleted. The connector performs these changes and sets on the request the
actual location (including the path and identification properties) of the node.
The connector sets a PathNotFoundException error on the request if the node does not exist in the workspace.
The connector sets a InvalidWorkspaceException error on the request if the named workspace does not exist.
|
| RenameNodeRequest |
A request to change the name of a node. The connector changes the node's name, adjusts all SNS indexes
accordingly, and returns the actual locations (including the path and identification properties) of both the original
location and the new location.
The connector sets a PathNotFoundException error on the request if the node does not exist in the workspace.
The connector sets a InvalidWorkspaceException error on the request if the named workspace does not exist.
|
| CopyBranchRequest |
A request to copy a portion of a subgraph that has as its root a particular node, up to a maximum depth.
The request includes the name of the workspace where the original node is located as well as the name of the
workspace where the copy is to be placed (these may be the same, but may be different).
The connector copies the branch from the original location, up to the specified maximum depth, and places a copy
of the node as a child of the new location.
The connector also sets on the request the actual location (including the path and identification properties)
of the original location as well as the location of the new copy.
The connector sets a PathNotFoundException error on the request if the node at
the top of the branch does not exist in the workspace.
The connector sets a InvalidWorkspaceException error on the request if one of the named workspaces does not exist.
|
| MoveBranchRequest |
A request to move a subgraph that has a particular node as its root.
The connector moves the branch from the original location and places it as child of the specified new location.
The connector also sets on the request the actual location (including the path and identification properties)
of the original and new locations. The connector will adjust SNS indexes accordingly.
The connector sets a PathNotFoundException error on the request if the node that is to be moved or the
new location do not exist in the workspace.
The connector sets a InvalidWorkspaceException error on the request if the named workspace does not exist.
|
| DeleteBranchRequest |
A request to delete an entire branch specified by a single node's location.
The connector deletes the specified node and all nodes below it, and sets the actual location,
including the path and identification properties, of the node that was deleted.
The connector sets a PathNotFoundException error on the request if the node being deleted does not exist in the workspace.
The connector sets a InvalidWorkspaceException error on the request if the named workspace does not exist.
|
| CompositeRequest | A request that actually comprises multiple requests (none of which will be a composite). The connector simply processes all of the requests in the composite request, but should set on the composite request any error (usually the first error) that occurs during processing of the contained requests. |
There are also requests that deal with workspaces:
Table 5.3. Types of Workspace Read Requests
| Name | Description |
|---|---|
| GetWorkspacesRequest | A request to obtain the names of the existing workspaces that are accessible to the caller. |
| VerifyWorkspaceRequest | A request to verify that a workspace with a particular name exists. The connector returns the actual location for the root node if the workspace exists, as well as the actual name of the workspace (e.g., the default workspace name if a null name is supplied). |
And there are also requests that deal with changing workspaces (and thus extend ChangeRequest):
Table 5.4. Types of Workspace Change Requests
| Name | Description |
|---|---|
| CreateWorkspaceRequest |
A request to create a workspace with a particular name.
The connector returns the actual location for the root node if the workspace exists, as well as the actual name of the workspace
(e.g., the default workspace name if a null name is supplied).
The connector sets a InvalidWorkspaceException error on the request if the named workspace already exists.
|
| DestroyWorkspaceRequest |
A request to destroy a workspace with a particular name.
The connector sets a InvalidWorkspaceException error on the request if the named workspace does not exist.
|
| CloneWorkspaceRequest |
A request to clone one named workspace as another new named workspace.
The connector sets a InvalidWorkspaceException error on the request if the original workspace does not exist,
or if the new workspace already exists.
|
Although there are over a dozen different kinds of requests, we do anticipate adding more in future releases.
For example, DNA will likely support searching repository content in sources through an additional subclass of Request.
Getting the version history for a node will likely be another kind of request added in an upcoming release.
This section covered the different kinds of Request classes. The next section provides a easy way to encapsulate how
a component should responds to these requests, and after that we'll see how these Request objects are also used
in the observation framework.
JBoss DNA connectors are typically the components that receive these Request objects. We'll dive deep into connectors
in the next chapter, but before we do there is one more component related to
Requests that should be discussed.
The RequestProcessor class is an abstract class that defines a process(...) method for each concrete Request subclass.
In other words, there is a process(CompositeRequest) method, a process(ReadNodeRequest) method,
and so on. This makes it easy to implement behavior that responds to the different kinds of Request classes:
simply subclass the RequestProcessor, override all of the abstract methods, and optionally
overriding any of the other methods that have a default implementation.
Note
The RequestProcessor abstract class contains default implementations for quite a few of the process(...) methods,
and these will be sufficient but probably not efficient or optimum. If you can provide a more efficient
implementation given your source, feel free to do so. However, if performance is not a big issue, all of the concrete methods
will provide the correct behavior. Keep things simple to start out - you can always provide better implementations later.
The JBoss DNA graph model also incorporates an observation framework that allows components to register and be notified when changes occur within the content owned by a graph.
Many event frameworks define the listeners and sources as interfaces. While this is often useful, it requires
the implementations properly address the thread-safe semantics of managing and calling the listeners.
The JBoss DNA observation framework uses abstract or concrete classes to minimize the effort required for implementing
ChangeObserver or Observable. These abstract classes provide implementations for a number of
utility methods (such as the unregister() method on ChangeObserver) that
also save effort and code.
However, one of the more important reasons for providing classes is that ChangeObserver uses
weak references to track the Observable instances, and the ChangeObservers
class uses weak references for the listeners. This means that an observer does not prevent Observable instances
from being garbage collected, nor do observers prevent Observable instances from being garbage collected.
These abstract class provide all this functionality for free.
Any component that can have changes and be observed can implement the Observable interface. This interface
allows to register (or be registered) to receive notifications of the changes. However, a concrete and thread-safe
implementation of this interface, called ChangeObservers, is available and should be used where possible, since it
automatically manages the registered ChangeObserver instances and properly implements the register and unregister mechanisms.
Components that are to recieve notifications of changes are called observers. To create an observer, simply extend
the ChangeObserver abstract class and provide an implementation of the notify( method.
Then, register the observer with an Observable using its Changes)register( method.
The observer's ChangeObserver)notify( method will then be called with the changes that have
been made to the Observable.
Changes)
When an observer is no longer needed, it should be unregistered from all Observable instances with which
it was registered. The ChangeObserver class automatically tracks which Observable instances it is
registered with, and calling the observer's unregister() will unregister the observer from
all of these Observables. Alternatively, an observer can be unregistered from a single Observable using the
Observable's unregister( method.
ChangeObserver)
The Changes class represents the set of individual changes that have been made during a single, atomic
operation. Each Changes instance has information about the source of the changes, the timestamp at which
the changes occurred, and the individual changes that were made. These individual changes take the form of
ChangeRequest objects, which we'll see more of in the next chapter. Each request is
frozen, meaning it is immutable and will not change. Also none of the change requests will be marked as cancelled.
Using the actual ChangeRequest objects as the "events" has a number of advantages.
First, the existing ChangeRequest subclasses already contain the information to accurately and completely
describe the operation. Reusing these classes means we don't need a duplicate class structure or come up with a generic
event class.
Second, the requests have all the state required for an event, plus they often will have more. For example,
the DeleteBranchRequest has the actual location of the branch that was deleted (and in this way is not much different than
a more generic event), but the CreateNodeRequest has the actual location of the created node along with the properties
of that node. Additionally, the RemovePropertyRequest has the actual location of the node along with the name of the property
that was removed. In many cases, these requests have all the information a more general event class might have but
then hopefully enough information for many observers to use directly without having to read the graph to decide what
actually changed.
Third, the requests that make up a Changes instance can actually be replayed. Consider the case of a cache
that is backed by a RepositorySource, which might use an observer to keep the cache in sync.
As the cache is notified of Changes, the cache can simply replay the changes against its source.
As we'll see in the next chapter, each connector is responsible for propagating
the ChangeRequest objects to the connector's Observer. But that's not the only use of .
We'll also see later how the sequencing system uses to monitor
for changes in the graph content to determine which, if any, sequencers should be run. And, the
JCR implementation also uses the observation framework to propagate those changes
to JCR clients.
In this chapter, we introduced JBoss DNA's graph model and showed the different kinds of objects used to represent nodes, paths, names, and properties. We saw how all of these objects are actually immutable, and how the low-level Graph API uses this characteristic to provide a stateless and thread-safe interface for working with repository content using the request model used to read, update, and change content.
Next, we'll dive into the connector framework, which builds on top of the graph model and request model, allowing JBoss DNA to access the graph content stored in many different kinds of systems.
There is a lot of information stored in many of different places: databases, repositories, SCM systems, registries, file systems, services, etc. The purpose of the federation engine is to allow applications to use the JCR API to access that information as if it were all stored in a single JCR repository, but to really leave the information where it is.
Why not just copy or move the information into a JCR repository? Moving it is probably pretty difficult, since most likely there are existing applications that rely upon that information being where it is. All of those applications would break or have to change. And copying the information means that we'd have to continually synchronize the changes. This not only is a lot of work, but it often makes it difficult to know whether information is accurate and "the master" data.
JBoss DNA lets us leave information where it, yet access it through the JCR API as if it were in one big repository. One major benefit is that existing applications that use the information in the original locations don't break, since they can keep using the information. But now our JCR clients can also access all the information, too. And if our federating JBoss DNA repository is configured to allow updates, JCR client applications can change the information in the repository and JBoss DNA will propagate those changes down to the original source, making those changes visible to all the other applications.
In short, all clients see the correct information, even when it changes in the underlying systems. But the JCR clients can get to all of the information in one spot, using one powerful standard API.
With JBoss DNA, your applications use the JCR API to work with the repository, but the DNA repository transparently fetches the information from different kinds of repositories and storage systems, not just a single purpose-built store. This is fundamentally what makes JBoss DNA different.
How does JBoss DNA do this? At the heart of JBoss DNA and it's JCR implementation is a simple graph-based connector system. Essentially, JBoss DNA's JCR implementation uses a single connector to access all content:

That single connector could use an in-memory repository, a JBoss Cache instance (including those that are clustered and replicated),
or a federated repository where content from multiple sources is unified.
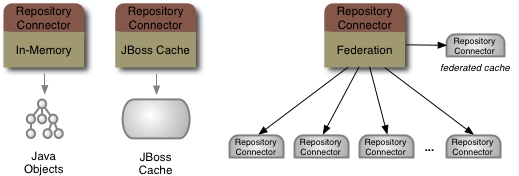
Really, the federated connector gives us all kinds of possibilities, since we can use that connector on top of lots of connectors
to other individual sources. This simple connector architecture is fundamentally what makes JBoss DNA so powerful and flexible.
Along with a good library of connectors, which is what we're planning to create.
For instance, we want to build a connector to other JCR repositories, and another that accesses the local file system. We've already started on a Subversion connector, which will allow JCR to access the files in a SVN repository (and perhaps push changes into SVN through a commit). And of course we want to create a connector that accesses data and metadata from relational databases. For more information, check out our roadmap. Of course, if we don't have a connector to suit your needs, you can write your own.
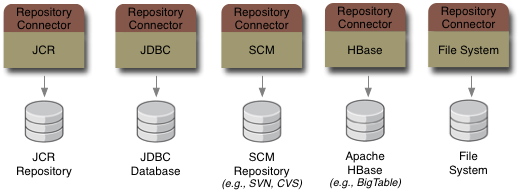
It's even possible to put a different API layer on top of the connectors. For example, the new New I/O (JSR-203) API offers the opportunity to build new file system providers. This would be very straightforward to put on top of a JCR implementation, but it could be made even simpler by putting it on top of a DNA connector. In both cases, it'd be a trivial mapping from nodes that represent files and folders into JSR-203 files and directories, and events on those nodes could easily be translated into JSR-203 watch events. Then, simply choose a DNA connector and configure it to use the source you want to use.
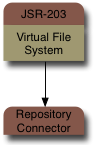
Before we go further, let's define some terminology regarding connectors.
A connector is the runnable code packaged in one or more JAR files that contains implementations of several interfaces (described below). A Java developer writes a connector to a type of source, such as a particular database management system, LDAP directory, source code management system, etc. It is then packaged into one or more JAR files (including dependent JARs) and deployed for use in applications that use JBoss DNA repositories.
The description of a particular source system (e.g., the "Customer" database, or the company LDAP system) is called a repository source. JBoss DNA defines a RepositorySource interface that defines methods describing the behavior and supported features and a method for establishing connections. A connector will have a class that implements this interface and that has JavaBean properties for all of the connector-specific properties required to fully describe an instance of the system. Use of JavaBean properties is not required, but it is highly recommended, as it enables reflective configuration and administration. Applications that use JBoss DNA create an instance of the connector's RepositorySource implementation and set the properties for the external source that the application wants to access with that connector.
A repository source instance is then used to establish connections to that source. A connector provides an implementation of the RepositoryConnection interface, which defines methods for interacting with the external system. In particular, the
execute(...)method takes anExecutionContextinstance and aRequestobject. TheExecutionContextobject defines the environment in which the processing is occurring, while theRequestobject describes the requested operations on the content, with different concrete subclasses representing each type of activity. Examples of commands include (but not limited to) getting a node, moving a node, creating a node, changing a node, and deleting a node. And, if the repository source is able to participate in JTA/JTS distributed transactions, then the RepositoryConnection must implement thegetXaResource()method by returning a validjavax.transaction.xa.XAResourceobject that can be used by the transaction monitor.
As an example, consider that we want JBoss DNA to give us access through JCR to the schema information contained in a
relational databases. We first have to develop a connector that allows us to interact with relational databases using JDBC.
That connector would contain a JdbcRepositorySource Java class that implements RepositorySource,
and that has all of the various JavaBean properties for setting the name of the driver class, URL, username, password,
and other properties. (Or we might have a JavaBean property that defines the JNDI name where we can find a JDBC
DataSource instance pointing to our JDBC database.)
Our new connector would also have a JdbcRepositoryConnection Java class that implements the
RepositoryConnection interface. This class would probably wrap a JDBC database connection,
and would implement the execute(...) method such that the nodes exposed by the connector
describe the database schema of the database. For example, the connector might represent each database table
as a node with the table's name, with properties that describe the table (e.g., the description, whether it's a
temporary table), and with child nodes that represent each of the columns, keys and constraints.
To use our connector in an application that uses JBoss DNA, we need to create an instance of the
JdbcRepositorySource for each database instance that we want to access. If we have 3 MySQL databases,
9 Oracle databases, and 4 PostgreSQL databases, then we'd need to create a total of 16 JdbcRepositorySource
instances, each with the properties describing a single database instance. Those sources are then available for use by
JBoss DNA components, including the JCR implementation.
So, we've so far learned what a connector is and how they're used to establish connections to the underlying sources and access the content in those sources. Next we'll show how connectors expose the notion of workspaces, and describe how to create your own connectors.
A number of connectors are already available in JBoss DNA, and are outlined in detail later in the document. Note that we do want to build more connectors in the upcoming releases.
There may come a time when you want to tackle creating your own connector. Maybe the connectors we provide out-of-the-box don't work with your source. Maybe you want to use a different cache system. Maybe you have a system that you want to make available through a JBoss DNA repository. Or, maybe you're a contributor and want to help us round out our library with a new connector. No matter what the reason, creating a new connector is pretty straightforward, as we'll see in this section.
Creating a custom connector involves the following steps:
Create a Maven 2 project for your connector;
Implement the RepositorySource interface, using JavaBean properties for each bit of information the implementation will need to establish a connection to the source system.
Then, implement the RepositoryConnection interface with a class that represents a connection to the source. The
execute(method should process any and all requests that may come down the pike, and the results of each request can be put directly on that request.ExecutionContext,Request)Don't forget unit tests that verify that the connector is doing what it's expected to do. (If you'll be committing the connector code to the JBoss DNA project, please ensure that the unit tests can be run by others that may not have access to the source system. In this case, consider writing integration tests that can be easily configured to use different sources in different environments, and try to make the failure messages clear when the tests can't connect to the underlying source.)
Configure JBoss DNA to use your connector. This may involve just registering the source with the
RepositoryService, or it may involve adding a source to a configuration repository used by the federated repository.Deploy the JAR file with your connector (as well as any dependencies), and make them available to JBoss DNA in your application.
Let's go through each one of these steps in more detail.
The first step is to create the Maven 2 project that you can use to compile your code and build the JARs. Maven 2 automates a lot of the work, and since you're already set up to use Maven, using Maven for your project will save you a lot of time and effort. Of course, you don't have to use Maven 2, but then you'll have to get the required libraries and manage the compiling and building process yourself.
Note
JBoss DNA may provide in the future a Maven archetype for creating connector projects. If you'd find this useful and would like to help create it, please join the community.
In lieu of a Maven archetype, you may find it easier to start with a small existing connector project. The dna-connector-filesystem project is small, but it may be tough to separate the stuff that every connector needs from the extra code and data structures that manage the content. See the subversion repository: http://anonsvn.jboss.org/repos/dna/trunk/extensions/dna-connector-filesystem/
You can create your Maven project any way you'd like. For examples, see the
Maven 2 documentation.
Once you've done that, just add the dependencies in your project's pom.xml dependencies section:
<dependency>

  <groupId>org.jboss.dna</groupId>

  <artifactId>dna-graph</artifactId>

  <version>0.5</version>

</dependency>
This is the only dependency required for compiling a connector - Maven pulls in all of the dependencies needed by the 'dna-graph' artifact. Of course, you'll still have to add dependencies for any library your connector needs to talk to its underlying system.
As for testing, you probably will want to add more dependencies, such as those listed here:
<!-- DNA-related unit testing utilities and classes -->

<dependency>

  <groupId>org.jboss.dna</groupId>

  <artifactId>dna-graph</artifactId>

  <version>0.5</version>

  <type>test-jar</type>

  <scope>test</scope>

</dependency>

<dependency>

  <groupId>org.jboss.dna</groupId>

  <artifactId>dna-common</artifactId>

  <version>0.5</version>

  <type>test-jar</type>

  <scope>test</scope>

</dependency>

<!-- Unit testing -->

<dependency>

  <groupId>junit</groupId>

  <artifactId>junit</artifactId>

  <version>4.4</version>

  <scope>test</scope>

</dependency>

<dependency>

  <groupId>org.hamcrest</groupId>

  <artifactId>hamcrest-library</artifactId>

  <version>1.1</version>

  <scope>test</scope>

</dependency>

<!-- Logging with Log4J -->

<dependency>

  <groupId>org.slf4j</groupId>

  <artifactId>slf4j-log4j12</artifactId>

  <version>1.4.3</version>

  <scope>test</scope>

</dependency>

<dependency>

  <groupId>log4j</groupId>

  <artifactId>log4j</artifactId>

  <version>1.2.14</version>

  <scope>test</scope>

</dependency>
Testing JBoss DNA connectors does not require a JCR repository or the JBoss DNA services. (For more detail,
see the testing section.) However, if you want to do
integration testing with a JCR repository and the JBoss DNA services, you'll need additional dependencies
(e.g., dna-repository and any other extensions).
At this point, your project should be set up correctly, and you're ready to move on to writing the Java implementation for your connector.
As mentioned earlier, a connector consists of the Java code that is used to access content from a system. Perhaps the most important class that makes up a connector is the implementation of the RepositorySource. This class is analogous to JDBC's DataSource in that it is instantiated to represent a single instance of a system that will be accessed, and it contains enough information (in the form of JavaBean properties) so that it can create connections to the source.
Why is the RepositorySource implementation a JavaBean? Well, this is the class that is instantiated, usually reflectively, and so a no-arg constructor is required. Using JavaBean properties makes it possible to reflect upon the object's class to determine the properties that can be set (using setters) and read (using getters). This means that an administrative application can instantiate, configure, and manage the objects that represent the actual sources, without having to know anything about the actual implementation.
So, your connector will need a public class that implements RepositorySource and provides JavaBean properties for any kind of inputs or options required to establish a connection to and interact with the underlying source. Most of the semantics of the class are defined by the RepositorySource and inherited interface. However, there are a few characteristics that are worth mentioning here.
The previous chapter talked about how connector expose their information through the graph language of JBoss DNA. This is true, except that we didn't dive into too much of the detail. JBoss DNA graphs have the notion of workspaces in which the content appears, and its very easy for clients using the graph to switch between workspaces. In fact, workspaces differ from each other in that they provide different views of the same information.
Consider a source control system, like SVN or CVS. These systems provide different views of the source code: a mainline development branch as well as other branches (or tags) commonly used for releases. So, just like one source file might appear in the mainline branch as well as the previous two release branches, a node in a repository source might appear in multiple workspaces.
However, each connector can kind of decide how (or whether) it uses workspaces. For example, there may be no overlap in the content between workspaces. Or a connector might only expose a single workspace (in other words, there's only one "default" workspace).
When your RepositorySource instance is put into the library within a running JBoss DNA system,
the initialize(RepositoryContext) method will be called on the instance.
The supplied RepositoryContext object represents the context in which the RepositorySource
is running, and provides access to an ExecutionContext, a RepositoryConnectionFactory that can be used
to obtain connections to other sources, and an Observer of your source that should be called with
events describing the Changes being made within the source, either as a result of ChangeRequest operations being
performed on this source, or as a result of operations being performed on the content from outside
the source.
Each connector is responsible for determining whether and how long DNA is to cache the content made available by the connector. This is referred to as the caching policy, and consists of a time to live value representing the number of milliseconds that a piece of data may be cached. After the TTL has passed, the information is no longer used.
DNA allows a connector to use a flexible and powerful caching policy. First, each connection returns the
default caching policy for all information returned by that connection.
Often this policy can be configured via properties on the RepositorySource implementation.
This is optional, meaning the connector can return null if it does not wish to
have a default caching policy.
Second, the connector is able to override its default caching policy on individual requests (which we'll cover in the next section). Again, this is optional, meaning that a null caching policy on a request implies that the request has no overridden caching policy.
Third, if the connector has no default caching policy and none is set on the individual requests, DNA uses whatever caching policy is set up for that component using the connector. For example, the federating connector allows a default caching policy to be specified, and this policy is used should the sources being federated not define their own caching policy.
In summary, a connector has total control over whether and for how long the information it provides is cached.
Sometimes it is necessary (or easier) for a RepositorySource implementation to look up an object in JNDI.
One example of this is the JBoss Cache connector: while the connector can
instantiate a new JBoss Cache instance, more interesting use cases involve JBoss Cache instances that are
set up for clustering and replication, something that is generally difficult to configure in a single JavaBean.
Therefore the JBossCacheSource has optional JavaBean properties that define how it is to look up a
JBoss Cache instance in JNDI.
This is a simple pattern that you may find useful in your connector. Basically, if your source implementation can look up an object in JNDI, simply use a single JavaBean String property that defines the full name that should be used to locate that object in JNDI. Usually it's best to include "Jndi" in the JavaBean property name so that administrative users understand the purpose of the property. (And some may suggest that any optional property also use the word "optional" in the property name.)
Another characteristic of a RepositorySource implementation is that it provides some hint as to whether
it supports several features. This is defined on the interface as a method that returns a
RepositorySourceCapabilities object. This class currently provides methods that say whether the connector supports
updates, whether it supports same-name-siblings (SNS), and whether the connector supports listeners and events.
Note that these may be hard-coded values, or the connector's response may be determined at runtime by various factors. For example, a connector may interrogate the underlying system to decide whether it can support updates.
The RepositorySourceCapabilities can be used as is (the class is immutable), or it can be subclassed
to provide more complex behavior. It is important, however, that the capabilities remain constant
throughout the lifetime of the RepositorySource instance.
Note
Why a concrete class and not an interface? By using a concrete class, connectors inherit the default behavior. If additional capabilities need to be added to the class in future releases, connectors may not have to override the defaults. This provides some insulation against future enhancements to the connector framework.
As we'll see in the next section, the main method connectors have to process requests takes an ExecutionContext,
which contains the JAAS security information of the subject performing the request. This means that the connector
can use this to determine authentication and authorization information for each request.
Sometimes that is not sufficient. For example, it may be that the connector needs its own authorization information
so that it can establish a connection (even if user-level privileges still use the ExecutionContext provided with
each request). In this case, the RepositorySource implementation will probably need JavaBean properties
that represent the connector's authentication information. This may take the form of a username and password,
or it may be properties that are used to delegate authentication to JAAS.
Either way, just realize that it's perfectly acceptable for the connector to require its own security properties.
One job of the RepositorySource implementation is to create connections to the underlying sources. Connections are represented by classes that implement the RepositoryConnection interface, and creating this class is the next step in writing a connector. This is what we'll cover in this section.
The RepositoryConnection interface is pretty straightforward:
/** * A connection to a repository source. * <p> * These connections need not support concurrent operations by multiple threads. * </p> */ @NotThreadSafe public interface RepositoryConnection { /** * Get the name for this repository source. This value should be the same as that returned * by the same RepositorySource that created this connection. * * @return the identifier; never null or empty */ String getSourceName(); /** * Return the transactional resource associated with this connection. The transaction manager * will use this resource to manage the participation of this connection in a distributed transaction. * * @return the XA resource, or null if this connection is not aware of distributed transactions */ XAResource getXAResource(); /** * Ping the underlying system to determine if the connection is still valid and alive. * * @param time the length of time to wait before timing out * @param unit the time unit to use; may not be null * @return true if this connection is still valid and can still be used, or false otherwise * @throws InterruptedException if the thread has been interrupted during the operation */ boolean ping( long time, TimeUnit unit ) throws InterruptedException; /** * Get the default cache policy for this repository. If none is provided, a global cache policy * will be used. * * @return the default cache policy */ CachePolicy getDefaultCachePolicy(); /** * Execute the supplied commands against this repository source. * * @param context the environment in which the commands are being executed; never null * @param request the request to be executed; never null * @throws RepositorySourceException if there is a problem loading the node data */ void execute(ExecutionContextcontext,Requestrequest ) throwsRepositorySourceException; /** * Close this connection to signal that it is no longer needed and that any accumulated * resources are to be released. */ void close(); }
While most of these methods are straightforward, a few warrant additional information.
The ping(...) allows DNA to check the connection to see if it is
alive. This method can be used in a variety of situations, ranging from verifying that a RepositorySource's
JavaBean properties are correct to ensuring that a connection is still alive before returning the connection from
a connection pool.
If the connector is able to publish events, then
DNA hasn't yet defined the event mechanism, so connectors don't have any methods to invoke on the .
This will be defined in the next release, so feel free to manage the listeners now. Note that by default the RepositorySourceCapabilities returns
false for supportsEvents().
The most important method on this interface, though, is the execute(...) method, which serves as the
mechanism by which the component using the connector access and manipulates the content exposed by the connector.
The first parameter to this method is the ExecutionContext, which contains the information about environment
as well as the subject performing the request. This was discussed earlier.
The second parameter, however, represents a Request that is to be processed by the connector. Request objects can
take many different forms, as there are different classes for each kind of request (see the
previous chapter for details).
Each request contains the information a connector needs to do the processing, and it also is the place
where the connector places the results (or the error, if one occurs).
Although there are over a dozen different kinds of requests, we do anticipate adding more in future releases.
For example, DNA will likely support searching repository content in sources through an additional subclass of Request.
Getting the version history for a node will likely be another kind of request added in an upcoming release.
A connector is technically free to implement the execute(...) method in any way, as long as the semantics
are maintained. But as discussed in the previous chapter, JBoss DNA provides
a RequestProcessor class that can simplify writing your own connector and at the
same time help insulate your connector from new kinds of requests that may be added in the future. The RequestProcessor
is an abstract class that defines a process(...) method for each concrete Request subclass.
In other words, there is a process(CompositeRequest) method, a process(ReadNodeRequest) method,
and so on.
To use this in your connector, simply create a subclass of RequestProcessor, overriding all of the abstract methods and optionally
overriding any of the other methods that have a default implementation.
Note
The RequestProcessor abstract class contains default implementations for quite a few of the process(...) methods,
and these will be sufficient but probably not efficient or optimum. If you can provide a more efficient
implementation given your source, feel free to do so. However, if performance is not a big issue, all of the concrete methods
will provide the correct behavior. Keep things simple to start out - you can always provide better implementations later.
Also, make sure your RequestProcessor is properly broadcasting the changes made during execution.
The RequestProcessor class has a recordChange( that can be called from each of the ChangeRequest)process(...)
methods that take a ChangeRequest. The RequestProcessor enqueues these requests, and when the RequestProcessor is
closed, the default implementation is to send a to the Observer supplied into the constructor.
Then, in your connector's execute( method, instantiate your ExecutionContext, Request)RequestProcessor subclass
and call its process(
The Request) method, passing in the execute(...) method's Request parameter.RequestProcessor will determine the appropriate method given the actual Request object and will then invoke that method:
public void execute( finalExecutionContextcontext, finalRequestrequest ) throws RepositorySourceException { String sourceName = // from the RepositorySource Observer observer = // from the RepositoryContextRequestProcessorprocessor = new CustomRequestProcessor(sourceName,context,observer); try { processor.process(request); } finally { processor.close(); // sends the accumulatedChangeRequests as aChangesto the Observer } }
If you do this, the bulk of your connector implementation may be in the RequestProcessor implementation methods.
This not only is pretty maintainable, it also lends itself to easier testing. And should any new request types be added
in the future, your connector may work just fine without any changes. In fact, if the RequestProcessor class
can implement meaningful methods for those new request types, your connector may "just work". Or, at least
your connector will still be binary compatible, even if your connector won't support any of the new features.
Finally, how should the connector handle exceptions? As mentioned above, each Request object has a slot where the connector
can set any exception encountered during processing. This not only handles the exception, but in the case of CompositeRequests
it also correctly associates the problem with the request. However, it is perfectly acceptable to throw an exception
if the connection becomes invalid (e.g., there is a communication failure) or if a fatal error would prevent subsequent
requests from being processed.
Testing connectors is not really that much different than testing other classes. Using mocks may help to isolate your instances so you can create more unit tests that don't require the underlying source system.
However, there may be times when you have to use the underlying source system in your tests. If this is the case, we recommend using Maven integration tests, which run at a different point in the Maven lifecycle. The benefit of using integration tests is that by convention they're able to rely upon external systems. Plus, your unit tests don't become polluted with slow-running tests that break if the external system is not available.
In this chapter, we covered all the aspects of JBoss DNA connectors, including the connector API, how DNA's JCR implementation works with connectors, what connectors are available (and how to use them), and how to write your own connector. So now that you know how to set up and use JBoss DNA repositories, the next chapter describes the sequencing framework and how to build your own custom sequencers. After that, we'll get into how to configure JBoss DNA and use JCR.
Many repositories are used (at least in part) to manage files and other artifacts, including service definitions, policy files, images, media, documents, presentations, application components, reusable libraries, configuration files, application installations, databases schemas, management scripts, and so on. Unlocking the information buried within all of those files is what JBoss DNA sequencing is all about. As files are loaded into the repository, you JBoss DNA can automatically sequence these files to extract from their content meaningful information that can be stored in the repository, where it can then be searched, accessed, and analyzed using the JCR API.
Sequencers are just POJOs that implement a specific interface, and their job is to process a stream of data (supplied by JBoss DNA) to extract meaningful content that usually takes the form of a structured graph. Exactly what content is up to each sequencer implementation. For example, JBoss DNA comes with an image sequencer that extracts the simple metadata from different kinds of image files (e.g., JPEG, GIF, PNG, etc.). Another example is the Compact Node Definition (CND) sequencer that processes the CND files to extract and produce a structured representation of the node type definitions, property definitions, and child node definitions contained within the file.
Sequencers are configured to identify the kinds of nodes that the sequencers can work against. When content in the repository changes, JBoss DNA looks to see which (if any) sequencers might be able to run on the changed content. If any sequencer configurations do match, those sequencers are run against the content, and the structured graph output of the sequencers is then written back into the repository (at a location dictated by the sequencer configuration). And once that information is in the repository, it can be easily found and accessed via the standard JCR API.
In other words, JBoss DNA uses sequencers to help you extract more meaning from the artifacts you already are managing, and makes it much easier for applications to find and use all that valuable information. All without your applications doing anything extra.
The StreamSequencer interface defines the single method that must be implemented by a sequencer:
public interface StreamSequencer {

    /**
     * Sequence the data found in the supplied stream, placing the output
     * information into the supplied map.
     *
     * @param stream the stream with the data to be sequenced; never null
     * @param output the output from the sequencing operation; never null
     * @param context the context for the sequencing operation; never null
     */
    void sequence( InputStream stream, SequencerOutput output,  context );
}
Implementations are responsible for processing the content in the supplied InputStream content and generating structured content using the supplied SequencerOutput interface. The provides additional details about the information that is being sequenced, including the location and properties of the node being sequenced, the MIME type of the node being sequenced, and a Problems object where the sequencer can record problems that aren't severe enough to warrant throwing an exception. The also provides access to the ValueFactories that can be used to create Path, Name, and any other value objects.
The SequencerOutput interface is fairly easy to use, and its job is to hide from the sequencer all the specifics about where the output is being written. Therefore, the interface has only a few methods for implementations to call. Two methods set the property values on a node, while the other sets references to other nodes in the repository. Use these methods to describe the properties of the nodes you want to create, using relative paths for the nodes and valid JCR property names for properties and references. JBoss DNA will ensure that nodes are created or updated whenever they're needed.
public interface SequencerOutput {

  /**
   * Set the supplied property on the supplied node.  The allowable
   * values are any of the following:
   *   - primitives (which will be autoboxed)
   *   - String instances
   *   - String arrays
   *   - byte arrays
   *   - InputStream instances
   *   - Calendar instances
   *
   * @param nodePath the path to the node containing the property;
   * may not be null
   * @param property the name of the property to be set
   * @param values the value(s) for the property; may be empty if
   * any existing property is to be removed
   */
  void setProperty( String nodePath, String property, Object... values );
  void setProperty( Path nodePath, Name property, Object... values );

  /**
   * Set the supplied reference on the supplied node.
   *
   * @param nodePath the path to the node containing the property;
   * may not be null
   * @param property the name of the property to be set
   * @param paths the paths to the referenced property, which may be
   * absolute paths or relative to the sequencer output node;
   * may be empty if any existing property is to be removed
   */
  void setReference( String nodePath, String property, String... paths );
}
Note
JBoss DNA will create nodes of type nt:unstructured unless you specify the value for the
jcr:primaryType property. You can also specify the values for the jcr:mixinTypes property
if you want to add mixins to any node.
Each sequencer must be configured to describe the areas or types of content that the sequencer is capable of handling. This is done by specifying these patterns using path expressions that identify the nodes (or node patterns) that should be sequenced and where to store the output generated by the sequencer. We'll see how to fully configure a sequencer in the next chapter, but before then let's dive into path expressions in more detail.
A path expression consist of two parts: a selection criteria (or an input path) and an output path:
inputPath => outputPath
The inputPath part defines an expression for the path of a node that is to be sequenced.
Input paths consist of '/' separated segments, where each segment represents a pattern for a single node's
name (including the same-name-sibling indexes) and '@' signifies a property name.
Let's first look at some simple examples:
Table 7.1. Simple Input Path Examples
| Input Path | Description |
|---|---|
| /a/b | Match node "b" that is a child of the top level node "a". Neither node
may have any same-name-sibilings. |
| /a/* | Match any child node of the top level node "a". |
| /a/*.txt | Match any child node of the top level node "a" that also has a name ending in ".txt". |
| /a/*.txt | Match any child node of the top level node "a" that also has a name ending in ".txt". |
| /a/b@c | Match the property "c" of node "/a/b". |
| /a/b[2] | The second child named "b" below the top level node "a". |
| /a/b[2,3,4] | The second, third or fourth child named "b" below the top level node "a". |
| /a/b[*] | Any (and every) child named "b" below the top level node "a". |
| //a/b | Any node named "b" that exists below a node named "a", regardless
of where node "a" occurs. Again, neither node may have any same-name-sibilings. |
With these simple examples, you can probably discern the most important rules. First, the '*' is a wildcard character
that matches any character or sequence of characters in a node's name (or index if appearing in between square brackets), and
can be used in conjunction with other characters (e.g., "*.txt").
Second, square brackets (i.e., '[' and ']') are used to match a node's same-name-sibiling index.
You can put a single non-negative number or a comma-separated list of non-negative numbers. Use '0' to match a node that has no
same-name-sibilings, or any positive number to match the specific same-name-sibling.
Third, combining two delimiters (e.g., "//") matches any sequence of nodes, regardless of what their names are
or how many nodes. Often used with other patterns to identify nodes at any level matching other patterns.
Three or more sequential slash characters are treated as two.
Many input paths can be created using just these simple rules. However, input paths can be more complicated. Here are some more examples:
Table 7.2. More Complex Input Path Examples
| Input Path | Description |
|---|---|
| /a/(b|c|d) | Match children of the top level node "a" that are named "a",
"b" or "c". None of the nodes may have same-name-sibling indexes. |
| /a/b[c/d] | Match node "b" child of the top level node "a", when node
"b" has a child named "c", and "c" has a child named "d".
Node "b" is the selected node, while nodes "b" and "b" are used as criteria but are not
selected. |
| /a(/(b|c|d|)/e)[f/g/@something] | Match node "/a/b/e", "/a/c/e", "/a/d/e",
or "/a/e" when they also have a child "f" that itself has a child "g" with property
"something". None of the nodes may have same-name-sibling indexes. |
These examples show a few more advanced rules. Parentheses (i.e., '(' and ')') can be used
to define a set of options for names, as shown in the first and third rules. Whatever part of the selected node's path
appears between the parentheses is captured for use within the output path. Thus, the first input path in the previous table
would match node "/a/b", and "b" would be captured and could be used within the output path using "$1",
where the number used in the output path identifies the parentheses.
Square brackets can also be used to specify criteria on a node's properties or children. Whatever appears in between the square brackets does not appear in the selected node.
Let's go back to the previous code fragment and look at the first path expression:
//(*.(jpg|jpeg|gif|bmp|pcx|png)[*])/jcr:content[@jcr:data] => /images/$1
This matches a node named "jcr:content" with property "jcr:data" but no siblings with the same name,
and that is a child of a node whose name ends with ".jpg", ".jpeg", ".gif", ".bmp", ".pcx",
or ".png" that may have any same-name-sibling index. These nodes can appear at any level in the repository.
Note how the input path capture the filename (the segment containing the file extension), including any same-name-sibling index.
This filename is then used in the output path, which is where the sequenced content is placed.
A number of sequencers are already available in JBoss DNA, and are outlined in detail later in the document. Note that we do want to build more sequencers in the upcoming releases.
The current release of JBoss DNA comes with six sequencers. However, it's very easy to create your own sequencers and to then configure JBoss DNA to use them in your own application.
Creating a custom sequencer involves the following steps:
Create a Maven 2 project for your sequencer;
Implement the StreamSequencer interface with your own implementation, and create unit tests to verify the functionality and expected behavior;
Add the sequencer configuration to the JBoss DNA
SequencingServicein your application as described in the previous chapter; andDeploy the JAR file with your implementation (as well as any dependencies), and make them available to JBoss DNA in your application.
It's that simple.
The first step is to create the Maven 2 project that you can use to compile your code and build the JARs. Maven 2 automates a lot of the work, and since you're already set up to use Maven, using Maven for your project will save you a lot of time and effort. Of course, you don't have to use Maven 2, but then you'll have to get the required libraries and manage the compiling and building process yourself.
Note
JBoss DNA may provide in the future a Maven archetype for creating sequencer projects. If you'd find this useful and would like to help create it, please join the community.
In lieu of a Maven archetype, you may find it easier to start with a small existing sequencer project. The dna-sequencer-images project is a small, self-contained sequencer implementation that has only the minimal dependencies. See the subversion repository: http://anonsvn.jboss.org/repos/dna/trunk/extensions/dna-sequencer-images/
You can create your Maven project any way you'd like. For examples, see the Maven 2 documentation.
Once you've done that, just add the dependencies in your project's pom.xml dependencies section:
<dependency>

  <groupId>org.jboss.dna</groupId>

  <artifactId>dna-graph</artifactId>

  <version>0.5</version>

</dependency>
These are minimum dependencies required for compiling a sequencer. Of course, you'll have to add other dependencies that your sequencer needs.
As for testing, you probably will want to add more dependencies, such as those listed here:
<!-- DNA-related unit testing utilities and classes -->

<dependency>

  <groupId>org.jboss.dna</groupId>

  <artifactId>dna-graph</artifactId>

  <version>0.5</version>

  <type>test-jar</type>

  <scope>test</scope>

</dependency>

<dependency>

  <groupId>org.jboss.dna</groupId>

  <artifactId>dna-common</artifactId>

  <version>0.5</version>

  <type>test-jar</type>

  <scope>test</scope>

</dependency>

<!-- Unit testing -->

<dependency>

  <groupId>junit</groupId>

  <artifactId>junit</artifactId>

  <version>4.4</version>

  <scope>test</scope>

</dependency>

<dependency>

  <groupId>org.hamcrest</groupId>

  <artifactId>hamcrest-library</artifactId>

  <version>1.1</version>

  <scope>test</scope>

</dependency>

<!-- Logging with Log4J -->

<dependency>

  <groupId>org.slf4j</groupId>

  <artifactId>slf4j-log4j12</artifactId>

  <version>1.4.3</version>

  <scope>test</scope>

</dependency>

<dependency>

  <groupId>log4j</groupId>

  <artifactId>log4j</artifactId>

  <version>1.2.14</version>

  <scope>test</scope>

</dependency>
Testing JBoss DNA sequencers does not require a JCR repository or the JBoss DNA services. (For more detail, see the testing section.) However, if you want to do integration testing with a JCR repository and the JBoss DNA services, you'll need additional dependencies for these libraries.
<!-- JBoss DNA JCR Repository -->

<dependency>

  <groupId>org.jboss.dna</groupId>

  <artifactId>dna-jcr</artifactId>

  <version>0.5</version>

  <scope>test</scope>

</dependency>

<!-- Java Content Repository API -->

<dependency>

  <groupId>javax.jcr</groupId>

  <artifactId>jcr</artifactId>

  <version>1.0.1</version>

  <scope>test</scope>

</dependency>
At this point, your project should be set up correctly, and you're ready to move on to write your custom implementation of the StreamSequencer interface. As stated earlier, this should be fairly straightforward: process the stream and generate the output that's appropriate for the kind of file being sequenced.
Let's look at an example. Here is the complete code for the ImageMetadataSequencer implementation:
public classImageMetadataSequencerimplements StreamSequencer { public static final String METADATA_NODE = "image:metadata"; public static final String IMAGE_PRIMARY_TYPE = "jcr:primaryType"; public static final String IMAGE_MIXINS = "jcr:mixinTypes"; public static final String IMAGE_MIME_TYPE = "jcr:mimeType"; public static final String IMAGE_ENCODING = "jcr:encoding"; public static final String IMAGE_FORMAT_NAME = "image:formatName"; public static final String IMAGE_WIDTH = "image:width"; public static final String IMAGE_HEIGHT = "image:height"; public static final String IMAGE_BITS_PER_PIXEL = "image:bitsPerPixel"; public static final String IMAGE_PROGRESSIVE = "image:progressive"; public static final String IMAGE_NUMBER_OF_IMAGES = "image:numberOfImages"; public static final String IMAGE_PHYSICAL_WIDTH_DPI = "image:physicalWidthDpi"; public static final String IMAGE_PHYSICAL_HEIGHT_DPI = "image:physicalHeightDpi"; public static final String IMAGE_PHYSICAL_WIDTH_INCHES = "image:physicalWidthInches"; public static final String IMAGE_PHYSICAL_HEIGHT_INCHES = "image:physicalHeightInches"; /** * {@inheritDoc} */ public void sequence( InputStream stream, SequencerOutput output, context ) {ImageMetadatametadata = newImageMetadata(); metadata.setInput(stream); metadata.setDetermineImageNumber(true); metadata.setCollectComments(true); // Process the image stream and extract the metadata ... if (!metadata.check()) { metadata = null; } // Generate the output graph if we found useful metadata ... if (metadata != null) { // Place the image metadata into the output map ... output.setProperty(METADATA_NODE, IMAGE_PRIMARY_TYPE, "image:metadata"); // output.psetProperty(METADATA_NODE, IMAGE_MIXINS, ""); output.setProperty(METADATA_NODE, IMAGE_MIME_TYPE, metadata.getMimeType()); // output.setProperty(METADATA_NODE, IMAGE_ENCODING, ""); output.setProperty(METADATA_NODE, IMAGE_FORMAT_NAME, metadata.getFormatName()); output.setProperty(METADATA_NODE, IMAGE_WIDTH, metadata.getWidth()); output.setProperty(METADATA_NODE, IMAGE_HEIGHT, metadata.getHeight()); output.setProperty(METADATA_NODE, IMAGE_BITS_PER_PIXEL, metadata.getBitsPerPixel()); output.setProperty(METADATA_NODE, IMAGE_PROGRESSIVE, metadata.isProgressive()); output.setProperty(METADATA_NODE, IMAGE_NUMBER_OF_IMAGES, metadata.getNumberOfImages()); output.setProperty(METADATA_NODE, IMAGE_PHYSICAL_WIDTH_DPI, metadata.getPhysicalWidthDpi()); output.setProperty(METADATA_NODE, IMAGE_PHYSICAL_HEIGHT_DPI, metadata.getPhysicalHeightDpi()); output.setProperty(METADATA_NODE, IMAGE_PHYSICAL_WIDTH_INCHES, metadata.getPhysicalWidthInch()); output.setProperty(METADATA_NODE, IMAGE_PHYSICAL_HEIGHT_INCHES, metadata.getPhysicalHeightInch()); } } }
Notice how the image metadata is extracted and the output graph is generated. A single node is created with the name
image:metadata
and with the image:metadata node type. No mixins are defined for the node, but several properties are set on the node
using the values obtained from the image metadata. After this method returns, the constructed graph will be saved to the repository
in all of the places defined by its configuration. (This is why only relative paths are used in the sequencer.)
The sequencing framework was designed to make testing sequencers much easier. In particular, the StreamSequencer interface does not make use of the JCR API. So instead of requiring a fully-configured JCR repository and JBoss DNA system, unit tests for a sequencer can focus on testing that the content is processed correctly and the desired output graph is generated.
Note
For a complete example of a sequencer unit test, see the ImageMetadataSequencerTest unit test
in the org.jboss.dna.sequencer.images package of the dna-sequencers-image project.
The following code fragment shows one way of testing a sequencer, using JUnit 4.4 assertions and some of the classes made available by JBoss DNA. Of course, this example code does not do any error handling and does not make all the assertions a real test would.
StreamSequencer sequencer = new ImageMetadataSequencer();
MockSequencerOutput output = new MockSequencerOutput();
MockSequencerContext context = new MockSequencerContext();
InputStream stream = null;
try {
    stream = this.getClass().getClassLoader().getResource("caution.gif").openStream();
    sequencer.sequence(stream,output,context);   // writes to 'output'
    assertThat(output.getPropertyValues("image:metadata", "jcr:primaryType"),
               is(new Object[] {"image:metadata"}));
    assertThat(output.getPropertyValues("image:metadata", "jcr:mimeType"),
               is(new Object[] {"image/gif"}));
    // ... make more assertions here
    assertThat(output.hasReferences(), is(false));
} finally {
    stream.close();
}
It's also useful to test that a sequencer produces no output for something it should not understand:
 sequencer = new ImageMetadataSequencer();
MockSequencerOutput output = new MockSequencerOutput();
MockSequencerContext context = new MockSequencerContext();
InputStream stream = null;
try {
    stream = this.getClass().getClassLoader().getResource("caution.pict").openStream();
    sequencer.sequence(stream,output,context);   // writes to 'output'
    assertThat(output.hasProperties(), is(false));
    assertThat(output.hasReferences(), is(false));
} finally {
    stream.close();
}
These are just two simple tests that show ways of testing a sequencer. Some tests may get quite involved, especially if a lot of output data is produced.
It may also be useful to create some integration tests that configure JBoss DNA to use a custom sequencer, and to then upload content using the JCR API, verifying that the custom sequencer did run. However, remember that JBoss DNA runs sequencers asynchronously in the background, and you must synchronize your tests to ensure that the sequencers have a chance to run before checking the results.
In this chapter, we described how JBoss DNA sequences files as they're uploaded into a repository. We've also learned in previous chapters about the JBoss DNA execution contexts, graph model, and connectors. In the next part we'll put all these pieces together to learn how to set up a JBoss DNA repository and access it using the JCR API.
The JBoss DNA project provides an implementation of the JCR API, which is built on top of the core libraries discussed earlier. This implementation as well as a number of JCR-related components are described in this part of the document. But before talking about how to use the JCR API with a JBoss DNA repository, first we need to show how to set up a JBoss DNA engine.
Using JBoss DNA within your application is actually quite straightforward. As you'll see in this chapter,
the first step is setting up JBoss DNA and starting the JcrEngine. After that, you obtain the
javax.jcr.Repository instance for a named repository and just use the standard JCR API throughout your
application.
JBoss DNA encapsulates everything necessary to run one or more JCR repositories into a single JcrEngine instance.
This includes all underlying repository sources, the pools of connections to the sources, the sequencers,
the MIME type detector(s), and the Repository implementations.
Obtaining a JcrEngine instance is very easy - assuming that you have a valid JcrConfiguration instance. We'll see
how to get one of those in a little bit, but if you have one then all you have to do is build and start the engine:
JcrConfiguration config = ...

JcrEngine engine = config.build();

engine.start();
Obtaining a JCR Repository instance is a matter of simply asking the engine for it by the name defined in the configuration:
javax.jcr.Repository repository = engine.getRepository("Name of repository");
At this point, your application can proceed by working with the JCR API.
And, once you're finished with the JcrEngine, you should shut it down:
engine.shutdown();

engine.awaitTermination(3,TimeUnit.SECONDS);    // optional
When the shutdown() method is called, the Repository instances managed by the engine are marked as being shut down,
and they will not be able to create new Sessions. However, any existing Sessions or ongoing operations (e.g., event notifications)
present at the time of the shutdown() call will be allowed to finish.
In essence, shutdown() is a graceful request, and since it may take some time to complete,
you can wait until the shutdown has completed by simply calling awaitTermination(...) as shown above.
This method will block until the engine has indeed shutdown or until the supplied time duration has passed (whichever comes first).
And, yes, you can call the awaitTermination(...) method repeatedly if needed.
The previous section assumed the existence of a JcrConfiguration. It's not really that creating an instance is all that difficult.
In fact, there's only one no-argument constructor, so actually creating the instance is a piece of cake. What can be a little more challenging,
though, is setting up the JcrConfiguration instance, which must define the following components:
Repository sourcesare the POJO objects that each describe a particular location where content is stored. Each repository source object is an instance of a JBoss DNA connector, and is configured with the properties that particular source. JBoss DNA's RepositorySource classes are analogous to JDBC'sDataSourceclasses - they are implemented by specific connectors (aka, "drivers") for specific kinds of repository sources (aka, "databases"). Similarly, a RepositorySource instance is analogous to aDataSourceinstance, with bean properties for each configurable parameter. Therefore, each repository source definition must supply the name of the RepositorySource class, any bean properties, and, optionally, the classpath that should be used to load the class.Repositoriesdefine the JCR repositories that are available. Each repository has a unique name that is used to obtain the Repository instance from theJcrEngine'sgetRepository(String)method, but each repository definition also can include the predefined namespaces (other than those automatically defined by JBoss DNA), various options, and the node types that are to be available in the repository without explicit registration through the JCR API.Sequencersdefine the particular sequencers that are available for use. Each sequencer definition provides the path expressions governing which nodes in the repository should be sequenced when those nodes change, and where the resulting output generated by the sequencer should be placed. The definition also must state the name of the sequencer class, any bean properties and, optionally, the classpath that should be used to load the class.MIME type detectorsdefine the particular MIME type detector(s) that should be made available. A MIME type detector does exactly what the name implies: it attempts to determine the MIME type given a "filename" and contents. JBoss DNA automatically uses a detector that uses the file extension to identify the MIME type, but also provides an implementation that uses an external library to identify the MIME type based upon the contents. The definition must state the name of the detector class, any bean properties and, optionally, the classpath that should be used to load the class.
There really are three options:
Load from a fileis conceptually the easiest and requires the least amount of Java code, but it now requires a configuration file.Load from a configuration repositoryis not much more complicated than loading from a file, but it does allow multipleJcrEngineinstances (usually in different processes perhaps on different machines) to easily access their (shared) configuration. And technically, loading the configuration from a file really just creates anInMemoryRepositorySource, imports the configuration file into that source, and then proceeds with this approach.Programmatic configurationis always possible, even if the configuration is loaded from a file or repository. Using theJcrConfiguration's API, you can define (or update or remove) all of the definitions that make up a configuration.
Each of these approaches has their obvious advantages, so the choice of which one to use is entirely up to you.
Loading the JBoss DNA configuration from a file is actually very simple:
JcrConfiguration config = new JcrConfiguration();

configuration.loadFrom(file);
where the file parameter can actually be a File instance, a URL to the file, an InputStream
containing the contents of the file, or even a String containing the contents of the file.
Note
The loadFrom(...) method can be called any number of times, but each time it is called it completely wipes
out any current notion of the configuration and replaces it with the configuration found in the file.
There is an optional second parameter that defines the Path within the configuration file identifying the parent node of the various configuration nodes. If not specified, it assumes "/". This makes it possible for the configuration content to be located at a different location in the hierarchical structure. (This is not often required, but when it is required this second parameter is very useful.)
Here is the configuration file that is used in the repository example, though it has been simplified a bit and most comments have been removed for clarity):
<?xml version="1.0" encoding="UTF-8"?>

<configuration xmlns="http://www.jboss.org/dna/1.0" xmlns:jcr="http://www.jcp.org/jcr/1.0">

      <!--

      Define the JCR repositories

      -->

      <dna:repositories>

          <!--

          Define a JCR repository that accesses the 'Cars' source directly.

          This of course is optional, since we could access the same content through 'vehicles'.

          -->

          <dna:repository jcr:name="car repository" dna:source="Cars">

              <dna:options jcr:primaryType="dna:options">

                  <jaasLoginConfigName jcr:primaryType="dna:option" dna:value="dna-jcr"/>

              </dna:options>

          </dna:repository>

      </dna:repositories>

    <!--

    Define the sources for the content. These sources are directly accessible using the DNA-specific Graph API.

    -->

    <dna:sources jcr:primaryType="nt:unstructured">

        <dna:source jcr:name="Cars"

                      dna:classname="org.jboss.dna.graph.connector.inmemory.InMemoryRepositorySource"

                      dna:retryLimit="3" dna:defaultWorkspaceName="workspace1"/>

        <dna:source jcr:name="Aircraft"

                      dna:classname="org.jboss.dna.graph.connector.inmemory.InMemoryRepositorySource">

            <!-- Define the name of the workspace used by default.  Optional, but convenient. -->

            <defaultWorkspaceName>workspace2</defaultWorkspaceName>

        </dna:source>

    </dna:sources>

    <!--

    Define the sequencers. This is an optional section. For this example, we're not using any sequencers.

    -->

    <dna:sequencers>

        <!--dna:sequencer jcr:name="Image Sequencer">

            <dna:classname>org.jboss.dna.sequencer.image.ImageMetadataSequencer</dna:classname>

            <dna:description>Image metadata sequencer</dna:description>

            <dna:pathExpression>/foo/source => /foo/target</dna:pathExpression>

            <dna:pathExpression>/bar/source => /bar/target</dna:pathExpression>

        </dna:sequencer-->

    </dna:sequencers>

    <dna:mimeTypeDetectors>

        <dna:mimeTypeDetector jcr:name="Detector"

                              dna:description="Standard extension-based MIME type detector"/>

    </dna:mimeTypeDetectors>

</configuration>
Loading the JBoss DNA configuration from an existing repository is also pretty straightforward. Simply create and configure the
RepositorySource instance to point to the desired repository, and then call the loadFrom(RepositorySource source)
method:
RepositorySource configSource = ...

JcrConfiguration config = new JcrConfiguration();

configuration.loadFrom(configSource);
This really is a more advanced way to define your configuration, so we won't go into how you configure a RepositorySource. For more information, consult the Getting Started.
Note
The loadFrom(...) method can be called any number of times, but each time it is called it completely wipes
out any current notion of the configuration and replaces it with the configuration found in the file.
There is an optional second parameter that defines the name of the workspace in the supplied source where the configuration content can be found. It is not needed if the workspace is the source's default workspace. There is an optional third parameter that defines the Path within the configuration repository identifying the parent node of the various configuration nodes. If not specified, it assumes "/". This makes it possible for the configuration content to be located at a different location in the hierarchical structure. (This is not often required, but when it is required this second parameter is very useful.)
Defining the configuration programmatically is not terribly complicated, and it for obvious reasons results in more verbose Java code. But this approach is very useful and often the easiest approach when the configuration must change or is a reflection of other dynamic information.
The JcrConfiguration class was designed to have an easy-to-use API that makes it easy to configure each of the different kinds of
components, especially when using an IDE with code completion. Here are several examples:
Each repository source definition must include the name of the RepositorySource class as well as each bean property that should be set on the object:
JcrConfiguration config = ...

config.repositorySource("source A")

      .usingClass(InMemoryRepositorySource.class)

      .setDescription("The repository for our content")

      .setProperty("defaultWorkspaceName", workspaceName);
This example defines an in-memory source with the name "source A", a description, and a single "defaultWorkspaceName" bean property. Different RepositorySource implementations will the bean properties that are required and optional. Of course, the class can be specified as Class reference or a string (followed by whether the class should be loaded from the classpath or from a specific classpath).
Note
Each time repositorySource(String) is called, it will either load the existing definition with the supplied
name or will create a new definition if one does not already exist. To remove a definition, simply call remove()
on the result of repositorySource(String).
The set of existing definitions can be accessed with the repositorySources() method.
Each repository must be defined to use a named repository source, but all other aspects (e.g., namespaces, node types, options) are optional.
JcrConfiguration config = ...

config.repository("repository A")

      .addNodeTypes("myCustomNodeTypes.cnd")

      .setSource("source 1")

      .registerNamespace("acme","http://www.example.com/acme")

      .setOption(JcrRepository.Option.JAAS_LOGIN_CONFIG_NAME, "dna-jcr");
This example defines a repository that uses the "source 1" repository source (which could be a federated source, an in-memory source, a database store, or any other source). Additionally, this example adds the node types in the "myCustomNodeTypes.cnd" file as those that will be made available when the repository is accessed. It also defines the "http://www.example.com/acme" namespace, and finally sets the "JAAS_LOGIN_CONFIG_NAME" option to define the name of the JAAS login configuration that should be used by the JBoss DNA repository.
Note
Each time repository(String) is called, it will either load the existing definition with the supplied
name or will create a new definition if one does not already exist. To remove a definition, simply call remove()
on the result of repository(String).
The set of existing definitions can be accessed with the repositories() method.
Each defined sequencer must specify the name of the StreamSequencer implementation class as well as the path expressions defining which nodes should be sequenced and the output paths defining where the sequencer output should be placed (often as a function of the input path expression).
JcrConfiguration config = ...

config.sequencer("Image Sequencer")

      .usingClass("org.jboss.dna.sequencer.image.ImageMetadataSequencer")

      .loadedFromClasspath()

      .setDescription("Sequences image files to extract the characteristics of the image")

      .sequencingFrom("//(*.(jpg|jpeg|gif|bmp|pcx|png|iff|ras|pbm|pgm|ppm|psd)[*])/jcr:content[@jcr:data]")

      .andOutputtingTo("/images/$1");
This shows an example of a sequencer definition named "Image Sequencer" that uses the ImageMetadataSequencer class
(loaded from the classpath), that is to sequence the "jcr:data" property on any new or changed nodes that are named
"jcr:content" below a parent node with a name ending in ".jpg", ".jpeg", ".gif", ".bmp", ".pcx", ".iff", ".ras",
".pbm", ".pgm", ".ppm" or ".psd". The output of the sequencing operation should be placed at the "/images/$1" node,
where the "$1" value is captured as the name of the parent node. (The capture groups work the same was as regular expressions;
see the Getting Started for more details.)
Of course, the class can be specified as Class reference or a string (followed by whether the class should be loaded from
the classpath or from a specific classpath).
Note
Each time sequencer(String) is called, it will either load the existing definition with the supplied
name or will create a new definition if one does not already exist. To remove a definition, simply call remove()
on the result of sequencer(String).
The set of existing definitions can be accessed with the sequencers() method.
Each defined MIME type detector must specify the name of the MimeTypeDetector implementation class as well as any other bean properties required by the implementation.
JcrConfiguration config = ...

config.mimeTypeDetector("Extension Detector")

      .usingClass(org.jboss.dna.graph.mimetype.ExtensionBasedMimeTypeDetector.class);
Of course, the class can be specified as Class reference or a string (followed by whether the class should be loaded from the classpath or from a specific classpath).
Note
Each time mimeTypeDetector(String) is called, it will either load the existing definition with the supplied
name or will create a new definition if one does not already exist. To remove a definition, simply call remove()
on the result of mimeTypeDetector(String).
The set of existing definitions can be accessed with the mimeTypeDetectors() method.
This chapter outlines how you configure JBoss DNA, how you then access a javax.jcr.Repository instance,
and use the standard JCR API to interact with the repository. The
next chapter talks about using the JCR API with your JBoss DNA repository.
The Content Repository for Java technology API provides a standard Java API for working with content repositories. Abbreviated "JCR", this API was developed as part of the Java Community Process under JSR-170 (JCR 1.0) and is being revised under JSR-283. JBoss DNA provides a partial JCR 1.0 implementation that allows you to work with the contents of a repository using the JCR API. For information about how to use the JCR API, please see the JSR-170 specification.
Note
In the interests of brevity, this chapter does not attempt to reproduce the JSR-170 specification nor provide an exhaustive definition of JBoss DNA JCR capabilities. Rather, this chapter will describe any deviations from the specification as well as any DNA-specific public APIs and configuration.
Using JBoss DNA within your application is actually quite straightforward. As you'll see in this chapter,
the first step is setting up JBoss DNA and starting the JcrEngine. After that, you obtain the
javax.jcr.Repository instance for a named repository and just use the standard JCR API throughout your
application.
Once you've obtained a reference to a JcrEngine as described in
the previous chapter, obtaining a repository is as easy as calling
the getRepository(String) method with the name of the repository that you just configured.
String repositoryName = ...;
JcrEngine jcrEngine = ...;
Repository repository = jcrEngine.getRepository(repositoryName);
At this point, your application can proceed by working with the JCR API.
Once you have obtained a reference to the JCR Repository, you can create a JCR session using one of its
login(...) methods. The JSR-170 specification provides four login methods.
The first method allows the implementation to choose its own security context to create a session in the default workspace
for the repository. The JBoss DNA JCR implementation uses the security context from the current AccessControlContext. This implies
that this method will throw a LoginException if it is not executed as a PrivilegedAction. Here is one example of how this might
work:
Subject subject = ...;
Session session = (Session) Subject.doAsPrivileged(subject, new PrivilegedExceptionAction<Session>() {
    public Session run() throws Exception {
        return repository.login();
    }
}, AccessController.getContext());
This approach will yield a session with the same user name and roles as subject. There is a comparable
version of login(...) that allows the workspace to be specified by name.
Subject subject = ...;
final String workspaceName = ...;
Session session = (Session) Subject.doAsPrivileged(subject, new PrivilegedExceptionAction<Session>() {
    public Session run() throws Exception {
        return repository.login(workspaceName);
    }}, AccessController.getContext());
It is also possible to supply the Credentials directly as part of the login process, although JBoss DNA imposes some requirements on what types of Credentials may be supplied. The simplest way is to provide a SimpleCredentials object. These credentials will be validated against the JAAS realm named "dna-jcr" unless another realm name is provided as an option during the JCR repository configuration. For example:
String userName = ...;
char[] password = ...;
Session session = repository.login(new SimpleCredentials(userName, password));
The credentials-based login(...) method also supports an optional workspace name.
String userName = ...;
char[] password = ...;
String workspaceName = ...;
Session session = repository.login(new SimpleCredentials(userName, password), workspaceName);
If a LoginContext is available for the user, that can be used as part of the credentials to authenticate the user with
JBoss DNA instead. This snippet uses an anonymous class to provide the login context, but any class with a LoginContext getLoginContext()
finalLoginContextloginContext = ...; Session session = repository.login(new Credentials() {LoginContextloginContext getLoginContext() { return loginContext; } }, workspaceName);
Servlet-based applications may wish to reuse the authentication information from HttpServletRequest instead. Please note that
the example below assumes that the servlet has a security constraint that prevents unauthenticated access.
HttpServletRequestrequest = ...; ServletSecurityContext securityContext = new ServletSecurityContext(request); Session session = repository.login(newSecurityContextCredentials(securityContext);
Once the Session is obtained, the repository content can be accessed and modified like any other JCR repository. No roles are required to connect
to any workspace at this time. Restrictions on workspace connections will likely be added to JBoss DNA in the near future. The roles from the JAAS
information or the HttpServletRequest are used to control read and write access to the repository. Please see the JCR Security section
for more details on how access is controlled.
The JBoss DNA JCR implementation will not be JCR-compliant prior to the 1.0 release. Additionally, the JCR specification allows some latitude to implementors for some implementation details. The sections below clarify JBoss DNA's current and planned behavior.
JBoss DNA currently supports most of the Level 1 and Level 2 feature set defined by the JSR-170 specification.
Queries, which are part of Level 1, are not implemented. Some of the L2 features such as workspace cloning and updating, corresponding nodes,
and referential integrity for REFERENCE properties are also not yet implemented. As the current implementation does provide many
of the features that may be needed by an application, we really hope that this release will allow you to give us some feedback on what we have so far.
JBoss DNA does not currently support any of the optional JCR features. Currently, the observation optional feature is planned to be complete prior to the 1.0 release. The locking optional feature may be implemented in this timeframe as well.
Note
The JCR-SQL optional feature is not planned to be implemented as it has been dropped from the JSR-283 specification.
Although the JSR-170 specification requires implementation of the Session.checkPermission(String, String) method,
it allows implementors to choose the granularity of their access controls. JBoss DNA supports coarse-grained, role-based access control at the repository
and workspace level.
JBoss DNA currently defines two permissions: READONLY and READWRITE. If the Credentials passed into Session.login(...)
(or the Subject from the AccessControlContext, if one of the no-credential login methods were used) has either role, the session will have
the corresponding access to all workspaces within the repository. That is, having the READONLY role implies that Session.checkPermission(path, "read")
will not throw an AccessDeniedException for any value of path in any workspace in the repository. Similarly, having the READWRITE
role implies that Session.checkPermission(path, actions) will not throw an AccessDeniedException for any values of path and
actions.
Note
In this release, JBoss DNA does not properly check for actions or even check that the actions parameter passed into
Session.checkPermission(...) is even valid. This will be corrected prior to the 1.0 release.
It is also possible to grant access only to one or more named workspaces. For a workspace named "staging", this can be done by assigning a role named
READONLY.staging. Appending "." + workspaceName to the READWRITE role works as well.
As a final note, the JBoss DNA JCR implementation will likely have additional security roles added prior to the 1.0 release. A CONNECT role
is already being used by the DNA REST Server to control whether users have access to the repository through that means.
JBoss DNA supports all of the built-in node types described in the JSR-170 specification. However, several of these node types (mix:lockable, mix:versionable, nt:version, nt:versionLabels, nt:versionHistory, and nt:frozenNode) are semantically meaningless as JBoss DNA does not yet support the locking or versioning optional features.
Although JBoss DNA does define some custom node types in the dna namespace, none of these
node types are intended to be used by developers integrating with JBoss DNA and may be changed or removed
at any time.
Although the JSR-170 specification does not require support for registration of custom types, JBoss DNA supports this extremely useful feature. Custom node types can be added at startup, as noted above or at runtime through a DNA-specific interface. JBoss DNA supports defining node types either through a JSR-283-like template approach or through the use of Compact Node Definition (CND) files. Both type registration mechanisms are supported equally within JBoss DNA, although the CND approach for defining node types is recommended.
Note
JBoss DNA also supports defining custom node types to load at startup. This is discussed in more detail in the next chapter.
Although the JSR-283 specification is not yet final, it does provide a useful means of programatically defining JCR node types. JBoss DNA supports a comparable
node type definition API that implements the functionality from the specification, albeit with classes in an org.jboss.dna.jcr package. The intent
is to deprecate these classes and replace their usage with the JSR-283 equivalents after JBoss DNA fully supports in the JSR-283 specification in a future release.
Node types can be defined like so:
Session session = ... ;
NodeTypeManager nodeTypeManager = session.getWorkspace().getNodeTypeManager();

// Declare a mixin node type named "searchable" (with no namespace)
NodeTypeTemplate nodeType = nodeTypeManager.createNodeTypeTemplate();
nodeType.setName("searchable");
nodeType.setMixin(true);
nodeType.getNodeDefinitionTemplates().add(childNode);

// Add a mandatory child named "source" with a required primary type of "nt:file"
NodeDefinitionTemplate childNode = nodeTypeManager.createNodeDefinitionTemplate();
childNode.setName("source");
childNode.setMandatory(true);
childNode.setRequiredPrimaryTypeNames(new String[] { "nt:file" });
childNode.setDefaultPrimaryType("nt:file");

// Add a multi-valued STRING property named "keywords"
PropertyDefinitionTemplate property = nodeTypeManager.createPropertyDefinitionTemplate();
property.setName("keywords");
property.setMultiple(true);
property.setRequiredType(PropertyType.STRING);
nodeType.getPropertyDefinitionTemplates().add(property);

// Register the custom node type
nodeTypeManager.registerNodeType(nodeType);
Residual properties and child node definitions can also be defined simply by not calling setName on
the template.
Custom node types can be defined more succinctly through the Compact Node Definition file format. In fact, this is how JBoss DNA defines its built-in node types. An example CND file that declares the same node type as above would be:
[searchable] mixin
- keywords (string) multiple
+ source (nt:file) = nt:file
This definition could then be registered with the following code snippet.
String pathToCndFileInClassLoader = ...;
CndNodeTypeSource nodeTypeSource = new CndNodeTypeSource(pathToCndFileInClassLoader);

for (Problem problem : nodeTypeSource.getProblems()) {
    System.err.println(problem);
}
if (!nodeTypeSource.isValid()) {
    throw new IllegalStateException("Problems loading node types");
}

Session session = ... ;
NodeTypeManager nodeTypeManager = session.getWorkspace().getNodeTypeManager();
nodeTypeManager.registerNodeTypes(nodeTypeSource);
Note
JBoss DNA does not yet support a simple means of unregistering types at this time, so be careful before registering types outside of a sandboxed environment.
In this chapter, we covered how to use JCR with JBoss DNA and learned about how it implements the JCR specification. Now that you know how JBoss DNA repositories work and how to use JCR to work with DNA repositories, we'll move on in the next chapter to show how you can use the RESTful web service to provide access to the content in a JCR repository to clients.
JBoss DNA now provides a RESTful interface to its JCR implementation that allows HTTP-based access and updating of content. Although the initial version of this REST server only supports the JBoss DNA JCR implementation, it has been designed to make integration with other JCR implementors easy. This chapter describes how to configure and deploy the REST server.
The REST Server currently supports the URIs and HTTP methods described below. The URI patterns assume that the REST server is deployed at its conventional location of "/resources". These URI patterns would change if the REST server were deployed under a different web context and URI patterns below would change accordingly. Currently, only JSON-encoded responses are provided.
Table 10.1. Supported URIs for the JBoss DNA REST Server
| URI Pattern | HTTP Method(s) | HTTP Description |
|---|---|---|
| /resources | Returns a list of accessible repositories | GET |
| /resources/{repositoryName} | Returns a list of accessible workspaces within that repository | GET |
| /resources/{repositoryName}/{workspaceName} | Returns a list of available operations within the workspace | GET |
| /resources/{repositoryName}/{workspaceName}/item/{path} | Accesses the item (node or property) at the path | ALL |
Note that this approach supports dynamic discovery of the available repositories on the server. A typical conversation might start with a request to the server to check the available repositories.
GET http://www.example.com/resources
This request would generate a response that mapped the names of the available repositories to metadata information about the repositories like so:
{
	"dna%3arepository" : {
		"repository" : {
			"name" : "dna%3arepository",
			"resources" : { "workspaces":"/resources/dna%3arepository" }
		}
	}
}
The actual response wouldn't be pretty-printed like the example, but the format would be the same. The name of the repository ("dna:repository" URL-encoded) is mapped to a repository object that contains a name (the redundant "dna:repository") and a list of available resources within the repository and their respective URIs. Note that JBoss DNA supports deploying multiple JCR repositories side-by-side on the same server, so this response could easily contain multiple repositories in a real deployment.
The only thing that you can do with a repository through the REST interface at this time is to get a list of its workspaces. A request to do so can be built up from the previous response like this:
GET http://www.example.com/resources/dna%3arepository
This request (and all of the following requests) actually create a JCR Session to service the request and require that security be configured. This process is described in more detail in a later section. Assuming that security has been properly configured, the response would look something like this:
{
	"default" : {
		"workspace" : {
			"name" : "default",
			"resources" : { "items":"/resources/dna%3arepository/default/items" }
		}
	}
}
Like the first response, this response consists of a list of workspace names mapped to metadata about the workspaces. The example above only lists one workspace for simplicity, but there could be many different workspaces returned in a real deployment. Note that the "items" resource builds the full URI to the root of the items hierarchy, including the encoding of the repository name and the workspace name.
Now a request can be built to retrieve the root item of the repository.
GET http://www.example.com/resources/dna%3arepository/default/items
Any other item in the repository could be accessed by appending its path to the URI above. In a default repository with no content, this would return the following response:
{
	"properties": {
		"jcr:primaryType": "dna:root",
		"jcr:uuid": "97d7e2ef-996e-4d99-8ec2-dc623e6c2239"
	},
	"children": ["jcr:system"]
The response contains a mapping of property names to their values and an array of child names. Had one of the properties been multi-valued, the values for that property would have been provided as an array as well, as will shortly be shown.
The items resource also contains an option query parameter: dna:depth. This parameter, which defaults
to 1, controls how deep the hierarchy of returned nodes should be. Had the request had the parameter:
GET http://www.example.com/resources/dna%3arepository/default/items?dna:depth=2
Then the response would have contained details for the children of the root node as well.
{
	"properties": {
		"jcr:primaryType": "dna:root",
		"jcr:uuid": "163bc5e5-3b57-4e63-b2ae-ededf43d3445"
	},
	"children": {
		"jcr:system": {
			"properties": {"jcr:primaryType": "dna:system"},
    		"children": ["dna:namespaces"]
		}
	}
}
It is also possible to use the RESTful API to add, modify and remove repository content. Removes are simple - a DELETE request with no body returns a response with no body.
DELETE http://www.example.com/resources/dna%3arepository/default/items/path/to/deletedNode
Adding content simply requires a POST to the name of the relative root node of the content that you wish to add and a request body in the same format as the response from a GET. Adding multiple nodes at once is supported, as shown below.
POST http://www.example.com/resources/dna%3arepository/default/items/newNode

{
	"properties": {
		"jcr:primaryType": "nt:unstructured",
		"jcr:mixinTypes": "mix:referenceable",
		"someProperty": "foo"
	},
	"children": {
		"newChildNode": {
			"properties": {"jcr:primaryType": "nt:unstructured"}
		}
	}
}
Note that protected properties like jcr:uuid are not provided but that the primary type and mixin types are provided as properties. The REST server will translate these into the appropriate calls behind the scenes. The response from the request will be empty by convention.
The PUT method allows for updates of nodes and properties. If the URI points to a property, the body of the request should be the new JSON-encoded value for the property.
PUT http://www.example.com/resources/dna%3arepository/default/items/newNode/someProperty

"bar"
Setting multiple properties at once can be performed by providing a URI to a node instead of a property. The body of the request should then be a JSON object that maps property names to their new values.
PUT http://www.example.com/resources/dna%3arepository/default/items/newNode

{
	"someProperty": "foobar",
	"someOtherProperty": "newValue"
}
Note
The PUT method doesn't currently support adding or removing mixin types. This will be corrected in the future. A JIRA issue has been created to help track this issue.
The DNA REST server is deployed as a WAR and configured mostly through its web configuration file (web.xml). Here is an example web configuration that is used for integration testing of the DNA REST server along with an explanation of its parts.
<?xml version="1.0"?>
<!DOCTYPE web-app PUBLIC "-//Sun Microsystems, Inc.//DTD Web Application 2.3//EN"
                         "http://java.sun.com/dtd/web-app_2_3.dtd">
<web-app>
  <display-name>JBoss DNA JCR RESTful Interface</display-name>
This first section is largely boilerplate and should look familiar to anyone who has deployed a servlet-based application before. The display-name can be customized, of course.
The next stanza configures the repository provider.
  <!--
    This parameter provides the fully-qualified name of a class that implements
    the o.j.d.web.jcr.rest.spi.RepositoryProvider interface.  It is required
    by the DnaJcrDeployer that controls the lifecycle for the DNA REST server.
  -->
  <context-param>
    <param-name>org.jboss.dna.web.jcr.rest.REPOSITORY_PROVIDER</param-name>
    <param-value>org.jboss.dna.web.jcr.rest.spi.DnaJcrRepositoryProvider</param-value>
  </context-param>
As noted above, this parameter informs the DnaJcrDeployer of the specific repository provider in use.
Unless you are using the JBoss DNA REST server to connect to a different JCR implementation, this should
never change.
Next we configure the DNA JcrEngine itself.
  <!--
    This parameter, specific to the DnaJcrRepositoryProvider implementation, specifies
    the name of the configuration file to initialize the repository or repositories.
    This configuration file must be on the classpath and is given as a classpath-relative
    directory.
  -->
  <context-param>
    <param-name>org.jboss.dna.web.jcr.rest.CONFIG_FILE</param-name>
    <param-value>/configRepository.xml</param-value>
  </context-param>
If you are not familiar with the file format for a JcrEngine configuration file, you can build one
programatically with the JcrConfiguration class and call save(...) instead of build()
to output the configuration file that equates to the configuration.
This is followed by a bit of RESTEasy and JAX-RS boilerplate.
  <!--
    This parameter defines the JAX-RS application class, which is really just a metadata class
    that lets the JAX-RS engine (RESTEasy in this case) know which classes implement pieces
    of the JAX-RS specification like exception handling and resource serving.

    This should not be modified.
  -->
  <context-param>
    <param-name>javax.ws.rs.Application</param-name>
    <param-value>org.jboss.dna.web.jcr.rest.JcrApplication</param-value>
  </context-param>

  <!-- Required parameter for RESTEasy - should not be modified -->
  <listener>
    <listener-class>org.jboss.resteasy.plugins.server.servlet.ResteasyBootstrap</listener-class>
  </listener>

  <!-- Required parameter for JBoss DNA REST - should not be modified -->
  <listener>
    <listener-class>org.jboss.dna.web.jcr.rest.DnaJcrDeployer</listener-class>
  </listener>

  <!-- Required parameter for RESTEasy - should not be modified -->
  <servlet>
    <servlet-name>Resteasy</servlet-name>
    <servlet-class>org.jboss.resteasy.plugins.server.servlet.HttpServletDispatcher</servlet-class>
  </servlet>

  <!-- Required parameter for JBoss DNA REST - should not be modified -->
  <servlet-mapping>
    <servlet-name>Resteasy</servlet-name>
    <url-pattern>/*</url-pattern>
  </servlet-mapping>
In general, this part of the web configuration file should not be modified.
Finally, security must be configured for the REST server.
  <!--
    The JBoss DNA REST implementation leverages the HTTP credentials to for authentication and authorization
    within the JCR repository.  It makes no sense to try to log into the JCR repository without credentials,
    so this constraint helps lock down the repository.

    This should generally not be modified.
  -->
  <security-constraint>
    <display-name>DNA REST</display-name>
    <web-resource-collection>
      <web-resource-name>RestEasy</web-resource-name>
      <url-pattern>/*</url-pattern>
    </web-resource-collection>
    <auth-constraint>
			<!--
        A user must be assigned this role to connect to any JCR repository, in addition to needing the READONLY
        or READWRITE roles to actually read or modify the data.  This is not used internally, so another
        role could be substituted here.
      -->
      <role-name>connect</role-name>
    </auth-constraint>
  </security-constraint>

  <!--
    Any auth-method will work for JBoss DNA.  BASIC is used this example for simplicity.
  -->
  <login-config>
    <auth-method>BASIC</auth-method>
  </login-config>

  <!--
    This must match the role-name in the auth-constraint above.
  -->
  <security-role>
    <role-name>connect</role-name>
  </security-role>
</web-app>
As noted above, the REST server will not function properly unless security is configured. All authorization methods supported by the Servlet specification are supported by JBoss DNA and can be used interchangeable, as long as authenticated users have the connect role listed above.
Deploying the DNA REST server only requires three steps: preparing the web configuration, configuring the users and their roles in your web container (outside the scope of this document), and assembling the WAR. This section describes the requirements for assembling the WAR.
If you are using Maven to build your projects, the WAR can be built from a POM. Here is a portion of the POM used to build the JBoss DNA REST Server integration subproject.
<project xmlns="http://maven.apache.org/POM/4.0.0"
     xmlns:xsi="http://www.w3.org/2001/XMLSchema-instance"
     xsi:schemaLocation="http://maven.apache.org/POM/4.0.0 http://maven.apache.org/maven-v4_0_0.xsd">
	<modelVersion>4.0.0</modelVersion>
	<parent>
		<artifactId>dna</artifactId>
		<groupId>org.jboss.dna</groupId>
		<version>0.5-SNAPSHOT</version>
		<relativePath>../..</relativePath>
	</parent>
	<artifactId>dna-web-jcr-rest-war</artifactId>
	<packaging>war</packaging>
	<name>JBoss DNA JCR REST Servlet</name>
	<description>JBoss DNA servlet that provides RESTful access to JCR items</description>
	<url>http://labs.jboss.org/dna</url>
	<dependencies>
		<dependency>
			<groupId>org.jboss.dna</groupId>
			<artifactId>dna-web-jcr-rest</artifactId>
			<version>${pom.version}</version>
		</dependency>

		<dependency>
			<groupId>org.slf4j</groupId>
			<artifactId>slf4j-log4j12</artifactId>
			<version>1.4.3</version>
			<scope>runtime</scope>
		</dependency>

		<dependency>
			<groupId>org.jboss.resteasy</groupId>
			<artifactId>resteasy-client</artifactId>
			<version>1.0-beta-8</version>
		</dependency>
	</dependencies>
</project>
If you use this approach, make sure that web configuration file is in the /src/main/webapp/WEB-INF
directory.
The JBoss REST Server WAR is still easy enough to build if you are not using Maven. Simply construct a WAR with the following contents:
+ /WEB-INF
	+ /classes
	|	+ configRepository.xml
	|	+ log4j.properties (Optional)
	+ /lib
	|	+ activation-1.1.jar
	|	+ antlr-runtime-3.1.3.jar
	|	+ commons-codec-1.2.jar
	|	+ commons-httpclient-3.1.jar
	|	+ commons-logging-1.0.4.jar
	|	+ dna-cnd-0.5-SNAPSHOT.jar
	|	+ dna-common-0.5-SNAPSHOT.jar
	|	+ dna-connector-federation-0.5-SNAPSHOT.jar
	|	+ dna-graph-0.5-SNAPSHOT.jar
	|	+ dna-jcr-0.5-SNAPSHOT.jar
	|	+ dna-repository-0.5-SNAPSHOT.jar
	|	+ dna-web-jcr-rest-0.5-SNAPSHOT.jar
	|	+ FastInfoset-1.2.2.jar
	|	+ google-collect-snapshot-20080530.jar
	|	+ hamcrest-core-1.1.jar
	|	+ javassist-3.6.0.GA.jar
	|	+ jaxb-api-2.1.jar
	|	+ jaxb-impl-2.1.9.jar
	|	+ jaxrs-api-1.1-RC2.jar
	|	+ jcip-annotations-1.0.jar
	|	+ jcr-1.0.1.jar
	|	+ jettison-1.0.1.jar
	|	+ joda-time-1.4.jar
	|	+ jsr250-api-1.0.jar
	|	+ junit-dep-4.4.jar
	|	+ resteasy-client-1.0-beta-8.jar
	|	+ resteasy-common-1.0-beta-8.jar
	|	+ resteasy-jaxb-provider-1.1-RC2.jar
	|	+ resteasy-jaxrs-1.1-RC2.jar
	|	+ scannotation-1.0.2.jar
	|	+ servlet-api-2.5.jar
	|	+ sjsxp-1.0.1.jar
	|	+ slf4j-api-1.4.3.jar
	|	+ slf4j-log4j12-1.4.3.jar
	|	+ slf4j-simple-1.5.2.jar
	|	+ stax-api-1.0-2.jar
	|	+ webserver-1.3.3.jar
	+ web.xml
If you are using sequencers or any connectors other than the in-memory or federated connector, you will also have
to add the JARs for those dependencies into the WEB-INF/lib directory as well. You will also have to
change the version numbers on the JARs to reflect the current version of JBoss DNA.
This WAR can be deployed into your servlet container.
The JBoss DNA REST server can also be used as an interface to to other JCR repositories by creating
an implementation of the RepositoryProvider interface that connects to the other repository.
The RepositoryProvider only has a few methods that must be implemented. When the DnaJcrDeployer starts
up, it will dynamically load the RepositoryProvider implementation (as noted above) and call the
startup(ServletContext) method on the provider. The provider can use this method to load any
required configuration parameters from the web configuration (web.xml) and initialize the repository.
As an example, here's the DNA JCR provider implementation of this method with exception handling omitted for brevity.
public void startup( ServletContext context ) {
    String configFile = context.getInitParameter(CONFIG_FILE);

     InputStream configFileInputStream = getClass().getResourceAsStream(configFile);
     jcrEngine = new JcrConfiguration().loadFrom(configFileInputStream).build();
     jcrEngine.start();
}
As you can see, the name of configuration file for the JcrEngine is read from the servlet context and used
to initialize the engine.
Once the repository has been started, it is now ready to accept the main methods that provide the interface
to the repository.
The first method returns the set of repository names supported by this REST server.
public Set<String> getJcrRepositoryNames() {
    return new HashSet<String>(jcrEngine.getRepositoryNames());
}
The JBoss DNA JCR repository does support multiple repositories on the same server. Other JCR implementations that don't support multiple repositories are free to return a singleton set containing any string from this method.
The other required method returns an open JCR Session for the user from the current request in a given repository
and workspace. The provider can use the HttpServletRequest to get the authentication credentials for the
HTTP user.
public Session getSession( HttpServletRequest request,
                           String repositoryName,
                           String workspaceName ) throws RepositoryException {
    Repository repository = getRepository(repositoryName);

	SecurityContext context = new ServletSecurityContext(request);
	Credentials credentials = new SecurityContextCredentials(context);
    return repository.login(credentials, workspaceName);
}
The getSession(...) method is used by most of the REST server methods to access the JCR
repository and return results as needed.
Finally, the shutdown() method signals that the web context is being undeployed and the JCR
repository should shutdown and clean up any resources that are in use.
The JBoss DNA project provides a number of connectors out-of-the-box. These are ready to be used by simply including them in the classpath and configuring them as a repository source.
The in-memory repository connector is a simple connector that creates a transient, in-memory repository. This repository is used as a very simple in-memory cache or as a standalone transient repository. This connector works well for a readable and writable repository source with small to moderate sized content that need not be permanently saved.
The InMemoryRepositorySource class provides a number of JavaBean properties that control its behavior:
Table 11.1. InMemoryRepositorySource properties
| Property | Description |
|---|---|
| name | The name of the repository source, which is used by the RepositoryService when obtaining a RepositoryConnection by name. |
| jndiName | Optional property that, if used, specifies the name in JNDI where an InMemoryRepository instance can be found.
This is an advanced property that is infrequently used. |
| rootNodeUuid | Optional property that, if used, defines the UUID of the root node in the in-memory repository. If not used, then a new UUID is generated. |
| retryLimit | Optional property that, if used, defines the number of times that any single operation on a RepositoryConnection to this source should be retried following a communication failure. The default value is '0'. |
| defaultCachePolicy | Optional property that, if used, defines the default for how long this information provided by this source may to be cached by other, higher-level components. The default value of null implies that this source does not define a specific duration for caching information provided by this repository source. |
| defaultWorkspaceName | Optional property that is initialized to an empty string and which defines the name for the workspace that will be used by default if none is specified. |
Using the in-memory connector is used by creating in the JcrConfiguration a repository source that uses the InMemoryRepositorySource class.
For example:
JcrConfiguration config = ...

config.repositorySource("source A")

      .usingClass(InMemoryRepositorySource.class)

      .setDescription("The repository for our content")

      .setProperty("defaultWorkspaceName", workspaceName);
This connector exposes an area of the local file system as a read-only graph of "nt:file" and "nt:folder" nodes. The connector considers a workspace name to be the path to the directory on the file system that represents the root of that workspace. Each connector can define whether it allows new workspaces can be created, but if so the names of the new workspaces must represent valid paths to existing directories.
The FileSystemSource class provides a number of JavaBean properties that control its behavior:
Table 12.1. FileSystemSource properties
| Property | Description |
|---|---|
| name | The name of the repository source, which is used by the RepositoryService when obtaining a RepositoryConnection by name. |
| directoryForDefaultWorkspace | Optional property that, if used, specifies the file system path to the existing directory that should be used for the
default workspace. If null (or not specified), the source will use the current working directory of this virtual machine
(as defined by new File(".").getAbsolutePath(). |
| predefinedWorkspaceNames | Optional property that, if used, defines names of the workspaces that are predefined and need not be created before being used. This can be coupled with a "fase" value for the "creatingWorkspaceAllowed" property to allow only the use of only predefined workspaces. |
| creatingWorkspaceAllowed | Optional property that defines whether clients can create additional workspaces. The default value is "true". |
| retryLimit | Optional property that, if used, defines the number of times that any single operation on a RepositoryConnection to this source should be retried following a communication failure. The default value is '0'. |
| cacheTimeToLiveInMilliseconds | Optional property that, if used, defines the maximum time in milliseconds that any information returned by this connector is allowed to be cached before being considered invalid. When not used, this source will not define a specific duration for caching information. |
Using the file system connector is used by creating in the JcrConfiguration a repository source that uses the InMemoryRepositorySource class.
For example:
JcrConfiguration config = ...

config.repositorySource("source A")

      .usingClass(FileSystemSource.class)

      .setDescription("The repository for our content")

      .setProperty("directoryForDefaultWorkspace", "file://some/file/path")

      .setProperty("creatingWorkspaceAllowed", "false");
This connector stores a graph of any structure or size in a relational database, using a JPA provider on top of a JDBC driver. Currently this connector relies upon some Hibernate-specific capabilities. The schema of the database is dictated by this connector and is optimized for storing a graph structure. (In other words, this connector does not expose as a graph the data in an existing database with an arbitrary schema.)
The JpaSource class provides a number of JavaBean properties that control its behavior:
Table 13.1. JpaSource properties
| Property | Description |
|---|---|
| name | The name of the repository source, which is used by the RepositoryService when obtaining a RepositoryConnection by name. |
| supportsUpdates | Determines whether the content in the database is can be updated ("true"), or if the content may only be read ("false"). The default value is "true". |
| rootNodeUuid | Optional property that, if used, defines the UUID of the root node in the in-memory repository. If not used, then a new UUID is generated. |
| nameOfDefaultWorkspace | Optional property that is initialized to an empty string and which defines the name for the workspace that will be used by default if none is specified. |
| predefinedWorkspaceNames | Optional property that, if used, defines names of the workspaces that are predefined and need not be created before being used. This can be coupled with a "fase" value for the "creatingWorkspaceAllowed" property to allow only the use of only predefined workspaces. |
| creatingWorkspaceAllowed | Optional property that defines whether clients can create additional workspaces. The default value is "true". |
| dialect | Required property that defines the dialect of the database. This must match one of the Hibernate dialect names, and must correspond to the type of driver being used. |
| dataSourceJndiName | The JNDI name of the JDBC DataSource instance that should be used. If not specified, the other driver properties must be set. |
| driverClassName | The name of the JDBC driver class. This is not required if the DataSource is found in JNDI, but is required otherwise. |
| driverClassloaderName | The name of the class loader or classpath that should be used to load the JDBC driver class. This is not required if the DataSource is found in JNDI. |
| url | The URL that should be used when creating JDBC connections using the JDBC driver class. This is not required if the DataSource is found in JNDI. |
| username | The username that should be used when creating JDBC connections using the JDBC driver class. This is not required if the DataSource is found in JNDI. |
| password | The password that should be used when creating JDBC connections using the JDBC driver class. This is not required if the DataSource is found in JNDI. |
| maximumConnectionsInPool | The maximum number of connections that may be in the connection pool. The default is "5". |
| minimumConnectionsInPool | The minimum number of connections that will be kept in the connection pool. The default is "0". |
| maximumConnectionIdleTimeInSeconds | The maximum number of seconds that a connection should remain in the pool before being closed. The default is "600" seconds (or 10 minutes). |
| maximumSizeOfStatementCache | The maximum number of statements that should be cached. Statement caching can be disabled by setting to "0". The default is "100". |
| numberOfConnectionsToAcquireAsNeeded | The number of connections that should be added to the pool when there are not enough to be used. The default is "1". |
| idleTimeInSecondsBeforeTestingConnections | The number of seconds after a connection remains in the pool that the connection should be tested to ensure it is still valid. The default is 180 seconds (or 3 minutes). |
| referentialIntegrityEnforced | An advanced boolean property that dictates whether the database's referential integrity should be enabled, or false if this checking is not to be used. While referential integrity does help to ensure the consistency of the records, it does add work to update operations and can impact performance. The default value is "true". |
| largeValueSizeInBytes | An advanced boolean property that controls the size of property values at which they are considered to be "large values". Depending upon the model, large property values may be stored in a centralized area and keyed by a secure hash of the value. This is an space and performance optimization that stores each unique large value only once. The default value is "1024" bytes, or 1 kilobyte. |
| compressData | An advanced boolean property that dictates whether large binary and string values should be stored in a compressed form. This is enabled by default. Setting this value only affects how new records are stored; records can always be read regardless of the value of this setting. The default value is "true". |
| model | An advanced property that dictates the type of storage schema that is used. Currently, the only supported value is "Basic", which is also the default. |
| retryLimit | Optional property that, if used, defines the number of times that any single operation on a RepositoryConnection to this source should be retried following a communication failure. The default value is '0'. |
| cacheTimeToLiveInMilliseconds | Optional property that, if used, defines the maximum time in milliseconds that any information returned by this connector is allowed to be cached before being considered invalid. When not used, this source will not define a specific duration for caching information. The default value is "600000" milliseconds, or 10 minutes. |
Using the file system connector is used by creating in the JcrConfiguration a repository source that uses the JpaSource class.
For example:
JcrConfiguration config = ...

config.repositorySource("source A")

      .usingClass(JpaSource.class)

      .setDescription("The database store for our content")

      .setProperty("dialect", "org.hibernate.dialect.MySQLDialect")

      .setProperty("dataSourceJndiName", "java:/MyDataSource")

      .setProperty("nameOfDefaultWorkspace", "My Default Workspace");
Of course, setting other more advanced properties would entail calling setProperty(...) for each. Since almost all
of the properties have acceptable default values, however, we don't need to set very many of them.
This database schema model stores node properties as opaque records and children as transparent records. Large property values are stored separately.
The set of tables used in this model includes:
Namespaces - the set of namespace URIs used in paths, property names, and property values.
Properties - the properties for each node, stored in a serialized (and optionally compressed) form.
Large values - property values larger than a certain size will be broken out into this table, where they are tracked by their SHA-1 has and shared by all properties that have that same value. The values are stored in a binary (and optionally compressed) form.
Children - the children for each node, where each child is represented by a separate record. This approach makes it possible to efficiently work with nodes containing large numbers of children, where adding and removing child nodes is largely independent of the number of children. Also, working with properties is also completely independent of the number of child nodes.
ReferenceChanges - the references from one node to another
Subgraph - a working area for efficiently computing the space of a subgraph; see below
Options - the parameters for this store's configuration (common to all models)
This database model contains two tables that are used in an efficient mechanism to find all of the nodes in the subgraph below a certain node. This process starts by creating a record for the subgraph query, and then proceeds by executing a join to find all the children of the top-level node, and inserting them into the database (in a working area associated with the subgraph query). Then, another join finds all the children of those children and inserts them into the same working area. This continues until the maximum depth has been reached, or until there are no more children (whichever comes first). All of the nodes in the subgraph are then represented by records in the working area, and can be used to quickly and efficient work with the subgraph nodes. When finished, the mechanism deletes the records in the working area associated with the subgraph query.
This subgraph query mechanism is extremely efficient, performing one join/insert statement <i>per level of the subgraph</i>, and is completely independent of the number of nodes in the subgraph. For example, consider a subgraph of node A, where A has 10 children, and each child contains 10 children, and each grandchild contains 10 children. This subgraph has a total of 1111 nodes (1 root + 10 children + 10*10 grandchildren + 10*10*10 great-grandchildren). Finding the nodes in this subgraph would normally require 1 query per node (in other words, 1111 queries). But with this subgraph query mechanism, all of the nodes in the subgraph can be found with 1 insert plus 4 additional join/inserts.
This mechanism has the added benefit that the set of nodes in the subgraph are kept in a working area in the database, meaning they don't have to be pulled into memory.
Subgraph queries are used to efficiently process a number of different requests, including ,
DeleteBranchRequest, , and CopyBranchRequest. Processing each of these kinds of
requests requires knowledge of the subgraph, and in fact all but the need to know the complete
subgraph.
The federated repository source provides a unified repository consisting of information that is dynamically federated from multiple other
RepositorySource instances. This is a very powerful repository source that appears to be a single repository, when in
fact the content is stored and managed in multiple other systems. Each FederatedRepositorySource is typically configured
with the name of another RepositorySource that should be used as the local, unified cache of the federated content.
The FederatedRepositorySource then looks in the configuration repository to determine the various workspaces
and how other sources are projected into each workspace.

Each federated repository source provides a unified repository consisting of information that is dynamically federated from multiple other RepositorySource instances. The connector is configured with a number of projections that each describe where in the unified repository the federated connector should place the content from another source. Projections consist of the name of the source containing the content and a number of rules that define the path mappings, where each rule is defined as a string with this format:
pathInFederatedRepository => pathInSourceRepository
Here, the pathInFederatedRepository is the string representation of the path in the unified
(or federated) repository, and pathInSourceRepository is the string representation of the path of the
actual content in the underlying source. For example:
/ => /
is a trivial rule that states that all of the content in the underlying source should be mapped into the unified
repository such that the locations are the same. Therefore, a node at /a/b/c in the source would
appear in the unified repository at /a/b/c. This is called a mirror projection,
since the unified repository mirrors the underlying source repository.
Another example is an offset projection, which is similar to the mirror projection except that the federated path includes an offset not found in the source:
/alpha/beta => /
Here, a node at /a/b/c in the source would actually appear in the unified repository at
/alpha/beta/a/b/c. The offset path (/alpha/beta in this example) can have 1 or more segments.
(If there are no segments, then it reduces to a mirror projection.)
Often a rule will map a path in one source into another path in the unified source:
/alpha/beta => /foo/bar
Here, the content at /foo/bar is projected in the unified repository under /alpha/beta,
meaning that the /foo/bar prefix never even appears in the unified repository. So the node at
/foo/bar/baz/raz would appear in the unified repository at /alpha/beta/baz/raz. Again,
the size of the two paths in the rule don't matter.
Federated repositories that use a single projection are useful, but they aren't as interesting or powerful as those that use multiple projections. Consider a federated repository that is defined by two projections:
/ => /                         for source "S1"
/alpha => /foo/bar             for source "S2"
And consider that S1 contains the following structure:
+- a
|  +- i
|  +- j
+- b
   +- k
   +- m
   +- n
and S2 contains the following:
+- foo
   +- bar
   |  +- baz
   |  |  +- taz
   |  |  +- zaz
   |  +- raz
   +- bum
      +- bot
The unified repository would then have this structure:
+- a
|  +- i
|  +- j
+- b
|  +- k
|  +- m
|  +- n
+- alpha
   +- baz
      +- taz
      |  +- zaz
      +- raz
Note how the /foo/bum branch does not even appear in the unified repository, since it is outside of the
branch being projected. Also, the /alpha node doesn't exist in S1 or S2; it's what is called a
placeholder node that exists purely so that the nodes below it have a place to exist.
Placeholders are somewhat special: they allow any structure below them (including other placeholder nodes or real
projected nodes), but they cannot be modified.
Even more interesting are cases that involve more projections. Consider a federated repository that contains information about different kinds of automobiles, aircraft, and spacecraft, except that the information about each kind of vehicle exists in a different source (and possibly a different kind of source, such as a database, or file, or web service).
First, the sources. The "Cars" source contains the following structure:
+- Cars
   +- Hybrid
   |  +- Toyota Prius
   |  +- Toyota Highlander
   |  +- Nissan Altima
   +- Sports
   |  +- Aston Martin DB9
   |  +- Infinity G37
   +- Luxury
   |  +- Cadillac DTS
   |  +- Bentley Continental
   |  +- Lexus IS350
   +- Utility
      +- Land Rover LR2
      +- Land Rover LR3
      +- Hummer H3
      +- Ford F-150
The "Aircraft" source contains the following structure:
+- Aviation
   +- Business
   |  +- Gulfstream V
   |  +- Learjet 45
   +- Commercial
   |  +- Boeing 777
   |  +- Boeing 767
   |  +- Boeing 787
   |  +- Boeing 757
   |  +- Airbus A380
   |  +- Airbus A340
   |  +- Airbus A310
   |  +- Embraer RJ-175
   +- Vintage
   |  +- Fokker Trimotor
   |  +- P-38 Lightning
   |  +- A6M Zero
   |  +- Bf 109
   |  +- Wright Flyer
   +- Homebuilt
      +- Long-EZ
      +- Cirrus VK-30
      +- Van's RV-4
Finally, our "Spacecraft" source contains the following structure:
+- Space Vehicles
   +- Manned
   |  +- Space Shuttle
   |  +- Soyuz
   |  +- Skylab
   |  +- ISS
   +- Unmanned
   |  +- Sputnik
   |  +- Explorer
   |  +- Vanguard
   |  +- Pioneer
   |  +- Marsnik
   |  +- Mariner
   |  +- Mars Pathfinder
   |  +- Mars Observer
   |  +- Mars Polar Lander
   +- Launch Vehicles
   |  +- Saturn V
   |  +- Aries
   |  +- Delta
   |  +- Delta II
   |  +- Orion
   +- X-Prize
      +- SpaceShipOne
      +- WildFire
      +- Spirit of Liberty
So, we can define our unified "Vehicles" source with the following projections:
/Vehicles => /                                  for source "Cars"
/Vehicles/Aircraft => /Aviation                 for source "Aircraft"
/Vehicles/Spacecraft => /Space Vehicles         for source "Cars"
The result is a unified repository with the following structure:
+- Vehicles
   +- Cars
   |  +- Hybrid
   |   |  +- Toyota Prius
   |   |  +- Toyota Highlander
   |   |  +- Nissan Altima
   |   +- Sports
   |   |  +- Aston Martin DB9
   |   |  +- Infinity G37
   |   +- Luxury
   |   |  +- Cadillac DTS
   |   |  +- Bentley Continental
   |  +- Lexus IS350
   |  +- Utility
   |     +- Land Rover LR2
   |     +- Land Rover LR3
   |     +- Hummer H3
   |     +- Ford F-150
   +- Aircraft
   |   +- Business
   |   |  +- Gulfstream V
   |   |  +- Learjet 45
   |   +- Commercial
   |   |  +- Boeing 777
   |   |  +- Boeing 767
   |   |  +- Boeing 787
   |   |  +- Boeing 757
   |   |  +- Airbus A380
   |   |  +- Airbus A340
   |   |  +- Airbus A310
   |   |  +- Embraer RJ-175
   |   +- Vintage
   |   |  +- Fokker Trimotor
   |   |  +- P-38 Lightning
   |   |  +- A6M Zero
   |   |  +- Bf 109
   |   |  +- Wright Flyer
   |   +- Homebuilt
   |      +- Long-EZ
   |      +- Cirrus VK-30
   |      +- Van's RV-4
   +- Spacecraft
      +- Manned
      |  +- Space Shuttle
      |  +- Soyuz
      |  +- Skylab
      |  +- ISS
      +- Unmanned
      |  +- Sputnik
      |  +- Explorer
      |  +- Vanguard
      |  +- Pioneer
      |  +- Marsnik
      |  +- Mariner
      |  +- Mars Pathfinder
      |  +- Mars Observer
      |  +- Mars Polar Lander
      +- Launch Vehicles
      |  +- Saturn V
      |  +- Aries
      |  +- Delta
      |  +- Delta II
      |  +- Orion
      +- X-Prize
         +- SpaceShipOne
         +- WildFire
         +- Spirit of Liberty
Other combinations are of course possible.
This connctor executes against the federated repository by projecting them into requests against the underlying sources that are being federated.
One important design of the connector framework is that requests can be submitted in a batch, which may be processed more efficiently than if each request was submitted one at a time. This connector design accomplishes this by projecting the incoming requests into requests against each source, then submitting the batch of projected requests to each source, and then transforming the results of the projected requests back into original requests.
This is accomplished using a three-step process:
Process the incoming requests and for each generate the appropriate request(s) against the sources (dictated by the workspace's projections). These "projected requests" are then enqueued for each source.
Submit each batch of projected requests to the appropriate source, in parallel where possible. Note that the requests are still ordered correctly for each source.
Accumulate the results for the incoming requests by post-processing the projected requests and transforming the source-specific results back into the federated workspace (again, using the workspace's projections).
This process is a form of the fork-join divide-and-conquer algorithm, which involves splitting a problem into smaller
parts, forking new subtasks to execute each smaller part, joining on the subtasks (waiting until all have finished), and then
composing the results. Technically, Step 2 performs the fork and join operations, but this class uses RequestProcessor
implementations to do Step 1 and 3 (called ForkRequestProcessor and JoinRequestProcessor, respectively).
Such fork-join style techniques are well-suited to parallel processing. This connector uses an ExecutorService to allow these different processors to operate concurrently. This can greatly improve the performance as perceived by the clients, since indeed much of the operations on the different sources are occurring at the same time.
It is also possible that not every incoming Request get projected to all sources. Indeed, many operations can
effectively be mapped to a single projection. In such cases, the overhead of the federated
connector is quite minimal.
Note
Requests that include the Path within the request's Location can be very quickly mapped to the correct projection,
and thus such federated requests can be processed with very little overhead. However, when requests contain Locations
that only contain identification properties (e.g., UUIDs), the connector may not be able to determine the correct
projection(s), and may have to simply forward the request to all of the projections. This is obviously less desirable,
so when possible ensure that the Request objects include the Path.
The federated connector behavior for read-only requests is fairly obvious. In the best case, the connector determines the appropriate projections, forwards the request into the appropriate sources, and then combines the results. But what happens with change requests?
Currently, the federated connector requires that each ChangeRequest be mapped to one and only one projection.
However, when a single projection cannot be determined for a ChangeRequest, the connector throws an error.
This is thought to be a minimal problem that will not actually be an issue in most uses of the federated connector. If you find that your usage does indeed fall into this category, please let us know via the mailing lists or log an enhancement request in JIRA. Be sure to include as much detail as possible about the scenario, the problem condition, and the desired behavior.
The federated repository uses other RepositorySources that are to be federated and a RepositorySource that is to be used as the cache of the unified contents. These are configured in another RepositorySource that is treated as a configuration repository, which should contain information about the workspaces and how other sources are projected:
<!-- Define the federation configuration. -->
<dna:workspaces>
  <dna:workspace jcr:name="default">
    <!-- Define how the content in the two sources maps to the federated/unified repository.
         This example puts the 'Cars' and 'Aircraft' content underneath '/vehicles', but the
         'Configuration' content (which is defined by this file) will appear under '/'. -->
    <dna:projections>
      <!-- Project the 'Cars' content, starting with the '/Cars' node. -->
      <dna:projection jcr:name="Cars projection" dna:source="Cars" dna:workspaceName="workspace1">
          <dna:projectionRules>/Vehicles/Cars => /Cars</dna:projectionRules>
      </dna:projection>
      <!-- Project the 'Aicraft' content, starting with the '/Aircraft' node. -->
      <dna:projection jcr:name="Aircarft projection" dna:source="Aircraft" dna:workspaceName="workspace2">
          <dna:projectionRules>/Vehicles/Aircraft => /Aircraft</dna:projectionRules>
      </dna:projection>
      <!-- Project the 'System' content. Only needed when this source is accessed through JCR. -->
      <dna:projection jcr:name="System projection" dna:source="System" dna:workspaceName="default">
          <dna:projectionRules>/jcr:system => /</dna:projectionRules>
      </dna:projection>
    </dna:projections>
  </dna:workspace>
</dna:workspaces>
Note
We're using XML to represent a graph structure, since the two map pretty well. Each XML element represents
a node and XML attributes represent properties on a node. The name of the node is defined by either the
jcr:name attribute (if it exists) or the name of the XML element. And we use XML namespaces
to define the namespaces used in the node and property names. BTW, this is exactly how the XML graph importer
works.
While the majority of the configuration is defined using the configuration source (as discussed above), the FederatedRepositorySource
class have have a few JavaBean properties:
Table 14.1. FederatedRepositorySource properties
| Property | Description |
|---|---|
| name | The name of the repository source, which is used by the RepositoryService when obtaining a RepositoryConnection by name. |
| retryLimit | Optional property that, if used, defines the number of times that any single operation on a RepositoryConnection to this source should be retried following a communication failure. The default value is '0'. |
This connector provides read-only access to the directories and folders within a Subversion repository, providing that content in
the form of nt:file and nt:folder nodes.
This source considers a workspace name to be the path to the directory on the repository's root directory location
that represents the root of that workspace (e.g., "trunk" or "branches").
New workspaces can be created, as long as the names represent valid existing directories within the SVN repository.
The SVNRepositorySource class provides a number of JavaBean properties that control its behavior:
Table 15.1. SVNRepositorySource properties
| Property | Description |
|---|---|
| name | The name of the repository source, which is used by the RepositoryService when obtaining a RepositoryConnection by name. |
| repositoryRootURL | Required property that should be set with the URL to the Subversion repository. |
| username | The username that should be used to establish a connection to the repository. |
| password | The password that should be used to establish a connection to the repository. This is not required if the URL represents an anonymous SVN repository address. |
| directoryForDefaultWorkspace | Optional property that, if used, specifies the relative path of the directory in the repository that should be exposed as the default workspace. |
| predefinedWorkspaceNames | Optional property that, if used, defines names of the workspaces that are predefined and need not be created before being used. This can be coupled with a "fase" value for the "creatingWorkspaceAllowed" property to allow only the use of only predefined workspaces. |
| creatingWorkspaceAllowed | Optional property that defines whether clients can create additional workspaces. The default value is "true". |
| retryLimit | Optional property that, if used, defines the number of times that any single operation on a RepositoryConnection to this source should be retried following a communication failure. The default value is '0'. |
| cacheTimeToLiveInMilliseconds | Optional property that, if used, defines the maximum time in milliseconds that any information returned by this connector is allowed to be cached before being considered invalid. When not used, this source will not define a specific duration for caching information. |
Using the SVN connector can be used by creating in the JcrConfiguration a repository source that uses the SVNRepositorySource class.
For example:
JcrConfiguration config = ...

config.repositorySource("SVN repository for JBoss DNA")

      .usingClass(SVNRepositorySource.class)

      .setDescription("The DNA SVN repository (anonymous access)")

      .setProperty("repositoryRootUrl", "http://anonsvn.jboss.org/repos/dna");

      .setProperty("directoryForDefaultWorkspace", "trunk");

      .setProperty("predefinedWorkspaceNames", new  String[]{"trunk","tags/0.1","/tags/0.2", "/tags/0.3", "/tags/0.4", "/tags/0.5");
The JBoss Cache repository connector allows a JBoss Cache instance to be used as a JBoss DNA (and thus JCR) repository. This provides a repository that is an effective, scalable, and distributed cache, and is often paired with other repository sources to provide a local or federated repository.
The JBossCacheSource class provides a number of JavaBean properties that control its behavior:
Table 16.1. JBossCacheSource properties
| Property | Description |
|---|---|
| name | The name of the repository source, which is used by the RepositoryService when obtaining a RepositoryConnection by name. |
| cacheFactoryJndiName | Optional property that, if used, specifies the name in JNDI where an existing JBoss Cache Factory instance can be found.
That factory would then be used if needed to create a JBoss Cache instance. If no value is provided, then the
JBoss Cache DefaultCacheFactory class is used. |
| cacheConfigurationName | Optional property that, if used, specifies the name of the configuration that is supplied to the cache factory when creating a new JBoss Cache instance. |
| cacheJndiName | Optional property that, if used, specifies the name in JNDI where an existing JBoss Cache instance can be found. This should be used if your application already has a cache that is used, or if you need to configure the cache in a special way. |
| uuidPropertyName | Optional property that, if used, defines the property that should be used to find the UUID value for each node
in the cache. "dna:uuid" is the default. |
| retryLimit | Optional property that, if used, defines the number of times that any single operation on a RepositoryConnection to this source should be retried following a communication failure. The default value is '0'. |
| defaultCachePolicy | Optional property that, if used, defines the default for how long this information provided by this source may to be cached by other, higher-level components. The default value of null implies that this source does not define a specific duration for caching information provided by this repository source. |
| nameOfDefaultWorkspace | Optional property that is initialized to an empty string and which defines the name for the workspace that will be used by default if none is specified. |
| predefinedWorkspaceNames | Optional property that defines the names of the workspaces that exist and that are available for use without having to create them. |
| creatingWorkspacesAllowed | Optional property that is by default 'true' that defines whether clients can create new workspaces. |
The JBoss DNA project provides a number of sequencers out-of-the-box. These are ready to be used by simply including them in the classpath and configuring them appropriately.
This sequencer processes JCR Compact Node Definition (CND) files
to extract the node definitions with their property definitions, and inserts these into the repository using JCR built-in types.
The node structure generated by this sequencer is equivalent to the node structure used in /jcr:system/jcr:nodeTypes.
This sequencer can be added to the repository configuration like so:
JcrConfiguration config = ...

config.sequencer("CND Sequencer")
      .usingClass("org.jboss.dna.sequencer.cnd.CndSequencer")
      .loadedFromClasspath()
      .setDescription("Sequences CND files to extract the node type definitions")
      .sequencingFrom("//(*.cnd[*])/jcr:content[@jcr:data]")
      .andOutputtingTo("/nodeTypes/$1");
This sequencer stores the structure and data of an XML file into the repository. DTD, entity, comments, and other content are maintained by the sequencer in the output structure.
JcrConfiguration config = ...

config.sequencer("XML Sequencer")
      .usingClass("org.jboss.dna.sequencer.xml.XmlSequencer")
      .loadedFromClasspath()
      .setDescription("Sequences XML documents and maps their data into the repository")
      .sequencingFrom("//(*.xml[*])/jcr:content[@jcr:data]")
      .andOutputtingTo("/xml/$1");
The ZIP file sequencer is included in JBoss DNA and extracts the files and folders contained in the ZIP archive file,
extracting the files and folders into the repository using JCR's nt:file and nt:folder
built-in node types. The structure of the output thus matches the logical structure of the contents of the ZIP file.
To use this sequencer, simply include the dna-sequencer-zip JAR
in your application and configure the JcrConfiguration to use this sequencer using something similar to:
JcrConfiguration config = ...

config.sequencer("ZIP Sequencer")
      .usingClass("org.jboss.dna.sequencer.zip.ZipSequencer")
      .loadedFromClasspath()
      .setDescription("Sequences compressed files to extract the internal file and folder structure")
      .sequencingFrom("//(*.(zip|gz|jar|war|ear)[*])/jcr:content[@jcr:data]")
      .andOutputtingTo("/zips/$1");
This sequencer is included in JBoss DNA and processes Microsoft Office documents, including Word documents, Excel spreadsheets, and PowerPoint presentations. With documents, the sequencer attempts to infer the internal structure from the heading styles. With presentations, the sequencer extracts the slides, titles, text and slide thumbnails. With spreadsheets, the sequencer extracts the names of the sheets. And, the sequencer extracts for all the files the general file information, including the name of the author, title, keywords, subject, comments, and various dates.
To use this sequencer, simply include the dna-sequencer-msoffice JAR and all of the
POI JARs
in your application and configure the JcrConfiguration to use this sequencer using something similar to:
JcrConfiguration config = ...

config.sequencer("Microsoft Office Document Sequencer")
      .usingClass("org.jboss.dna.sequencer.msoffice.MSOfficeMetadataSequencer")
      .loadedFromClasspath()
      .setDescription("Sequences MS Office documents, including spreadsheets and presentations")
      .sequencingFrom("//(*.(*.(doc|docx|ppt|pps|xls)[*])/jcr:content[@jcr:data]")
      .andOutputtingTo("/msoffice/$1");
One of the sequencers that included in JBoss DNA is the dna-sequencer-java subproject. This sequencer parses Java source code added to the repository and extracts the basic structure of the classes and enumerations defined in the code. This structure includes: the package structures, class declarations, class and member attribute declarations, class and member method declarations with signature (but not implementation logic), enumerations with each enumeration literal value, annotations, and JavaDoc information for all of the above. After extracting this information from the source code, the sequencer then writes this structure into the repository, where it can be further processed, analyzed, searched, navigated, or referenced.
To use this sequencer, simply include the dna-sequencer-java JAR (plus all of the JARs that it is dependent upon)
in your application and configure the JcrConfiguration to use this sequencer using something similar to:
JcrConfiguration config = ...

config.sequencer("Java Sequencer")
      .usingClass("org.jboss.dna.sequencer.java.JavaMetadataSequencer")
      .loadedFromClasspath()
      .setDescription("Sequences java files to extract the characteristics of the Java source")
      .sequencingFrom("//(*.(java)[*])/jcr:content[@jcr:data]")
      .andOutputtingTo("/java/$1");
The ImageMetadataSequencer sequencer extracts metadata from JPEG, GIF, BMP, PCX, PNG, IFF, RAS, PBM, PGM, PPM and PSD image files.
This sequencer extracts the file format, image resolution, number of bits per pixel and optionally number of images, comments
and physical resolution, and then writes this information into the repository using the following structure:
image:metadata node of type
image:metadatajcr:mimeType - optional string property for the mime type of the image
jcr:encoding - optional string property for the encoding of the image
image:formatName - string property for the name of the format
image:width - optional integer property for the image's width in pixels
image:height - optional integer property for the image's height in pixles
image:bitsPerPixel - optional integer property for the number of bits per pixel
image:progressive - optional boolean property specifying whether the image is stored in a progressive (i.e., interlaced) form
image:numberOfImages - optional integer property for the number of images stored in the file; defaults to 1
image:physicalWidthDpi - optional integer property for the physical width of the image in dots per inch
image:physicalHeightDpi - optional integer property for the physical height of the image in dots per inch
image:physicalWidthInches - optional double property for the physical width of the image in inches
image:physicalHeightInches - optional double property for the physical height of the image in inches
This structure could be extended in the future to add EXIF and IPTC metadata as child nodes. For example, EXIF metadata is structured as tags in directories, where the directories form something like namespaces, and which are used by different camera vendors to store custom metadata. This structure could be mapped with each directory (e.g. "EXIF" or "Nikon Makernote" or "IPTC") as the name of a child node, with the EXIF tags values stored as either properties or child nodes.
To use this sequencer, simply include the dna-sequencer-images JAR
in your application and configure the JcrConfiguration to use this sequencer using something similar to:
JcrConfiguration config = ...
config.sequencer("Image Sequencer")
      .usingClass("org.jboss.dna.sequencer.image.ImageMetadataSequencer")
      .loadedFromClasspath()
      .setDescription("Sequences image files to extract the characteristics of the image")
      .sequencingFrom("//(*.(jpg|jpeg|gif|bmp|pcx|png|iff|ras|pbm|pgm|ppm|psd)[*])/jcr:content[@jcr:data]")
      .andOutputtingTo("/images/$1");
Another sequencer that is included in JBoss DNA is the dna-sequencer-mp3 sequencer project. This sequencer processes MP3 audio files added to a repository and extracts the ID3 metadata for the file, including the track's title, author, album name, year, and comment. After extracting this information from the audio files, the sequencer then writes this structure into the repository, where it can be further processed, analyzed, searched, navigated, or referenced.
To use this sequencer, simply include the dna-sequencer-mp3 JAR and the JAudioTagger
library in your application and configure the JcrConfiguration to use this sequencer using something similar to:
JcrConfiguration config = ...

config.sequencer("MP3 Sequencer")
      .usingClass("org.jboss.dna.sequencer.mp3.Mp3MetadataSequencer")
      .loadedFromClasspath()
      .setDescription("Sequences MP3 files to extract the ID3 tags of the audio file")
      .sequencingFrom("//(*.mp3[*])/jcr:content[@jcr:data]")
      .andOutputtingTo("/mp3s/$1");
The JBoss DNA project provides a number of MIME type detectors out-of-the-box.
These are ready to be used by simply including them in the classpath and
setting up the ExecutionContext appropriately.
Table of Contents
The ApertureMimeTypeDetector class is an implementation of MimeTypeDetector that uses the
Aperture open-source library, which
is a very capable utility for determining the MIME type for a wide range of file types,
using both the file name and the actual content.
To use, simply include the dna-mime-type-detector-aperture.jar file on the classpath
and create a new ExecutionContext subcontext with it:
MimeTypeDetector myDetector = new ApertureMimeTypeDetector();
ExecutionContext contextWithMyDetector = context.with(myDetector);
Creating a custom detector involves the following steps:
Create a Maven 2 project for your detector;
Implement the MimeTypeDetector interface with your own implementation, and create unit tests to verify the functionality and expected behavior;
Add a MimeTypeDetectorConfig to the
MimeTypeclass in your application as described earlier; andDeploy the JAR file with your implementation (as well as any dependencies), and make them available to JBoss DNA in your application.
It's that simple.
The first step is to create the Maven 2 project that you can use to compile your code and build the JARs. Maven 2 automates a lot of the work, and since you're already set up to use Maven, using Maven for your project will save you a lot of time and effort. Of course, you don't have to use Maven 2, but then you'll have to get the required libraries and manage the compiling and building process yourself.
Note
JBoss DNA may provide in the future a Maven archetype for creating detector projects. If you'd find this useful and would like to help create it, please join the community.
Note
The dna-mimetype-detector-aperture project is a small, self-contained detector implementation that that you can use to help you get going. Starting with this project's source and modifying it to suit your needs may be the easiest way to get started. See the subversion repository: http://anonsvn.jboss.org/repos/dna/trunk/sequencers/dna-mimetype-detector-aperture/
You can create your Maven project any way you'd like. For examples, see the Maven 2 documentation.
Once you've done that, just add the dependencies in your project's pom.xml dependencies section:
<dependency>

  <groupId>org.jboss.dna</groupId>

  <artifactId>dna-common</artifactId>

  <version>0.1</version>

</dependency>

<dependency>

  <groupId>org.jboss.dna</groupId>

  <artifactId>dna-graph</artifactId>

  <version>0.1</version>

</dependency>

<dependency>

  <groupId>org.slf4j</groupId>

  <artifactId>slf4j-api</artifactId>

</dependency>
These are minimum dependencies required for compiling a detector. Of course, you'll have to add other dependencies that your sequencer needs.
As for testing, you probably will want to add more dependencies, such as those listed here:
<dependency>

  <groupId>junit</groupId>

  <artifactId>junit</artifactId>

  <version>4.4</version>

  <scope>test</scope>

</dependency>

<dependency>

  <groupId>org.hamcrest</groupId>

  <artifactId>hamcrest-library</artifactId>

  <version>1.1</version>

  <scope>test</scope>

</dependency>

<!-- Logging with Log4J -->

<dependency>

  <groupId>org.slf4j</groupId>

  <artifactId>slf4j-log4j12</artifactId>

  <version>1.4.3</version>

  <scope>test</scope>

</dependency>

<dependency>

  <groupId>log4j</groupId>

  <artifactId>log4j</artifactId>

  <version>1.2.14</version>

  <scope>test</scope>

</dependency>
After you've created the project, simply implement the MimeTypeDetector interface. And testing should be quite straightforward, MIME type detectors don't require any other components. In your tests, simply instantiate your MimeTypeDetector implementation, supply various combinations of names and/or InputStreams, and verify the output is what you expect.
To use in your application, create a MimeTypeDetectorConfig object with the name, description, and class information
for your detector, and add to the MimeType class using the addDetector(MimeTypeDetectorConfig config) method.
Then, just use the MimeType class.
JBoss DNA adds a lot of new features and capabilities. It introduced an initial RESTful server that makes JCR repositories accessible over HTTP to clients. The JCR implementation was enhanced to support more features, including the ability to define and register node types using the Compact Node Definition (CND) format. A new configuration system was added, making it very easy to configure and manage the JBoss DNA JCR engine. An observation framework was added to the graph API. The federation connector was rewritten to improve performance and correct several issues. And quite a few issues were fixed.
What's next for JBoss DNA? Passing all of the JCR API compatibility tests for Level 1 and Level 2, plus some of the optional features, is the primary focus for the next release. Of course, there are a handful of improvements we'd like to make under the covers, and a few outstanding issues that we'll address. Farther out on our roadmap are the development of additional connectors and sequencers, some Eclipse tooling for publishing artifacts to a repository, and quite a few other interesting features.
We're always looking for suggestions and contributors. If you'd like to get involved on JBoss DNA, the first step is joining the mailing lists or hopping into our chat room on IRC (at irc.freenode.net#jbossdna). You can also download the code and get it building, and start looking for simple issues or bugs in our JIRA issue management system.
But if nothing else, please contact us and let us know how you're using JBoss DNA and what we can do to make it even better.
And, if you haven't already, check out our Getting Started guide, which has examples that you can build and run to see JBoss DNA in action.